Please select the object link below for more information on how to configure the object.
Object |
Share with other SmartSolve© Applications |
Required for SmartDocTM |
|
No |
Yes |
|
|
No |
No |
|
|
No |
No |
|
|
No |
No |
|
|
No |
No |
|
|
Yes |
Yes |
|
|
No |
Yes |
|
|
No |
No |
|
|
Yes |
No |
|
|
Yes |
No |
|
|
Yes |
No |
|
|
Yes |
No |
|
|
No |
No |
|
|
No |
No |
|
|
No |
No |
|
|
No |
No |
|
|
No |
No |
|
|
No |
No |
|
|
No |
Yes |
|
|
No |
No |
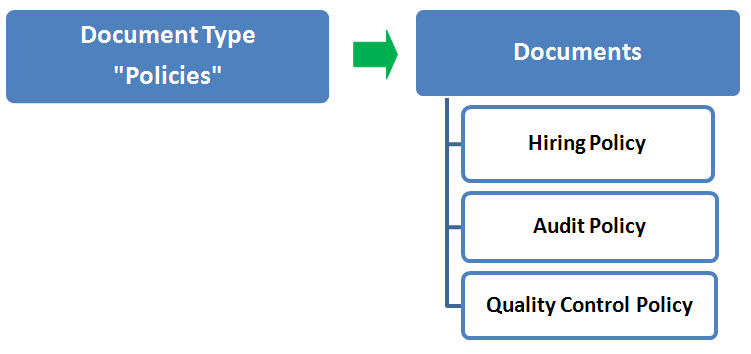
Document records in SmartDocTM maintain document files for both editing and viewing. All document records created in SmartDocTM must be attached to a document type. These document records stored in SmartDocTM are based upon the document type template (better known as the document policy). These templates contain properties inherited by document based on the type. This provides consistency across documents and avoids unnecessarily entering the same information.
Any number of document types can be created. However, document records can only be attached to one type. It is recommended that you sort documents into groups according to their common properties and create one document type for each group. In the future, each time a document from that group is created and based on its respective type; it will contain the same properties as other documents within the group.
Properties inherited from the document type can be configured in the document record. Therefore, it is not necessary to create document types that must exactly match the needs of the document.
Document Type Policies can enforce:
· Document and Change Ownership
· Approval Requirements (Approval Groups by Business Unit and/or by Document Type)
· Document Access (Viewing, Managing, etc.) and Distribution
· Document Number specifications (auto numbering)
· Certification Information associated Training Requirements for company employees
|
NOTE: Typically customers only need to configure about 10 to 20 Document Types in their SmartDocTM system to start, but are not limited to this amount. |
Any information not transferred from the document type policy is transferred from the document type to the new document, including:
· Attributes
· Auto Expire
· Categories (when the Transfer Categories check box is enabled)
· Distribution lists
· Document Owner
· Document Owner Role
· Keep Copy Of Every Build
· Keep Draft Copy
· Master Copy Location
· Review group
· Review model
· Roles
· Secondary Format
· Supersede Previous Revision in Reference
· Template
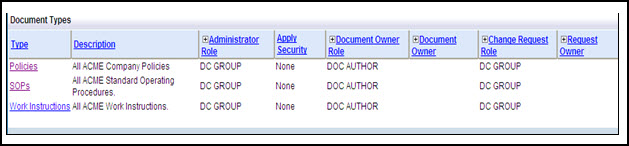
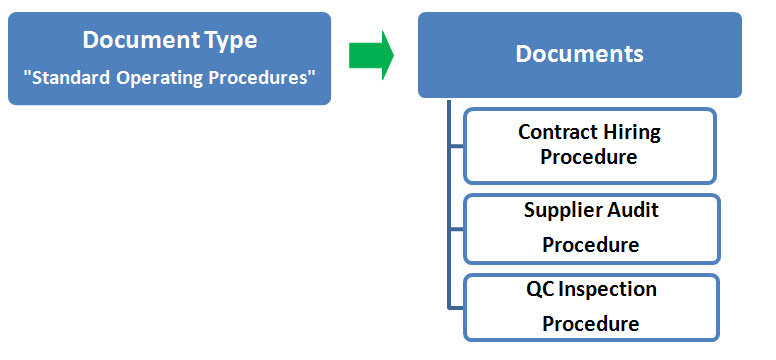
Before configuring Documents in the system determine your document workflow for a specific Type of document and how it may be maintained in SmartDocTM. This is an example of a common document type setup and managed in SmartDocTM. This is used by customers who have a centralized document management system where Document Control Owns document and change records (authors modify files only using change records).
· This Document Type will be named SOP which is short for Standard Operating Procedures.
· This Document Type will be used by all business units (i.e., QA, HR, Manufacturing, etc.).
· This Document Type record will be owned by the Document Control group.
· Only members from the Document Control Group can create document records and own them.
· As the Document record is created, the Department who owns the SOP will be added under the Org Unit field in the document record.
· Document Authors will have View only access to these document records in the system and may be identified in the document record using a user defined field if needed.
· All SOP documents will be converted to PDF automatically by SmartDocTM.
· All SOP’s will be numbered 1-SOP, 2-SOP, etc. with Revision Style of A, B, C, etc.
· A Training Interval of two weeks will be placed as a default for this Document Type and can be adjusted at the document record level later by Document Control if needed.
· After Expiration, SOP’s must stay in the SmartDocTM system for a retention time of seven years.
· New Revisions released that are referenced to these documents must supersede the old reference
· Document drafts will be reviewed in Change Records for release; therefore, no release review group needs to be defined at this time (the Document Owner from Document Control will perform a review to release these documents).
· Once the document record is released it will have a three year interval scheduled for an Effectiveness Review. Document Control will be notified of this review one month in advance.
· Training on these documents will be controlled within the individual document record and not from Document Type.
· All Change Requests will be owned by the Document Control Group.
· Change Requests will be numbered using the following format: 1-CR, 2-CR, 3-CR, etc.
The following rights must be assigned to a user to manage or view Document Type:
Rights |
Description |
|
SDT_CREATE |
Allows administrator to create a Document Type record. |
|
SDT _DELETE |
Allows administrator to delete a Document Type record. |
|
SDT _MANAGE |
Allows administrator to modify and manage existing Document Types. |
|
SDT _SUPERVISOR |
Allows administrator to Change Administrator Role in Document Type |
|
SDT _VIEW |
Allows user to view Document Types. |
|
DCT_VIEW |
Allows user to access Document Categories to view and select. |
|
DAT_VIEW |
Allows user to access Attributes to view and select. |
|
ATN_VIEW |
Allows user to access numbering scheme to view and select. |
|
ROL_VIEW |
Allows user to access owner role to view and select (if applicable) |
|
ACT_VIEW |
Allows user to access owner to view and select (if applicable) |
|
CRM_VIEW |
Allows user to access Document review model to view and select (if applicable) |
|
GRP_VIEW |
Allows user to access Review Group to View and select (if applicable) |
Please see Rights Group to assign Rights Groups to users.
Document types created in the global organization can be used to create document records by both the global organization and any local organizations. If logging into the global organization and viewing a global document type, the user will only see the document records created under this type which was created within the global organization (not any that were created under the local organization).
1. From the SmartSolve© tabs select Admin > Policy. Under Document select Document Type.
2. Right click and select Add
The Document Type window displays.
Please see Document Access Warning Controls for more information on the ITAR default Document Type.
3. Enter information in the following fields:
Field |
Description |
|
Type |
Enter the document type name.
|
|
Description |
Enter the description of the document type.
|
|
Administrator Role |
Zoom and select an Administrator Role for this document type. (Only actors under this role can edit this document type- all others can view only.) The administrator role is assigned when the document type is created and can be changed only by right clicking over the Document Type Detail screen (it is not seen when you edit). The Document Type Manage and Document Type Supervisor rights are required to perform this function. Only actors who have this role in the system can manage (modify) the document type properties assigned in the system. As company policies and document requirements change throughout a company, the Administrator Role will allow only appropriate users to be able to modify the document type (approval policies, training requirements, etc.). Typically it is the Document Control Group who owns document types or even a designated system administrator. Please see How to Create a Role Please see Administrator Role
|
|
Apply Security |
Select the security that will be used for document records belonging to this type (if applicable). None – security is not applied (free for all to view and edit) Manage – security is applied for editing only (by Roles); anyone can view the document Manage & View – security is applied for both editing and viewing document by role Please see Security
|
|
Secured Inworks |
Click the Secured Inworks check box to keep any users with rights from being able to view or manage documents that are in the Inworks status.
|
|
Secured Expire |
Click the Secured Expire check box to keep any users with rights from being able to view or manage documents that are in the Expired status.
|
|
Master Copy Location |
Enter the Master Copy Location of each Master Copy kept under this Document Type.
|
|
Secondary Format |
From the drop down, select the Secondary Format option to be used. Disabled - secondary format will not be used Enabled - secondary format will be used; however, secondary file must be saved manually by the author prior to checking the document into the system Auto Sync - secondary format will automatically be created by the system in .pdf format
|
|
Keep Draft Copy |
The Keep Draft Copy option is enabled at the document type only if you are keeping a copy of every build. While a document is INWORKS and going through a review process, the system can keep copies of previous builds of your document so that you can track all of the changes made to the document prior to its release. You must enable this build option in the Document Type screen in order for this to work. However, before setting this up you need to first determine if draft copies will be maintained within document or change records during their review. The Keep Draft Copy option is enabled at the document type only if you are Keeping a Copy of Every Build Options available are: Never - A copy of the checked in document is not retained (system default). Until Prerelease - All draft copies are kept and automatically deleted when the document reaches PRERELEASED status, after which the draft copies are no longer available in the audit trail. Always - Draft copies are never deleted.
|
|
Numbering Scheme |
Select the appropriate document numbering scheme to be used for documents of this type. Please see How to Create a Numbering Scheme
|
|
Force AutoNumber in Document |
Click the Force AutoNumber in Document check box if you wish this numbering scheme to be required for documents of this type. |
|
Document Role |
Zoom and select a Document Owner Role for documents of this type. (If an owner is not entered, the actor logged into the system when creating the document automatically becomes the owner of the document.) Please see How to Create a Role
|
|
Document Owner |
Zoom and select a Document Owner for documents of this type. (If an owner is not entered, the actor logged into the system when creating the document automatically becomes the owner of the document.) Please see How to Create a User
|
|
Transfer Categories |
Click the Transfer Categories check box if document categories that are established at this document type will transfer into each document created. Please see How to Create Document Categories Please see How to Attach Categories to Document Type
|
|
Keep Copy of Every Build |
Click the Keep Copy of Every Build check box to allow the system to keep previous copies of rejected documents prior to releasing the document after approval. If this Document Type is enabled then a document under this type is routed for approval while it is INWORKS. If it is rejected, the build changes and a copy is stored in the database. If Secondary Format is enabled for these documents then the copy is created in PDF. If Secondary Format is not enabled, then the copy is stored using the primary file type (i.e., Word). The History of Document Builds is accessed through the Review folder within the document profile record.
|
|
Grace Period For Release |
Enter the Grace Period for Release duration (for document training). The grace period is sometimes referred to as the training period for a document record which has been approved and is now ready for release. Enter a numeric value in the Grace Period For Release field to specify the length of time after the document becomes PRERELEASED that it will remain PRERELEASED. When the effective date is met the document will automatically change to a status of CURRENT. The system can be configured to allow the document owner to override this functionality within each document by entering their own effective date on the document. Please see Keep User Specified Doc Effective Date
|
|
Retention Time |
Enter a numeric value in the Retention Time field to specify the length of time after the document is EXPIRED, that the status changes to Purge. This value is overridden if a Date to Purge entry is specified in the document. (When the document EXPIRES. When you want the system to notify you to delete the record from the system).
|
|
Supersede Previous Rev. in Reference |
Check the Supersede Previous Revision In Reference check box to ensure that each new revision of a document record replaces the previous revision in the document’s References folder. OR Uncheck the Supersede Previous Revision in Reference check box and document revisions will not update in the document’s References folder.
|
|
Allow Multiple Inworks |
Check the Allow Multiple Inworks check box to allow multiple INWORKS copies of the same document to exist. OR Uncheck the Allow Multiple Inworks check box and multiple INWORKS copies of the same document are not allowed to exist. The Keep Copy of Every Build option is useful for customers who do not need to have multiple INWORKS revisions of documents. Because most customers do not like to delete records from the system, which results in gaps between revisions, enabling this option would not be recommended. Otherwise, you will have to justify why some of your documents have a status of INWORKS.
|
|
|
NOTE: This option default is checked when creating each document type. Take care when checking these options. Most Pilgrim customers uncheck this option to ensure that only one INWORKS version of a document should be allowed.
|
|
Automatically Expire Previous Revision |
Check the Automatically Expire Previous Revision checkbox to automatically expire a previous revision of a document when the new document becomes current. The previous revision’s expiration date is updated to the date the new revision is made CURRENT and the previous revision’s Auto Expire check box is enabled. OR Uncheck the Automatically Expire Previous Revision check box to move the previous revision of a document record to REVISED status. This should only be disabled if you wish to have multiple CURRENT documents in your system which is not recommended for regulatory reasons.
|
|
Auto Expire |
Check the Auto Expire check box to allow the document to move to EXPIRED status automatically when the document’s expiration date has been met. OR Uncheck this option if you wish Review Closure to EXPIRE document when a new revision of the document is created and the document type’s Automatically Expire Previous Revision check box is checked.
|
|
Review Model |
Review Models contain types of reviews which occur within a document’s life cycle and are the driving force behind standardizing your document workflow. It is recommended that review models be setup in document type. Without it, your document owner would have to manually attach reviews to every document record created in order to get document to change status. Please see How to Create a Review Model
|
|
Review Group |
Review Groups contain a list of predefined actors who may be responsible for approving document records that exist within a document type. If a review group is not attached to a document type, then the responsibility of assigning reviewers is delegated to the document owner. If standard approvals are required for particular document types, assign review groups at the document type level to save your document owner the work of having to always add approvers every time a new document or revision is created. Multiple review groups can be attached to a document type through the policies folder within the document type record. This configuration would take place if many different business units share the same document types. Please see How to Create a Group
|
|
Change Request Role |
Zoom and select a Change Request Role for documents of this type. (If an Owner is not entered, the actor logged into the system when creating the Change Request automatically becomes the owner of the request).
|
|
Request Owner |
Click the Use Doc Owner For Change Request check box to allow the system to use the document owner as the owner of the request.
|
|
Use Document Owner for Change Request |
Zoom and select a Change Request Owner for documents of this type. (If an owner is not entered, the actor logged into the system when creating the change request automatically becomes the owner of the request).
|
|
Change Request Numbering Scheme |
Select the appropriate Change Request Numbering Scheme which will be used for documents of this type.
|
|
Add Another |
Click this box to add another document type.
|
|
NOTE: Any of the options above can be changed by right clicking over the Document Type Detail window.
|
4. Click the Save button.
Document Types can be edited and deleted within document type and can be managed accordingly by an Administrator.
1. From the SmartSolve© tabs select Admin > Policy. Under Document select Document Type.
The Document Types list displays.
2. Click the ![]() icon to switch to local view (if applicable).
icon to switch to local view (if applicable).
3. Select the check box of the Document Type to edit, then select Action > Edit from the main menu (or right click).
4. Edit any information for your Document Type.
5. Click the Save button.
All changes should now be reflected in the list.
1. From the SmartSolve© tabs select Admin > Policy. Under Document select Document Type.
The Document Types list displays.
2. Click the ![]() icon to switch to local view (if applicable).
icon to switch to local view (if applicable).
3. Select the check box of the Document Type to delete, then select Action > Delete from the main menu (or right click).
4. Click the Save button.
The object has now been removed from the system.
Sometimes an existing document type is similar to a document type that needs to be created. In those instances, it is convenient to copy the existing document type and make changes to the copy. The Copy function saves time and prevents duplication of efforts.
All information (e.g., review model, retention time) from the existing document type is copied to the new document type.
If all document types share some common information, it is possible to create a master document type containing this information. A copy of the master document type can be made each time a new document type is created. This common information is therefore, not re-entered in every document type.
Document Type Manage and Document Type Create rights are required to copy a document type. The administrator role is not required.
1. From the Document Types window, click the Type link of the document type to copy.
The Document Type window appears.
2. Right click and select Copy.
3. Enter information in the following fields:
Fields |
Description |
|
Type |
This field will display the name of the Document Type which is being copied. |
|
New Type |
Enter a unique identifier for the new type. |
|
Description |
Enter information about the document type. |
4. Click the Save button to save the copied document type.
1. From the Document Type Detail right click and select the Change Administrator Role option.
2. Zoom from the Administrator Role field and select a new Role.
3. Click the Save button.
The Smart Document View right is required to view document records.
If security is applied to INWORKS documents, documents are accessible when the status is PRERELEASED and CURRENT. The number of actors who can view the document once it is PRERELEASED and CURRENT is limited by the Apply Security setting in the document type.
If security is not applied to INWORKS documents, the document records are accessible to actors as soon as they are created according to the document type's Apply Security setting.
|
NOTES: Security for INWORKS documents is set up in the document's type. If the Secured Inworks check box is enabled, the INWORKS document is only accessible to those actors listed in the document type's Securities folder. Security for EXPIRED documents is set up in the document's type. If the Secured Expired check box is enabled, the EXPIRED document is only accessible to those actors listed in the document type's Securities folder.
|
From the SmartSolve tabs select Admin > Policy. Under Document select Document Type.
Select the Document Type.
Right click and select Edit.
Change the Apply Security option to Manage or Manage and View.
Option |
Description |
|
None |
All Actors with the Smart Document View right can view the documents.
|
|
Manage & View |
The Actor Role must be listed in the document type | Securities folder.
|
|
Manage |
If the Document is: · not in INWORKS or EXPIRE status, then all actors with the Smart Document View right can view the documents.
· in INWORKS status and the document type > Document Type folder > Secured Inworks check box is enabled, then the actor role must be listed in the document type > Securities folder and the actor must be assigned the Smart Document Inwork right.
· in INWORKS status and the document type > Document Type folder > Secured Inworks check box is disabled, then all actors can view the documents.
· in EXPIRE status and the document type > Document Type folder > Secured Expire check box is enabled, then the actor role must be listed in the document type >Securities folder.
· in EXPIRE status and the document type > Document Type folder > Secured Expire check box is disabled, then all actors with the Smart Document View right can view the document.
|
Click the Save button
Click the Document Type.
In the Document Type, select Securities from the tree.
Right click and select Add.
Zoom from the Role field and tag to select all Roles which will have access to documents of this type.
Click the appropriate check boxes to Allow Edit, Allow Delete, and Allow Create options (View rights are added when Role is added).
Click the Save button.
Documents can be viewed and created from the Document Type window. Please see How to Create New Documents under the SmartDocTM End User Guide for more information on how to create documents.
The physical files checked in and out of the document record are stored in an electronic vault. The vault is a secure repository for all document content. Documents checked into the vault cannot be accessed without security rights to check the document out. Additionally, the content cannot be altered in any way and the file cannot be accessed from a directory when in the vault.
Securing document content in the vault ensures that modifications are not made to documents without a change process. This means that all document changes are tracked in the application and an archive of all document builds is made for historical purposes.
Currently, SmartDocTM does not require the vault to be configured and only one vault is available.
The Secondary Format option is used to determine how end users will view the native file that is checked into the document record (i.e., engineering file converted to PDF so that end user does not need to have the engineering application license to view only). The following options are available in SmartDocTM:
Option |
Description |
|
Disabled |
Secondary format will not be used meaning the file will be viewed using its native format.
|
|
Enabled |
Secondary format will be used; however, secondary file must be converted and checked in manually by the document owner.
|
|
Auto Sync |
Secondary format will be used to automatically convert the native file into PDF format for viewing (recommended setting). The system can currently convert MS Office (2000) documents into PDF format. When Secondary Format in Document Type is set to AutoSync, SmartCommTM generates the primary format file into a Portable Document Format (PDF) file. The PDF file is automatically checked into the SmartDocTM vault as the secondary format. The Registry lists the different file types that SmartCommTM is capable of converting to a PDF file. The different file types are called Multipurpose Internet Mail Extensions (Mime) type files. An application plugin is used to convert the Mime type into a PDF file. The Registry associates the Mime type document extension with a converter that is capable of converting that file type into a PDF file (e.g., word document is converted to PDF). Registry currently supports only Microsoft® Office file extensions; however, you can purchase the Neevia plug-in which can convert over 300 file types http://www.neevia.com/.
|
The secondary format is updated in one of four ways to ensure that any edits to the document profile or primary file content are included in the secondary format:
through the Synchronize Secondary Format function. Please see Managing Documents under the SmartDocTM End User Guide.
each time the document review is started.
when editing the document detail and selecting the Resynchronization checkbox.
when the document status is not INWORKS, and one of the following items are changed in the document profile:
o Effective date
o Expiration date
o References
When the document is checked out, the document | Document folder | Secondary Format Status field displays OutofSync. The secondary format is then synchronized when the document is routed for review or by selecting the resynchronization check box in the document detail record.
SmartDoTMc provides the option to resynchronize the secondary format PDF files without having to go through the review process. This option can be used when there are:
· changes to the document detail profile that affect the Document Detail report.
· changes to a current document that is OutofSync because it has been checked in with minor changes that do not require a review.
This option is only available when the document Secondary Format is set to AutoSync.
If the Secondary Format is enabled or set to AutoSync and the Secondary Format Status is not empty, the secondary format displays when the document record | Document folder | View button is clicked.
If the Secondary Format is Disabled and the Secondary Format Status is empty, the secondary format cannot be viewed. Only one View button is available to view the primary file.
Please see SmartCommTM PDF Rendering for more information on the Document Registry.
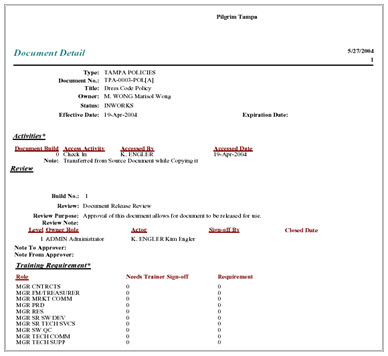
When the document's secondary format setting is AutoSync, a PDF cover sheet titled Document Detail is generated with the secondary file. This cover sheet becomes the first page of the secondary file and includes all of the pertinent information contained in the document profile, such as:
· Document type
· Document number
· Title
· Owner
· Status
· Effective Date
· References
· Revision Notes
· Reviews, reviewers and their associated review responses
As the secondary file is viewed by the document reviewers, this cover sheet provides the reviewers with the information they need regarding the document at a glance without having to open the record in SmartDocTM.
Example Cover Page Configured with additional information such as Training Requirements (i.e., Certification Information).
The Cover Page can be modified using Crystal Report Writer which does not come with SmartSolve©. Please see Crystal Reports under SmartSolve Reporting & Analytics.
SmartDoc provides the ability to apply watermarks as well as security to the secondary files created by SmartCommTM. This functionality is determined by the PDF Driver.xml file.
Please see SmartCommTM PDF Rendering for more information on configuring Watermarks and PDF Security.
With SmartDocTM, you can apply print copy expiration stamps to printed secondary format PDF documents, either electronic or hard copy. The print copy expiration date stamp is customizable using the PDFDriver.xml file.
Please see SmartCommTM PDF Rendering for more information on configuring the Print Copy Expiration Stamp.
To simplify navigation within the document, Pilgrim introduced directional icons that use one click to launch the appropriate screen for Review Signature, Access History, Content History and Access List.

These icons will be available through a new Document Detail Form which has been developed by Pilgrim and made available on Pilgrim’s Customer Support Center website as seen under the Pilgrim Forms Collaboration Portal. Please contact your Pilgrim representative for more information.
Please see Doc Effective Date Option under the Application Options Utility.
Document Categories can be tied to a specific document type, then transferred to the documents within that type and can be kept or deleted. Think of a document category as a sub document type or grouping of documents.
The following rules apply to Document Categories:
· Categories can be transferred to documents from the Document Type if Transfer Categories is enabled at the Document Type profile.
· When selecting Categories for a single document, you will only see the categories that have been applied to that Document Type.
Categories |
Document Types |
|
Engineering Library |
Eng Forms Eng Work Instructions Eng Policies Eng Procedures Eng Drawings
|
|
QA Library
|
QA Forms QA Work Instructions QA Policies QA Procedures QA Drawings
|
Categories |
Documents (by doc type) |
|
New Product Docs |
Requirement Specs Part Lists BOMs FMEAs Engineering Drawings
|
|
QA Manual |
Policies Procedures Work Instructions
|
Step 1 – Categories are added to a document type:
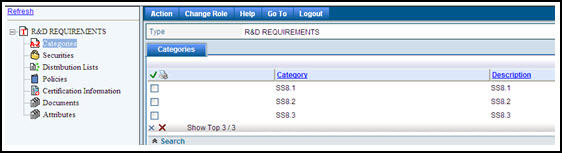
Step 2 – Category(s) to be used in specific document selected within the document record:
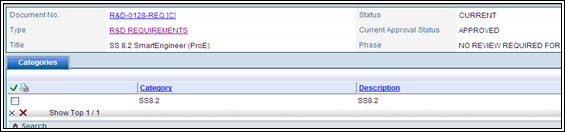
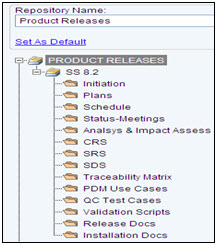
Step 3 – Document Repository was created using same category (SS8.2) to filter specific documents.
The following rights must be assigned to a user to manage or view document categories:
Rights |
Description |
|
DCT_MANAGE |
Allows administrator to add new categories, modify existing categories, or delete categories.
|
|
DCT_VIEW |
Allows user to access categories to view and select.
|
Please see Rights Group to assign Rights Groups to users.
· Global Document Categories will be inherited by all local organizations.
· Local Document Categories will only be viewed and used within that local organization.
1. From the SmartSolve© tabs select Admin > Setup. Under Document select Document Category.
2. Right click and select Add.
3. Enter the Category name.
4. Enter the Description of the Category.
5. Click the Save button.
The Category has been added.
Categories can be edited and deleted and be managed accordingly by an administrator.
1. From the SmartSolve© menu select Admin > Setup. Under Document select Document Category.
The Category list displays.
2. Click the ![]() icon to switch to local view (if applicable).
icon to switch to local view (if applicable).
3. Select the check box of the Category to edit, then select Action > Edit from the main menu (or right click).
4. Edit any information for your category.
5. Click the Save button.
All changes should now be reflected in the list.
Categories can only be deleted from SmartSolve© if the category has not been attached to any SmartSolve© records.
1. From the SmartSolve© tabs select Admin > Setup. Under Document select Document Category.
The Category list displays.
2. Click the ![]() icon to switch to local view (if applicable).
icon to switch to local view (if applicable).
3. Select the check box of the Category to delete, then select Action > Delete from the main menu (or right click).
4. Click the Save button.
The object has now been removed from the system.
1. From the SmartSolve© tabs select Admin > Policy. Under Document select Document Type.
2. Click the Document Type to which the Category(s) will be attached.
3. From the Document Type tree select the Categories folder.
4. Right click and select Add.
5. Select all Categories to be attached to this Type.
6. Click the Save button.
7. Edit the Document Type and identify if Categories will or will not be transferred to the document record when each document is created within this Type.
Categories cannot be added to document records unless you first attach them to document type.
Please see How to Attach a Category to a Document under the SmartDocTM End User Guide.
Hard copy distribution lists can be setup and maintained within each document record. These distribution lists can be setup at the document type record and transfer to every document created under the specified document type. The document distribution folder contains a collection of organization units and actors that MUST receive copies of a particular document once the document becomes effective (CURRENT). The document owner can also identify when hard copies were returned and/or destroyed for expired documents.
|
NOTE: Documents are NOT automatically distributed by SmartDocTM when a document is in a CURRENT Status. They must be distributed by a designated actor and the distribution list must be manually updated.
|
1. From the SmartSolve© tabs select Admin > Policy. Under Document select Document Type.
2. Click the Document Type to which the Distribution List will be attached.
3. From the Document Type tree select the Distribution Lists folder.
4. Right click and select Add.
5. Zoom to select an Organization Unit.
6. Zoom to select an Actor recipient.
7. Enter the number of copies this recipient will receive.
8. Click the Save button.
Please see How to Add Distribution Lists to a Document under the SmartDocTM End User Guide.
Who will your document owners be? Who will be your default document reviewers? In SmartDocTM a Document Type Policy is used to define these types of ownerships. When you create your policy, any fields in the document creation screen can drive your policy. If needed, you may define different document reviewers for different areas creating documents for the same types.
Document Type itself can drive the policy for document, and review ownership. The Policy tab is only used to identify if there is specific metadata in the document creation process which may override this policy (i.e., different organization units or processes for documents may have different review groups).
The policy can be driven by any of the zoomable field entries during document creation.
To configure a Document Type Policy, you must be familiar with writing the test condition in SQL statement format using the un-translated field names of any of the document creation entries you wish to drive the policy. These SQL statements are not checked; therefore, human intervention is required.
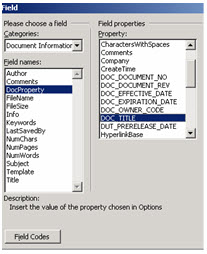
The diagram below illustrates the un-translated field codes for the document creation screen:
Translated Field |
Code to use for Writing the Policy |
|
Type |
DOT_TYPE |
|
Title |
DOC_TITLE |
|
Organization Unit |
DUT_ORU_CODE |
|
Process |
DUT_PRC_CODE |
|
Product |
DUT_PRD_CODE |
|
Plant Area |
DUT_PLA_CODE |
|
Comment |
DOC_MEMO |
|
Change Order No. |
SDC_CHO_ID |
1. From the SmartSolve© tabs select Admin > Policy. Under Document select Document Type.
2. Click the Document Type then select the Policies tree item.
3. Right click and select Add.
4. Enter information in the following fields:
Field |
Description |
|
Test Sequence |
Enter a sequence number. The system looks from lowest to highest to meet the requirement. |
|
Test Condition |
Enter the un-translated field name. |
|
Test Description |
Enter a description that explains what the test condition means. |
|
Document Role |
Zoom to select a Document Role |
|
Document Owner |
Zoom to select a Document Owner. |
|
Review Group |
Zoom to select a Review Group. |
|
Review Model |
Enter or select a Review Model. |
|
Add Another |
Click Add Another to add another policy. |
5. Click the Save button.
Do you wish to track document training using the SmartDocTM system? There may be certain company policies or procedures which employees are required to read and understand. The Certification Information folder is available in Document Types and within every document record in order for customers to track employee training and sign-off on such documentation.
Document training requirements are setup under the Certification Information folder by role. Any users who have since been assigned a role that has been added to the Certification Information folder must now read the document and sign-off on it in the system as it may have been made a training requirement.
Option |
Definition |
|
Certification Information – Doc Type |
Any roles setup under Certification Information folder at Document Type level will transfer to every document record which is created and maintained under this type. If the document owner wishes to remove the role at the document level they can do so with appropriate rights.
|
|
Certification Information - Document |
If roles are not assigned at the Document Type under Certification Information, the document owner can assign roles needing training under the individual document record. Any user with this role will be notified once the document has been released and will be required to sign-off that they have read and understood the document.
|
A requirement is a document that one must read and understand. It usually contains information necessary for an individual to fulfill their job function. Most of these documents would relate to Standard Operating Procedures, Policies, or Work Instructions. Decisions need to be made such as:
· What documents to make requirements and for whom?
· How long does a person have to complete the requirement?
· Whether trainer sign off is required to obtain the certification.
1. From the SmartSolve© tabs select Admin > Policy. Under Document select Document Type.
2. Click the Document Type that will have the certification information attached.
3. From the Document Type select Certification Information from the tree.
4. Identify appropriate information.
Fields |
Description |
|
Must Have |
If the requirement is a must have for the roles it is associated with. The setting can be changed for the requirement at the role level.
|
|
Complete within Duration Days |
The number of days allowed for completion of the requirement. If not specified, the completion date is the day the requirement is associated with the actor record.
|
|
Need Training |
Does not apply unless you have SmartTrainTM. |
|
Need Assessment |
Does not apply unless you have SmartTrainTM. |
|
Refresher Certification Required |
Does not apply unless you have SmartTrainTM. |
|
Refresher Advance Notice Days |
Does not apply unless you have SmartTrainTM. |
|
Requires Training if Previously Trained |
Does not apply unless you have SmartTrainTM. |
|
Need Trainer Sign-off |
If trainer sign off is required in order for the requirement to be fulfilled.
|
|
Revision Certification Required? |
If Yes, revision certification is required anytime Document is revised.
|
|
Refresher Interval Days |
Refresher certification is required, in the days specified, when the Document is revised.
|
|
Grace Days for Refresher |
The number of days after the refresher interval occurs that an individual must be re-certified. If the refresher is not completed within that time frame, certification is expired.
|
5. Right click and select Add.
6. Zoom from the Role field and select all the roles which would require certification on any Document records of this type (if applicable).
7. Click the Save button.
Please see How to Add Certification Information to a Document under the SmartDocTM End User Guide.
SmartDocTM templates are similar to templates in Microsoft Word. Applying a template ensures that all documents of the same type have the same format and styles. When a document record is created and a copy of the template file is checked in to the new record, it automatically contains all of the template properties. For example, if the company logo appears in the header of the template, the copied file also contains this company logo.

1. From the Document Type window, click the Attach link under the Template Information section.
The Attachment window displays.
2. Enter comments about the template in the Description field.
3. Click the Browse button and map to the template file.
4. Click the Save button.
Once the template is attached, the Attach button is replaced by Edit and Delete buttons.
The status Template displays as the Content Status in the new document record and the name of the template file displays in the Primary File Name field.
|
NOTE: Only one template can be attached to each Document Type.
|
You can link any metadata fields within your Microsoft Office templates that are used with the SmartDocTM system (i.e., Document Owner, Dates, Title, Numbers, etc.) by creating macros within the template. It is up to you to decide what needs to go in your document header/footer when the document is released. You must be familiar with un-translated field names of the document detail record in order to setup document properties within Microsoft Office files
|
NOTE:. the metadata will only display in the document if you have the document content set to AutoSync and the Secondary Status of the Document is In Sync.
|
The diagram below illustrates the un-translated field codes for the document detail record:
Translated Field |
Code to use for Writing the Policy |
|
Type |
DOT_TYPE |
|
Title |
DOC_TITLE |
|
Document No. |
DOC_DOCUMENT_NO |
|
Revision |
DOC_DOCUMENT_REV |
|
Effective Date |
DOC__EFFECTIVE_DATE |
|
Expiration Date |
DOC__EXPIRATION_DATE |
|
Document Owner |
DOC_OWNER_CODE |
|
Organization Unit |
DUT_ORU_CODE |
|
Process |
DUT_PRC_CODE |
|
Product |
DUT_PRD_CODE |
|
Plant Area |
DUT_PLA_CODE |
Please see Microsoft Office Help for how to Insert Fields into Templates.
Document Attributes can be setup to attach multiple entities to a document for traceability and searching (i.e. Product Specifications that involve multiple customers, suppliers, and products). Attributes can be whatever you need them to be and must first be setup by a system administrator. Attributes added to the document type can be automatically inherited by all documents created with the specified document type if the transfer option is checked (meaning, yes, transfer). If it is not enabled, the creator of a document can select which attributes to apply to the document.
The following options are available for attributes:
· End user can be forced to zoom to a standard table when selecting an attribute type (i.e., Customer, Supplier, Part #, etc.).
· End user can be given the ability to manually enter a value for the type of attribute they have selected (i.e., Order #, Batch #, Lot #, etc.).

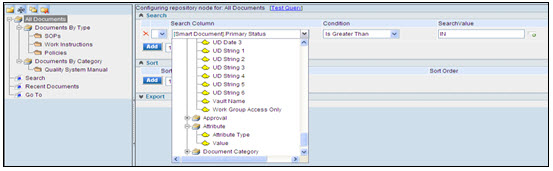
Once Attributes are attached to document records, the administrator can configure document repositories to search for documents by attribute (if applicable).
The following rights must be assigned to a user to manage or view document attributes:
Rights |
Description |
|
DAT_MANAGE |
Allows administrator to add new attributes, modify existing attributes, or delete attributes.
|
|
DAT_VIEW |
Allows user to access categories to view and select.
|
Please see Rights Group to assign Rights Groups to users.
· Global Document Attributes will be inherited by all local organizations.
· Local Document Attributes will only be viewed and used within that local organization.
Attributes can be setup from a Document Type record or from the Setup menu.
1. From the SmartSolve© tabs select Admin > Setup. Under Document select Attribute.
OR
From the Document Type select the Attributes tree item.
2. Right click and select Add.
The Document Attribute window displays.
3. Enter information in the following fields:
Field |
Description |
|
Attribute Type |
Enter an attribute type. |
|
Value |
Enter an attribute value. |
|
Description |
Enter a description for the attribute. |
|
Look Up |
Select a Lookup option. None - This allows the end user to later enter a value from the document Detail folder for the attribute. Org Unit - If Org Unit is selected, the end user will later need to zoom from the Attribute Value field to select the Client Department, or Work Center which will be added as the attribute. Product - If Product is selected, the end user will later need to zoom from the Attribute Value field to select the Product Line or Part which will be added as the attribute. Process - If Process is selected, the end user will later need to zoom from the Attribute Value field to select the Standard Operation or Operation which will be added as the attribute. Plant Area - If Plant Area is selected, the end user will later need to zoom from the Attribute Value field to select the Plant Area which will be added as the attribute.
|
|
Transfer |
Click the Transfer box to allow transfer of the attribute. |
|
|
NOTE: if this option is selected from the Document Type, any document record that is created will transfer this attribute from the Document Type Attribute folder to the document specific Attribute folder.
|
|
Add Another |
Click the Add Another box to add another attribute. |
4. Click the Save button.
The attribute has been added.
Attributes can be edited, deleted and managed accordingly by an administrator.
1. From the SmartSolve© tabs select Admin >Setup. Under Document select Attribute.
The Attribute list displays.
2. Click the ![]() icon to switch to local view (if applicable).
icon to switch to local view (if applicable).
3. Select the check box of the Attribute to edit, then select Action > Edit from the main menu (or right click).
4. Edit any information for your Attribute.
5. Click the Save button.
All changes should now be reflected in the list.
Attributes can only be deleted from SmartSolve© if the status has not been attached to any SmartSolve© records.
1. From the SmartSolve© tabs select Admin >Setup. Under Document select Attribute.
The Attribute list displays.
2. Click the ![]() icon to switch to local view (if applicable).
icon to switch to local view (if applicable).
3. Select the check box of the Attribute to delete, then select Action > Delete from the main menu (or right click).
4. Click the Save button.
The object has now been removed from the system.
1. From the SmartSolve© tabs select Admin > Policy. Under Document select Document Type.
2. Click the Document Type name to which the Attribute(s) will be attached.
3. From the Document Type tree select the Attributes option.
4. Click the Add button.
5. Enter the Attribute Type and Value if the value is known. (Usually, the value is not known at the Document Type level).
6. If you wish end users to zoom to a SmartSolve© table select the table from the Look Up drop down.

|
NOTE: Attributes can zoom to other tables, even third party systems. See your Pilgrim Consultant for more information.
|
7. Check if the Attribute will Transfer.
8. Click the Save button.
Please see External Data Sources.
Documents can only be added to document records if they have first been attached to document type.
Please see How to Attach an Attribute to a Document under the SmartDocTM End User Guide.
Please see Numbering Scheme under System Wide Setup.
Document Statuses represent the different stages of a document’s life cycle; however they are specifically used to activate reviews. Statuses are used when setting up a document review type and review model schedule. These statuses can be configured to the company's standard by adding new statuses or editing the label of the existing statuses; however, this is not recommended as most Pilgrim customers use the system defaults.
Additional statuses are only needed if you perform more than one review between the following statuses:
· INWORKS and PRERELEASED (i.e., Content Review, Management Review, Training Review)
· CURRENT and PREEXPIRED (i.e., Effectiveness Review, Expiration Review)
|
NOTE: In a typical SmartDocTM implementation customers have not added additional reviews to the document workflow because single reviews have met requirements. When more reviews are added it means more clicking for end users; therefore, it is not recommended you use additional reviews or add additional statuses.
|
Default Statuses
Primary Status |
Description |
|
INWORKS |
Typically the first Status of the Document workflow (unless Collaboration Review is being used). This Status activates the first review in the Document workflow which usually needs to be performed in order to release the document for training and use.
|
|
PRERELEASED |
Once the Release review is Closed, the Document Status will automatically change to a PRERELEASED Status and remain in this Status until the Effective Date is met within the document record. The PRERELEASED Status works with the Grace Period for Release option in Document Type and typically represents the training period for the document.
|
|
CURRENT |
Once the Effective Date is met in the document record, SmartCommTM will automatically change the Document Status from PRERELEASED to CURRENT.
This Status may also activate an optional periodic review which may be used for specific types of documents in which verification for effectiveness needs to be determined (1, 2, 3 year Periodic review to determine if document is still valid).
|
|
PREEXPIRE |
If a Review is performed after document has become current (i.e., periodic review) and it is determined that document is no longer valid and will not be revised in the system, then once the periodic review is closed by the document owner the document will change to a Status of PREEXPIRE.
|
|
EXPIRED |
Once the Expiration Date is met in the document record, SmartCommTM will automatically change the Document Status from PREEXPIRE to EXPIRED. If a Retention Date is set at Document Type for the document, the system will automatically post a Purge Date in the document when it expires; however, the document administrator would later need to purge the document from the system.
|
The following rights must be assigned to a user to manage or view document status:
Rights |
Description |
|
DST_MANAGE |
Allows administrator to add new document status, modify existing status, or delete status.
|
|
DST_VIEW |
Allows user to access document status to view and select.
|
Please see Rights Group to assign Rights Groups to users.
· Global Document Statuses will be inherited by all local organizations.
· Local Document Statuses will only be viewed and used within that local organization.
1. From the SmartSolve© tabs select Admin > Setup. Under Document select Document Status.
2. Right click and select Add.
3. Enter information in the following fields:
Fields |
Description |
|
Status |
Enter a secondary status.
|
|
Primary Status |
From the drop down select the appropriate primary status. Primary Status = INWORKS if new status will be before document becomes CURRENT Primary Status = CURRENT if new status will be after document is made CURRENT and before expiration
|
|
Add Another |
Click this box to add another document status.
|
4. Click the Save button.
Document statuses can be edited, deleted and managed accordingly by an administrator.
1. From the SmartSolve© tabs select Admin > Setup. Under Document select Document Status.
The Document Statuses list displays.
2. Click the ![]() icon to switch to local view (if applicable).
icon to switch to local view (if applicable).
3. Select the check box of the Document Status to edit, then select Action > Edit from the main menu (or right click).
4. Edit any information for your Document Status.
5. Click the Save button.
All changes should now be reflected in the list.
Document statuses can only be deleted from SmartSolve© if the status has not been attached to any SmartSolve© records.
1. From the SmartSolve© tabs select Admin > Setup. Under Document select Document Status.
The Document Statuses list displays.
2. Click the ![]() icon to switch to local view (if applicable).
icon to switch to local view (if applicable).
3. Select the check box of the Document Status to delete, then select Action > Delete from the main menu (or right click).
4. Click the Save button.
The object has now been removed from the system.
Document Phases are used in document records, and are incorporated into document review models. When a review is completed, the phase may be changed to indicate the current stage or milestone in the document lifecycle.
It is not necessary to link reviews to phases; however, it may be helpful for more complicated document models that incorporate many reviews. The progress of the document can be easily determined by looking at the document's current phase.
Example Phases:
|
Status = |
INWORKS |
CURRENT |
EXPIRED |
|
Phase = |
PENDING APPROVAL or UNDER RELEASE REVIEW (if Approval is Started) |
PERIODIC REVIEW SCHEDULED or UNDER REVIEW (if Approval is Started) |
PURGE DATE SCHEDULED |
The following right must be assigned to a user to manage or view document phase:
Rights |
Description |
|
DPS_MANAGE |
Allows administrator to add new document phase, modify existing phase, or delete phase.
|
|
DPS_VIEW |
Allows user to access document phase to view.
|
Please see Rights Group to assign Rights Groups to users.
· Global Document Phases will be inherited by all local organizations.
· Local Document Phases will only be viewed and used within that local organization.
1. From the SmartSolve© tabs select Admin > Setup. Under Document select Document Phase.
2. Right click and select Add.
3. Enter information in the following fields:
Fields |
Description |
|
Name |
Enter a name for the phase.
|
|
Description |
Enter a description of the phase.
|
|
Add Another |
Click this box to add another Document phase.
|
4. Click the Save button.
Document Phases can be edited and deleted within the Document phase and can be managed accordingly by an administrator.
1. From the SmartSolve© tabs select Admin > Setup. Under Document select Document Phase.
The Phases list displays.
2. Click the ![]() icon to switch to Local view (if applicable).
icon to switch to Local view (if applicable).
3. Select the check box of the Document Phase to edit, then select Action > Edit from the main menu (or right click).
4. Edit any information for your Document Phase.
5. Click the Save button.
All changes should now be reflected in the list.
Document Phases can only be deleted from SmartSolve© if the phase has not been attached to any SmartSolve© records.
1. From the SmartSolve© tabs select Admin > Setup. Under Document select Document Phase.
The Phases list displays.
2. Click the ![]() icon to switch to local view (if applicable).
icon to switch to local view (if applicable).
3. Select the check box of the Document Phase to delete, then select Action > Delete from the main menu (or right click).
4. Click the Save button.
The object has now been removed from the system.
Please see Groups under System Wide Setup.
Please see Checklist under System Wide Setup.
Review Escalation defines the action that must occur in the system to ensure that the review process does not stop. If a reviewer does not respond to the review in the allowed time defined, an additional action may be enforced.
If the escalation policy is attached the review group, then the policy will be enforced on every level identified within the review group. For example, if review group has three levels of reviewers, the escalation could apply the same for all three levels.
Also, each level of reviewers listed in the review group can have a unique escalation policy attached. The system looks first for the level specific escalation policy and if not found will apply the escalation policy attached to the review group.
The following right must be assigned to a user to manage and view review escalations:
Rights |
Description |
|
RES_MANAGE |
Allows administrator to add new review escalation, modify existing escalation, or delete escalation.
|
|
RES_VIEW |
Allows user to access review escalation to view.
|
Please see Rights Group to assign Rights Groups to users.
· Global Review Escalation will be inherited by all local organizations.
· Local Review Escalation will only be viewed and used within that local organization.
The following escalation steps can be applied to document review:
Additional Action |
Description |
|
Escalate to Alternate |
The review is re-assigned to the alternate actor (from Actor Role) |
|
Escalate to Manager |
The review is re-assigned to the actor's manager |
|
None |
This step indicates that no additional action will be taken except for notification only |
|
Escalate to Owner |
The review is re-assigned to the record owner. |
|
Skip |
The review is no longer needed by this actor and moves to the next level. |
|
Stop |
The review routing has stopped and the record has been sent back to the owner. |
|
Escalate to Org Unit Head |
The review is re-assigned to the actor's org unit head. |
The following Reviewers are included in the Routing sheet for Document Review:
· Level 1 QA Reviewer
· Level 2 Content Reviewer
· Level 2 Content Reviewer
· Level 3 Doc Control Group
Step 1 – No escalation will be used for level 1 or 3; however, the level 2 content reviewers will have 3 business days to approve the Document from the date the Document has been routed to this level. If 3 business days have passed, the system needs to skip these reviewers all together and route to the next level.
The following steps will be applied to the escalation policy:
Step |
Additional Action |
Allowed Time |
|
1 |
Skip |
3 Business Days |
Review Escalation is an optional feature in the system and is attached to Groups (if groups are used for document reviews).
1. From the SmartSolve© tabs select Admin > Policy. Under Document select Escalation.
2. Right click and select Add.
3. Enter information in the following fields:
Fields |
Description |
|
Code |
Enter a code for the policy. |
|
Name |
Enter a description of the escalation policy. |
|
Add Another |
Click this box to add another escalation. |
4. Click the Save button
5. Select the Step tab.
6. Right click and select Add.
7. Enter information in the following fields:
Fields |
Description |
|
Step |
Enter a number in the field. |
|
Additional Action |
Click the drop down list and select the additional action to occur in this step. |
|
Allowed Time |
Enter the time the escalation will trigger if minimum requirements are not met within the review. |
|
Add Another |
Click this box to add more steps if needed. |
8. Click the Save button.
Additional actions can be attached each step configured within the escalation policy. For example, if a reviewer is skipped the system can be setup to also notify the record owner so that they know the escalation policy has taken effect.
The following additional actions can be applied to each escalation step:
Additional Action |
Description |
|
Add Alternate |
The review is re-assigned to the alternate actor (from Actor Role) |
|
Add Manager |
The review is re-assigned to the actor's manager |
|
Add Org Unit Head |
The review is re-assigned to the actor's org unit head. |
|
Notify Alternate |
The actor’s alternate is notified of the escalation step taken. |
|
Notify Manager |
The actor’s manager is notified of the escalation step taken. |
|
Notify Owner |
The Document owner is notified of the escalation step taken. |
|
Notify Org Unit Head |
The org unit head of the actor’s department is notified of the escalation step taken. |
1. From the escalation policy detail select the Additional Actions folder.
2. Right click and select Add.
3. Select the Additional Action option which will occur in this Step.
4. Click the Save button.
The following options are available within Review Escalation and can be managed accordingly by an administrator:
· Review Escalations can be edited and deleted
· Review Escalations must be attached to review groups in order to be used.
1. From the SmartSolve© tabs select Admin > Policy. Under Document select Escalation.
The Review Escalations list displays.
2. Click the ![]() icon to switch to local view (if applicable).
icon to switch to local view (if applicable).
3. Select the check box of the escalation to edit, then select Action > Edit from the main menu (or right click).
4. Edit any information for your Escalation.
5. Click the Save button.
All changes should now be reflected in the list.
Review Escalations can only be deleted from SmartSolve© if the escalation has not been attached to any review groups.
1. From the SmartSolve© tabs select Admin > Policy. Under Document select Escalation.
The Review Escalations list displays.
2. Click the ![]() icon to switch to local view (if applicable).
icon to switch to local view (if applicable).
3. Select the check box of the escalation to delete, then select Action > Delete from the main menu (or right click).
4. Click the Save button.
The object has now been removed from the system.
1. From the SmartSolve© tabs select Admin > Setup. Under System Wide select Group.
The Groups list displays.
2. Click the ![]() icon to switch to local view (if applicable).
icon to switch to local view (if applicable).
3. Select the check box of the group to attach the escalation to, then select Action > Edit from the main menu (or right click).
4. From the escalation drop down menu select the escalation policy to be used within this group
5. Click the Save button.
The escalation policy has now been attached to the group.
1. From the SmartSolve© tabs select Admin > Setup. Under System Wide select Group.
The Groups list displays.
2. Click the ![]() icon to switch to local view (if applicable).
icon to switch to local view (if applicable).
3. Access the Group Role folder by left clicking over the ![]() and selecting Role.
and selecting Role.
4. Access the Level Detail folder by left clicking over the ![]() and selecting Level Detail.
and selecting Level Detail.
5. Select the check box of the level to attach the escalation to, then select Action > Edit from the main menu (or right click).
6. From the Escalation drop down menu select the escalation policy to be used within this level
7. Click the Save button.
The escalation policy has now been attached to the group.
Please see Rules under System Wide Setup.
SmartDocTM allows you to create as many Review Types as you need for your document workflows. However, it is typical for a document record to have two reviews attached which are used for document release and document expiration. SmartDocTM comes with a review library containing configured types of reviews which need to be performed within document workflows.
You must have at least one review attached to your document in order to get the document status from INWORKS to CURRENT. Also, you can only have one active review at a time within a document workflow; however, within that review you can have different levels of reviewers.
Some example Document Reviews could include:
Review Types |
Description |
|
One-time Reviews |
Review which is performed one time prior to the document becoming CURRENT (when the draft has been completed and needs to be approved for release).
|
|
Periodic Reviews |
Reviews that may need to be performed after the document has been issued (made CURRENT). An example of this type of review may be a three year periodic review on certain types of document to ensure document records are still valid.
|
This Matrix illustrates the setup tables involved with Document review. You may not setup all of these tables for your document workflows.
Two default document review types, called Default Document and System Pre-Expire Review are already entered in the document review type master file upon installation. These document review types are provided as optional document review types for use in the organization's review models. The default document review type:
Is completely configurable
Can be edited or deleted
Automatically attaches to all new Review Models anytime a new model is configured. If you do not need to use this default type, it must be detached.
|
NOTE: Most Pilgrim customers create their own review types or edit the name of the default under the global organization (i.e., Release Review.)
|
The following rights must be assigned to a user to manage or view Document review type:
Rights |
Description |
|
DRT_MANAGE |
Allows administrator to add new review type, modify existing review type, or delete review type.
|
|
DRT_VIEW |
Allows user to access review type to view and select.
|
Please see Rights Group to assign rights groups to users
· Global Document Review Types will be inherited by all local organizations.
· Local Document Review Types will only be viewed and used within that local organization.
1. From the SmartSolve© tabs select Admin > Policy. Under Document select Review Type.
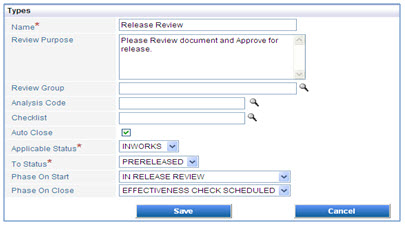
The Types window displays.
2. Right click and select Add.
3. Enter information in the following fields.
Field Name |
Description |
|
Name |
The name of the review (will later show up under the document record).
|
|
Review Purpose |
Statement that will be stamped for each approver signing off on the review.
|
|
Review Group |
If more than one approver must approve the Document set up a review group. Some common scenarios: Only the document owner needs to approve (do not add review group and Document owner will automatically show up as Document reviewer) – most common scenario. Approval groups may be specific to business units/operations who own documents within the type. If this is the case then review groups are setup at the document type policy level rather than here under the review type.
|
|
Analysis Code |
The purpose of the analysis code field is to enter a specific code representing the record to which it belongs. The record being created will be synonymous with the analysis code when a report is run. This field is typically not used by Pilgrim customers and can be hidden using the Forms Configurator.
|
|
Checklist |
Add quality checks to this review to ensure that the review is not closed until all checks have been addressed (see next section). This field is typically not used by Pilgrim customers and can be hidden using the Forms Configurator.
|
|
Auto Close |
If checked, the review automatically closes once the last approval rule is met (reviewer approves). If not checked, the document owner is notified once the last approval is complete. The document owner must manually close the review in the document to change the status (this field is typically checked to eliminate extra clicking).
|
|
Applicable Status |
The status that will activate the review in the document (i.e., INWORKS). Always set the INWORKS status if this is the first review performed in the Document workflow. Always set to CURRENT if you are attaching a Periodic Review Type.
|
|
NOTE: Failure to configure applicable status correctly will impact how the document workflow performs.
|
|
|
To Status |
The status the document will change to once the review is closed (i.e., PRERELEASED). Always set the PRERELEASED status if this is the first review performed in the Document workflow. Always set to PREEXPIRED if you are attaching a Periodic Review Type.
|
|
NOTE: Failure to configure To Status correctly will impact how the document workflow performs.
|
|
|
Phase on Start |
The phase the document will change to once the review is routed (i.e., UNDER RELEASE REVIEW). Please see How to Create Document Phases.
|
|
Phase on Close |
The phase the document will change to once the review is closed (i.e., EFFECTIVENESS REVIEW SCHEDULED). Please see How to Create Document Phases.
|
|
Add Another |
Click this box to add another type.
|
4. Click the Save button.
The Review Type is now displayed in the system.
Please see Groups to setup and assign Review Groups to Document Review Types.
Please see Checklists to setup and assign Checklists to Document Review Types.
Please see Document Status to setup Document Statuses.
Please see Document Phase to setup Document Phases.
The following options are available within Document Review Type and can be managed accordingly by an administrator:
· Document Review Types can be edited and deleted.
· Document Types can be attached to Document Review Models or directly to Document records.
1. From the SmartSolve© tabs select Admin > Policy. Under Document select Review Type.
The Types list displays.
2. Click the ![]() icon to switch to local view (if applicable).
icon to switch to local view (if applicable).
3. Select the check box of the Document Review Type to edit, then select Action > Edit from the main menu (or right click).
4. Edit any information for your Document review type.
5. Click the Save button.
All changes should now be reflected in the list.
Document review types can only be deleted from SmartSolve© if the document review type has not been attached to any document review models.
1. From the SmartSolve© tabs select Admin > Policy. Under Document select Review Type.
The Types list displays.
2. Click the ![]() icon to switch to local view (if applicable).
icon to switch to local view (if applicable).
3. Select the check box of the Document Review Type to delete, then select Action > Delete from the main menu (or right click).
4. Click the Save button.
The object has now been removed from the system.
Please see How to Create a Document Review Model
Please see How to Create a Document Review Model
Review Models are provided in order to define all of the review schedules that are necessary to define a document workflow. Any number of reviews can be added to your review models; however, most customers only use one or two. Review Models configure the following requirements:
· Which reviews need to be performed within the document and who will be assigned.
· When in the document each review will be performed (at which Status and/or Phase).
· What is the estimated time needed to complete the review (if applicable).
· Document Review Models MUST be attached to document types in order to enforce the document workflow.
The following rights must be assigned to a user to manage or view document review model:
Rights |
Description |
|
DRM_MANAGE |
Allows administrator to add new document review models, modify existing review models, or delete review models.
|
|
DRM_VIEW |
Allows user to access the document review model to view and select.
|
Please see Rights Group to assign Rights Groups to users
· Global Document Review Models will be inherited by all local organizations.
· Local Document Review Models will only be viewed and used within that local organization.
1. From the SmartSolve© tabs select Admin > Policy. Under Document select Review Model.
2. Right click and select Add.
The Review Model window displays.
3. Enter information in the following fields:
Fields |
Description |
|
Code |
Enter a review model code. |
|
Name |
Enter a name for the review model. |
|
Document Status |
Select a status from the drop down list. This is the status the Document is in when first created. |
|
Phase |
Select a phase from the drop down list. This is the phase the Document is in when first created. |
|
Add Another |
Click this box to add more steps if needed. |
4. Click the Save button.
The Review Model displays.
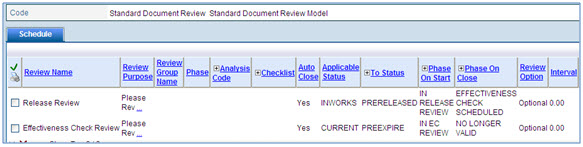
5. From the newly created Review Model, click the Schedule link.
The Schedule displays.
6. Delete the DEFAULT DOCUMENT Review Type by checking off the Review Type and right clicking to select Delete.
No Review Type should be listed in the Schedule now
7. Right click and select Attach to attach the Review Type you wish to first apply to the model.
8. Zoom from the Attach field and select a Review Type Name.
9. Select a Review Option.
10. Enter the Interval when the Review will be Scheduled (if this is one time that will be routed after workflow is complete leave blank).
11. Enter an Advance Notice interval for when the system notifies the Document Owner that the Review is upcoming (only use if step 8 above is setup).
12. Select a Phase.
13. Click the Save button.
The following options are available within Document Review Model and can be managed accordingly by an administrator:
· Document Review Models can be edited and deleted
· Document Review Models MUST be attached to Document types in order to enforce the Document workflow.
1. From the SmartSolve© tabs select Admin > Policy. Under Document select Review Model.
The Review Models list displays.
2. Click the ![]() icon to switch to local view (if applicable).
icon to switch to local view (if applicable).
3. Select the check box of the Document review model to edit, then select Action > Edit from the main menu (or right click).
4. Edit any information for your Document review model.
5. Click the Save button.
All changes should now be reflected in the list.
Document review models can only be deleted from SmartSolve© if the review model has not been attached to any document types.
1. From the SmartSolve© tabs select Admin > Policy. Under Document select Review Model.
The Review Models list displays.
2. Click the ![]() icon to switch to local view (if applicable).
icon to switch to local view (if applicable).
3. Select the check box of the Document review model to delete, then select Action > Delete from the main menu (or right click).
4. Click the Save button.
The object has now been removed from the system.
Document review models MUST be attached to document types in order to enforce the document workflow
1. From the SmartSolve© tabs select Admin > Policy. Under Document select Document Type.
The Document Types list displays.
2. Click the ![]() icon to switch to local view (if applicable).
icon to switch to local view (if applicable).
3. Select the check box of the Document type to attach the review model to, then select Action > Edit from the main menu (or right click).
4. From the Review Model drop down menu select the review model to be attached to the Document type
5. Click the Save button.
The Review Model has now been attached to the Document Type
For collaboration on Word documents during the Document INWORKS Review process, you can enable the Document Collaboration Application option. Using the option, a new Document Review Type must be configured which is routed while the document is in an INWORKS Status, and now keeps the Document in the INWORKS Status once the Collaboration Review is completed, then the Document can be routed for final review to finally release the document which will change the Status to CURRENT once the document has become Effective.
|
NOTE: In order for the Collaboration Review process to work successfully in the system, your approvers must be listed in Serial Format. At this time, collaboration review does not support Parallel routing.
|
If using Document Review Collaboration, you may wish to add the following Phases to the system to better track where the INWORKS document is throughout the collaboration, then content review lifecycle. The following Phases below are some suggestions:
Phase |
Status |
Step Action |
|
COLLABORATION NEEDED |
INWORKS |
If using Document Collaboration, this should be the first Phase that comes up when the Document record is created.
|
|
UNDER COLLABORATION |
INWORKS |
Once the Collaboration Review Start button is clicked to route the document for collaboration, this Phase can be displayed.
|
|
RELEASE APPROVAL NEEDED or COLLABORATION REVIEW COMPLETE
|
INWORKS |
Once the Collaboration Review is Closed, the INWORKS Document can change to one of these Phases indicating that the final approval can now be routed to release the document. |
|
UNDER RELEASE APPROVAL |
INWORKS |
Once the Release Review Start button is clicked to route the document for final approval, this Phase can be displayed.
|
|
PERIODIC REVIEW SCHEDULED, or DOC APPROVED
|
CURRENT |
Once the Release Review is Closed, the INWORKS Document will now change Status from INWORKS to PRERELEASED, then CURRENT once Effective Date has been met. You must determine which type of Phase will now be attached to your CURRENT Document.
|
See the Installation Guide for information on how to install SmartDAV for Document Collaboration
Access Application Options to set the EnableDocumentCollaboration option to YES
Create new Document Phases (as recommended above)
Create the new Document Collaboration Review Type:
Field Name |
Description |
|
Name |
Collaboration Review (this will later show up under the document record).
|
|
Review Purpose |
Statement that will be stamped for each approver signing off on the review.
|
|
Review Group |
Collaboration Review groups may be specific to business units/operations who own documents within the type. If this is the case then review groups are setup at the document type policy level rather than here under the review type.
|
|
Auto Close |
If checked, the review automatically closes once the last approval rule is met (reviewer approves). If not checked, the document owner is notified once the last approval is complete. The document owner must manually close the review in the document to change the status (this field is typically checked to eliminate extra clicking).
It is recommended you set this Review Type to auto close.
|
|
Applicable Status |
This Status must equal a Secondary Status with a Primary Status of INWORKS (i.e., DRAFT).
|
|
To Status |
This Status must equal INWORKS
|
|
Phase on Start |
The phase the document will change to once the review is routed (i.e., UNDER COLLABORATION). Please see How to Create Document Phases.
|
|
Phase on Close |
The phase the document will change to once the review is closed (i.e., COLLABORATION COMPLETE). Please see How to Create Document Phases.
|
Create a new Document Review Model for Document Collaboration
Recommended Review Types for INWORKS Status
Review Type |
Auto Close |
Applicable Status |
To Status |
Phase on Start |
Phase on Close |
|
Collaboration Review |
Yes |
INWORKS |
INWORKS |
UNDER COLLABORATION |
COLLABORATION COMPLETE |
|
Release Review |
Yes
|
INWORKS |
PRERELEASED |
UNDER RELEASE APPROVAL |
PERIODIC REVIEW SCHEDULED or DOC APPROVED |
Attach the new Document Review Model to all appropriate Document Types which will use collaboration.
Setup any Users who will be listed as Collaboration Reviewers under SSO Setup (this will not enable Single Sign On setup if you choose not to use this option; however, reviewers still must be setup here to activate this function).
Administrators now have the ability to capture access history for Content and Profile viewing of documents. The system will track User ID, Date, and time stamp of the user who accesses the record.

To enable the option for tracking Content and Profile History please see Record Document Content Access History under the Application Options Utility.
If needed, SmartDocTM can support ITAR (International Traffic in Arms Regulations) regulations by displaying warning/terms of condition messages when the document record is accessed and viewed by an End User. To configure this option:
Enable the Application Option Show Document Access Warning.
Locate the ITAR Document Type under Admin > Policy > Document Type > ITAR.
From the Document Type window select the Attributes folder.
The following Attributes are displayed off the shelf:

Attribute Type |
Value |
|
Content View Alert File |
Replace VOID with link to document, web site, or other source to display Terms and Conditions when End User Views the document Primary or Secondary content.
|
|
Profile View Alert File |
Replace VOID with link to document, web site, or other source to display Terms and Conditions when End User Views the document Profile (record).
|
|
Edit Access Alert File |
Replace VOID with link to document, web site, or other source to display Terms and Conditions when End User Edits the document Profile (record).
|
|
Enable Document Security Alert |
Leave this field as is. This is the Attribute which activate this option from the Document Type.
|
Copy the ITAR Document Type when creating New Document Types which will have this feature.
If Document Types already exist, add these Attributes just as they are in the ITAR Document Type.
Documents can now be logically grouped into folders, called a Repository, so that searching and retrieving documents is easier for the end user. Administrators create the Repository and define the documents to be located in each folder using the new save search capability. The folder structures can be published for specific actors, roles, departments, organizations or for all organizations. When a user looks for a document they can view the folder structure and are able to search within each folder for the required document. Users can view or check out/in documents directly from the folder list view. A document author is able to create a document directly from the folder in which is should reside. A listing of the documents that reside in a folder can also be exported to Microsoft Excel.
Some of the following options should be considered:
· Search criteria can be setup based on any document record data (i.e., department, product, categories, operations, ownership, etc.).
· How the Criteria can be sorted and in what order can also be configured.
· Who can view the Repository must be considered and applied.
When accessing the Open Document list the default Repository displays all documents listed in the Repository:
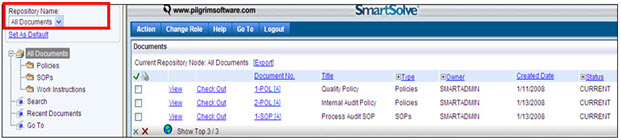
The Document Repository can be setup under the Admin > Setup. Under Document select External Document. Or from the Document Repository if the user has appropriate rights:
The following rights must be assigned to a user to manage or view document repositories:
Rights |
Description |
|
FOLDERCONFIG_MANAGE |
Allows administrator to create and manage the Document Repository.
|
|
FOLDERCONFIG_VIEW |
Allows user to access the Document Repository to View.
|
Please see Rights Group to assign Rights Groups to users
· Global Document Repositories could be inherited by all local organizations.
· Local Document Repositories will only be viewed and used within that local organization and cannot be distributed to other Local Organizations
1. From the SmartSolve© tabs select Admin > Setup. Under Document select Document Repository Configuration.
2. Right click and select Add.
3. Enter the Document Repository Name at the top left corner of the configuration screen.

4. Enter all applicable Search and Sort parameters.
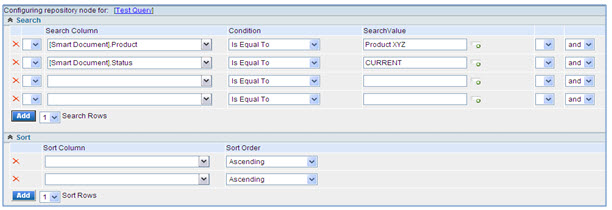
|
NOTE: The Search parameter field will offer suggestions when you click on the icon next to the blank field.
|
5. Click the Save button.
Please see How to Configure Search Columns
Action |
Instruction |
|
Add a New Folder |
Click the
|
|
Rename a Folder |
Select the folder you wish to rename, then click on the
|
|
Copy a Folder |
Save time when building your folders by using the copy folder feature. For example, you need to build a repository to list documents for 10 different departments to be filtered by Org Unit code and Status. Once you create the first departmental folder and setup Search parameters, click the
|
|
Move a Folder |
If you need to move folders and make them sub folders you can do so by dragging the folder into the main folder. In the example below, the Engineering folder has been highlighted. Then it is dragged to the SOPs folder. Now, it appears under SOPs.
|
|
Delete a Folder |
Click the
|
From the SmartSolve© tabs select Admin > Setup. Under Document select Document Repository Configuration or, from the Repository View select the Configure Repository link.
Click over the Repository Name to make changes.
The Repository is now displayed in edit mode.
Edit any information for the Repository.
Click the Save button.
All changes should be reflected in the Document Repository.
Please see How to Publish a Repository for more information on making the Repository available.
To create a Document Repository using the configuration of a similar repository, use the Save As option at the top of the configuration screen.
1. From the Configuration screen click the Save As link.

2. Enter New Repository Name from the User Prompt screen.
3. Click the Ok button.
Once a New Repository folder is created, the first step is to apply Search Columns. Search Columns can be configured for any displayed or non displayed fields included in each SmartSolve© record. This includes any user defined fields added to SmartSolve© records during implementation if additional fields are needed for more information and reporting.
Example Displayed Columns

Displayed Columns as seen in Published Repository

Example Non Displayed Columns
Locate the list which needs the Advanced Search Columns configured.
From the Search section select the first Search Column to configure (four Search Columns are displayed as a default to start).
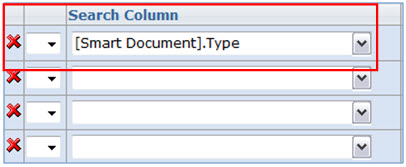
Once the Search Column is entered, select the Search Condition to be used.

Condition |
Definition |
|
Starts With |
Column values are compared against string, date, time stamp, numeric, and other literal values.
|
|
Is Equal To |
Compares the equality of two expressions.
|
|
Is Less Than |
Compares two expressions to determine whether the left expression has a value less than the right expression.
|
|
Is Less Than or Equal To |
Compares two expressions to determine whether the left expression has a value less than or equal to the right expression.
|
|
Is Greater Than |
Compares two expressions to determine whether the left expression has a value greater than the right expression.
|
|
Is Greater Than or Equal To |
Compares two expressions to determine whether the left expression has a value greater than or equal to the right expression.
|
|
Contains |
Supports complex searches for terms in record text columns (for example, title, contents). Can search for inflected forms of the search terms, test for proximity of the terms, and perform logical comparisons. Search terms can include wildcard characters.
NOTE: Do not use with larger lists as this predicate could degrade the query's performance. |
|
Not Equal To |
Compares two expressions to determine whether the left expression is not equal to the right expression.
|
|
Ends With |
Column values are compared against string, date, time stamp, numeric, and other literal values.
NOTE: Do not use with larger lists as this predicate could degrade the query's performance. |
|
Is Null |
Determines if a query expression is null. Column values that are undefined at this time for the record can be detected using the NULL predicate.
NOTE: Search queries using the NULL predicate can require that SmartSolve© Search scan the entire content index, which may degrade the query's performance. |
|
Is Not Null |
Determines if a query expression is not null.
|
Enter a search value.

Default Search Values
Value |
Definition |
|
{UserContext.ActorCode} |
To filter the data by Logged Actor code, viewing the saved search. |
|
{UserContext.ActorOrgUnitCode} |
To filter the data by logged on Actor’s Department, viewing the saved search. |
|
AddDays(0) |
Show range of records based only on date parameter and number of positive or negative days defined. |
|
{[Param1]} |
Used for parameterized query. For example, check for duplicate exception records for a specific Org Unit and Part Number. Step 1 – Create the Saved Search List Step 2 – Add the Org Unit Column Search Column: Under the Non Displayed Columns, select “Org. Unit” Condition: Select “Is Equal To” SearchValue: Select {|Param1|} Replace “Param1” with the parameter name for Org. Unit. Parameter Name for the column is any user defined name. Example: Org Unit Parameter Name = “{|OrgUnit|}” Step 3 – Add the Part Number Column Search Column: Under the Displayed Columns, select “Part Number” Condition: Select “Is Equal To” SearchValue: Enter “{|PartNumber|}” Step 4 - Save the Saved Search list Step 5 - Identify the Saved Search Form Name View the Saved Search List to identify the form name listed in the URL. Product Exception Form Name = PXP_PRODUCT_QXPS_MAIN.ASPX 1. Identify the Saved Search List ID. a) Edit the new Saved Search List. b) Copy the number after the QueryID in the URL to a temporary place. Step 6 - Define the following Form Config Properties Part field: AutoPostBack to “TRUE” Org Unit field: AutoPostBack to “TRUE” Part Field Label: HelpURL: <%#Sring.format(“SavedSearchListFormName? QueryID={0}&ParameterNam1={1}&ParameterName2={2}", “SavedSearchListID",GetCurrentValue(“ParameterName 1 Control ID"),GetCurrentValue (" ParameterName 1 Control ID "))%> Example: <%#String.format("PXP_PRODUCT_QXPS_MAIN.ASPX? QueryID={0}&OrgUnit={1}&PartNumber={2}","0000000000000000000010000", GetCurrentValue("_ctl1:QXP_ORU_CODE"),GetCurrentValue("_ctl1:PXP_PRODUCT_CODE"))%> |
5. Select Parethesis ( ) if you wish to close this condition.
6. Select the appropriate Boolean Operator (and | or).
7. Select the Allow Editing option.
Allow Editing Options (Predefined Templates)
Option |
Definition |
|
Yes |
The Yes option allows the end user to modify this search parameter from the Advanced Search view. For example, if you wish the end user to enter their own search value in the Advanced Search, select the Yes option to Allow Editing. In the example below, an Advanced Search was created to show a list of records by Short Description which contains the value that will later be entered by the end user viewing this Advanced Search.
|
|
No |
The No option locks in the Search Value entered under the Advanced Search setup and will not allow a user to modify this search value when the Advanced Search is later viewed. In the example below, a Advanced Search was created to show a list of records by Status which Is Equal To OPEN and cannot be changed by the end user viewing this Advanced Search. Notice how the Is Equal To Condition is grayed out. It will not allow the end user to change the Search Condition or enter a Search Value.
|
8. Add more Search Columns as needed
9. Once complete click the Save button.
Example Search Columns

Locate the list that needs the Advanced Search Sort Order configured.
From the Sort section select the first Sort Column to configure.
Select Ascending or Descending from the Sort Order drop down menu.
Add more Sort Columns as needed.
Once complete click the Save button.
If given appropriate rights, end users can export frequently used searches to Excel using the Advanced Search. You can setup columns to be exported to Excel as well as columns to be displayed in the lists
At least one column must be defined with "Show In Grid" set to Yes
If needed, additional Columns can be added which may not be displayed in the Advanced Search result, but will display when the search is exported.
Search Results Export to Excel at this time.

Example Export to Excel

1. First determine which columns you wish to display in the Advanced Search View and which columns will export to Excel.
2. Locate the list which needs the Advanced Search Export Columns configured.
3. From the Export section select the first Export Column to configure.
![]()
4. Once the Export Column is entered select the Show in Grid option to be used:

|
NOTE: Record No's automatically show up in Search Results without having to add them to Export; however, the record No. must be added to the Export section to be able to view the Record No. from the exported list in Excel. For Record No.'s please make sure you set Show In Grid to No; otherwise, record number will show up in two columns in your Search List.
|
Show in Grid |
Definition |
|
Yes |
Column will display in Advanced Search View and when the list is exported to Excel.
|
|
No |
Column will not display in Advanced Search View; however, when the list is exported to Excel it will display.
|
|
|
NOTE: for SmartSolve© record numbers do not set Show in Grid to Yes as record numbers display in grid by default.
|
5. Enter type of Format (if applicable):
Format |
Definition |
|
Default |
{0} Displays Date only as 8/12/2008
|
|
Short Date |
{0:d} Displays Date only as 8/12/2008
|
|
Long Date |
{0:g} Displays Date and Time as 8/12/2008 2:26 PM
|
|
YYYY-MMM-DD |
{0:yyyy-MMM-dd} Displays Date only as 2008-8-12
|
|
Number |
{0:f} Displays a number to two decimal places. Example: 12345.6789 is displayed as 12345.68
|
6. Enable Grouping (if applicable).
What is Grouping? It is the + symbol at the column header. Clicking + allows end users to search by group count of records as seen in example below:
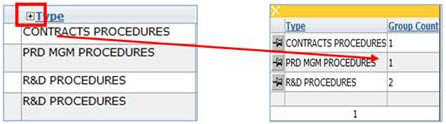
7. Click the Add button to add more columns.
8. Select which Column is a Navigation Column.
Only one column can be enabled. This is the data that will show a hyperlink to the record or will prompt an Action option (i.e., Change Owner). Please see How to Configure Actions.
9. Click the Save button to save your additions.
Example Export Columns
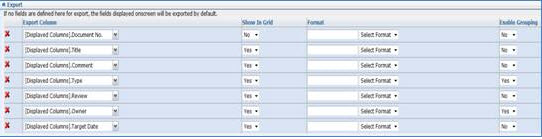
Distribution can be setup to allow only certain users to view the search. The following options are available for Saved Searches:
All Organizations
Specific Organizations
Specific Organization Units (Client, Department, Work Center)
Role
Specific Actors (default)
From the Saved Search creation screen select the Distribution List For drop down option.
Select the distribution List option for the distribution to be setup.
Click the Ok button to confirm (if applicable).
Select the Zoom option and check off all Distribution Criteria that apply (Actors, Departments, and Orgs).
Click the Save button.
The distribution has been saved.
Once a Document Repository is ready to be used, you must publish it to the open documents list. Make sure your repository is saved prior to publishing (Publish option will not be displayed until you have saved your work).
1. From the SmartSolve© tabs select Admin > Setup. Select Document Repository Configuration under Document.
2. From the Configuration screen select the Publish link.

3. Enter Sign-off Comment and Password.
4. Click the Ok button.
Repository will now be visible from the Open Documents List.
If a Document Repository is no longer needed you can unpublish it. Unpublishing a repository removes it from general use.
Be Careful, once a repository is unpublished it is permanently deleted from the system.
1. From the SmartSolve© tabs select Admin > Setup. Select Document Repository Configuration under Document.
2. From the Configuration screen select the Unpublish link.

3. Enter Sign-off Comment and Password.
4. Click the Ok button.
Repository will now be removed completely from the system.
You can also setup distribution and decide who can view the search. The following options are available for Saved Searches:
· All Organizations (default)
|
NOTE: can only be configured from the global organization. |
· Specific Organizations
· Specific Organization Units (Client, Department, Work Center)
· Specific Roles
· Specific Actors
1. From the Saved Search creation screen select the Distribution List For drop down option.
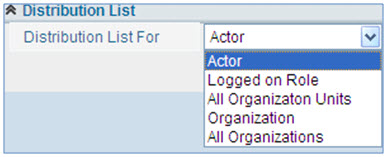
2. Select the option for which distribution will be setup.
3. Zoom and check off all Distribution Criteria that apply (Actors, Departments, Orgs).
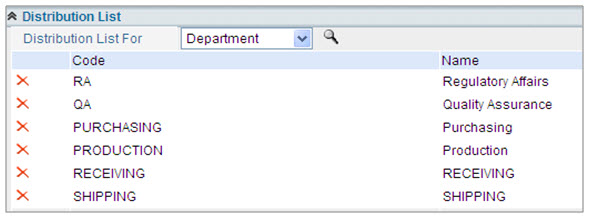
4. Click the Save button
|
NOTE: Make sure you consistently save the repository so that you don’t lose your work. |
In order to improve your end user experience when viewing documents from SmartDocTM, it is important to note that you may wish to configure security options to launch documents to edit in your browser as well as configure tabbed settings for multi tab use within one internet window.
Please see Internet Explorer – Internet Options for how to properly configure tabs in your browser to help ease end user experience with viewing and working with documents.

If needed, all documents from one Document Type can be migrated to another Type and even be given the same numbering scheme as the documents under that new Type. Or, if you wish you can still keep the old numbering for the documents that were migrated over.
Please see Replace Document Type under SmartSolve Utilities for more information on how to migrate documents.