 Default
Roles are a key feature of the SmartSolve© solutions. Roles determine record assignments for management and transactions and also determine the functions a User can perform in the system. A User must have at least one Role assigned to them within each Organization to be able to log into the system (in addition to Rights Groups).
Roles can be attached to Internal Actors (Persons) and/or Client Contacts (any Users).
Roles can be created in the GLOBAL Organization and be reused by any Local Organization; or, each Local Organization can create and manage their own User Roles.
Roles assigned to a User within a GLOBAL Organization only gives the User access to the GLOBAL Organization, meaning Roles need to be assigned to a User per Organization.
It is best practice to align your Role Names to the names of your Rights Groups (i.e., Document Owners, Document Approvers, Document Viewers, etc.). This makes maintaining User Management more efficient for the administrator when new Users need to be assigned Roles and Rights Groups.
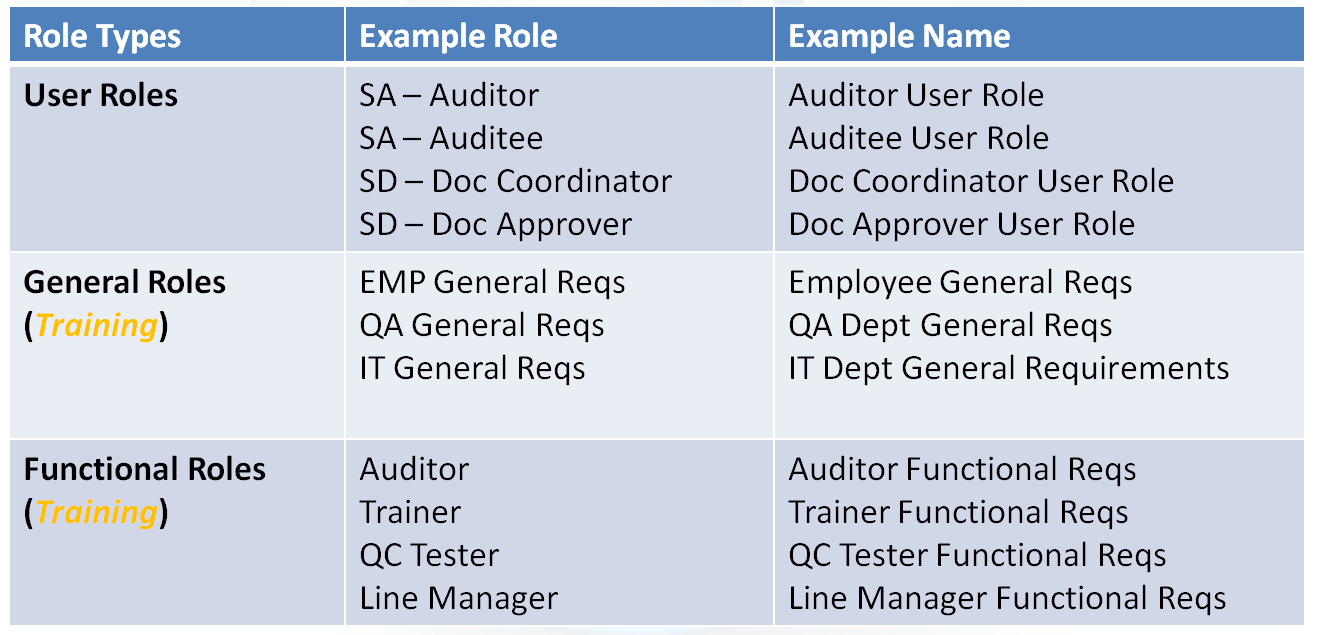
It is important to become familiar with the various Role Types which may be configured in your SmartSolve© system:
The following Roles come as defaults with a SmartSolve© installation and should not be deleted by an administrator:
Default Role |
Role Definition |
ADMINISTRATOR |
This is a system Role that is automatically attached to the User who first creates a Local Organization. It is given to this User so that they can access their new Organization to create configurations.
|
DEFAULT |
This is a system Role that is automatically attached to the User who first creates a Local Organization. It is given to this User so that they can access their new Organization to create configurations.
This Role is also used when the SmartSolve© system needs to perform internal transactions such as auto closing a record, etc.
|
SMARTCOMM ADMIN |
This is a system Role that must be attached to a User in order for the User to access the SmartCommTM system.
|
SYSTEM |
This is a system Role that is used when the SmartSolve© system needs to perform internal transactions within the application.
|
UNIVERSAL REQUIREMENT ROLE |
This is a system Role that is used with Training ManagementTM.
|
It is also important to come up with a good naming convention for Role (Codes) and Names to better group different Role Types in the system that you establish for your various applications:
The following roles are examples of more common roles created by Pilgrim customers who use the SmartSolve© solutions:
SmartSolve© Solution |
Example Roles |
SmartAuditTM |
· Lead Auditor · Auditor · Auditee · Action Plan Approvers · Audit Viewer |
SmartCAPATM |
· Exception Reporter · Exception Owner · Issue Owner · Issue Task Owner · Approver · CAPA Viewer |
SmartComplaintsTM |
· Complaint Reporter · Complaint Owner · Regulatory Group · Issue Owner · Issue Task Owner · Approver · Complaints Viewer |
The following rights must be assigned to a user to manage or view Roles:
Rights |
Description |
ROL_MANAGE |
Allows administrator to add new object, modify existing object, or delete object.
|
ROL_VIEW |
Allows user to access object to view and select.
|
Please see Rights Groups to assign Rights Groups to users.
· Global Roles will be inherited by all Local Organizations.
· Local Roles will only be viewed and used within that Local Organization.
1. Log into the appropriate Organization.
2. From the Portal Page, click Smart Solutions tab > Admin and Report > Setup. Under User Management select Role.
3. Select Action > Add from the main menu.
4. Enter the Role (Code) and Name of the Role.
5. Click the Save button.
The new Role has now been added to the Roles list and the Detail of the Role is displayed.
There are many functions of a Role depending on which SmartSolve© solution your company is using. Please use the reference below to better understand each of the functions of Role for each solution:
Role Tab |
Description |
Requirement |
This folder is only used for Document ManagementTM and Training ManagementTM.
|
Users |
This folder is used to attach multiple Users to this Role. See How to Attach Multiple Users to a Single Role.
|
Position |
This folder is only used for Training ManagementTM.
|
Requirement History |
This folder is used for Document Management and Training ManagementTM.
|
The following options are available within Roles and can be managed accordingly by an administrator:
Roles can be edited and/or deleted.
A Role can be attached to multiple Users. Please see How to Attach Multiple Users to a Single Role for more information.
Multiple Roles can be assigned to a Single User. Please see How to Attach Multiple Roles to a Single User for more information.
1. Log into the appropriate Organization.
2. From the Portal Page, click Smart Solutions tab > Admin and Report > Setup. Under User Management select Role.
3. Select the check box of the Role to edit then select Action > Edit from the main menu.
| NOTE: Roles
can only be edited from the |
4. Edit any information for your Role.
5. Click the Save button.
All changes should now be reflected in the Role.
Roles can only be deleted from SmartSolve© if the Role is not currently been attached to any SmartSolve© Users or records.
1. Log into the appropriate Organization.
2. From the Portal Page, click Smart Solutions tab > Admin and Report > Setup. Under User Management select Role.
3. Select the check box of the Role to delete, then select Action > Delete from the main menu.
| NOTE: Roles
can only be deleted from the |
4. Click the Save button.
The Role has now been removed from the system.
Roles cannot be deactivated in the system; however, they can be removed from users and renamed. If you open up Advanced Search and create a Search for administrators to view Roles which you no longer use (i.e., enter deactivated in the name of the role) your administrator can access this deactivated list at anytime to recycle your Roles (rename role to create new ones in future). Only your administrators should see these unused roles, all users would not have access to them by restricting access via Advanced Search.
Multiple Users can be assigned to a Role from the Role record by selecting the Users tab. Use this option if you need to attach multiple Users to a single Role.
1. Log into the appropriate Organization where the Users will be assigned to the Role.
2. From the Portal Page, click Smart Solutions tab > Admin and Report > Setup. Under User Management select Role.
To attach a Shared Role
select the ![]() icon
to view Shared Roles.
icon
to view Shared Roles.
3. Select the Role for which Users will be added by left clicking over the Role.
4. From the Role select the Users tab.
All Internal Actors currently assigned to this Role within this Organization will display in the top half of the Users page under the Current Actors (Users) section. Use the Select User option to view Persons (Training ManagementTM) and Client Contacts if you want to assign these types of Users rather than Internal Actors).
5. Scroll to the bottom of the Users page to view all Available Actors (Users) who can be attached to this Role.
| NOTE: If
an administrator needs to search for Users by a different Organization,
the administrator has an option to select the |
6. From the Available Actors list check off all Users who will be attached to this Role.
7. Click on the Assign To Rights Group button to attach selected Users to the Role.
8. Scroll to the top of the Users page.
All Users selected are attached to the Role.
See How to Attach Multiple Roles to a Single User
Multiple Users can be removed from a Role from the Role record by selecting the Users tab. Use this option if you need to remove multiple Users from a single Role.
1. Log into the appropriate Organization where the Users will be assigned to the Role.
2. From the Portal Page, click Smart Solutions tab > Admin and Report > Setup. Under User Management select Role.
To remove Users from
a Shared Role select the ![]() icon to view Shared
Roles.
icon to view Shared
Roles.
3. To remove Users from the role, select the role from which Users will be removed.
4. From the Role select the Users tab.
All Internal Actors currently assigned to this Role within this Organization will display in the top half of the Users page under the Current Actors (Users) section. Use the Select User option to view Persons (Training ManagementTM) and Client Contacts if you wish to assign these types of Users rather than Internal Actors).
5. From the Current Actors list check off all Users who will be removed from this Role.
6. Click the Remove From Rights Group button to remove selected Users from the Role.
All Users selected are removed from the Role.
See How to Remove Multiple Roles from a Single User