Please select the object link below for more information on how to configure the object.
Object |
Shared with other SmartSolve© Applications |
Required for SmartDocTM |
|
No |
Yes |
|
|
Yes |
Yes |
|
|
No |
Yes |
|
|
No |
Yes |
|
|
Yes |
No |
|
|
Yes |
No |
|
|
No |
No |
|
|
No |
No |
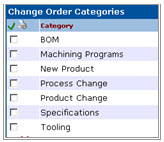
When creating a Change Order, you will be required to enter the category. You may also search for and sort, and run reports and analysis based on change order categories.
The following rights must be assigned to a user to manage or view change order categories:
Rights |
Description |
|
COC_MANAGE |
Allows administrator to add new change order categories, modify existing categories, or delete categories.
|
|
COC_VIEW |
Allows user to access the change order category to view and select.
|
Please see Rights Groups to assign Rights Groups to users
· Global Change Order Categories will be inherited by all local organizations.
· Local Change Order Categories will only be viewed and used within that local organization
1. From the SmartSolve© menu select Admin > Setup. Under Document select Change Order Category.
The Change Order Category list displays.
2. Right click and select Add.
3. Enter the Name of your Category.
4. Select the Auto Numbering Scheme for this Category.
5. Click the Save button.
Only newly added Change Order Categories can be edited and deleted. These options are in the Category object and can be managed by an administrator.
1. From the SmartSolve© menu select Admin > Setup. Under Document select Change Order Category.
The Change Order Category list displays.
2. Select the ![]() icon to switch to Local view (if applicable).
icon to switch to Local view (if applicable).
3. Select the check box of the Category to edit, then select Action > Edit from the main menu (or right click).
4. Edit any information for your Category.
5. Click the Save button.
All changes should now be reflected in the Category.
Categories can only be deleted from SmartSolve© if the category is not currently attached to any SmartSolve© records.
1. From the SmartSolve© menu select Admin > Setup. Under Document select Change Order Category.
The Change Order Category list displays.
2. Select the ![]() icon to switch to Local view (if applicable).
icon to switch to Local view (if applicable).
3. Select the check box of the Category to delete, then select Action > Delete from the main menu (or right click).
4. Click the Save button.
The Category has now been removed from the system
Please see Numbering Scheme under System Wide Setup.
Change Order Status indicates the point in the workflow of the change order. The following statuses come as defaults with the system and can be changed if you wish to apply your own terminology, or if local organizations need to create their own statuses and apply them to their own change order workflows.
The following statuses are applied to the change order workflow listed below in the order that they would appear:
Status |
Description |
|
INWORKS
|
When a change order is first created, the INWORKS status is displayed. The change order status remains INWORKS while the change order owner attaches proposed changes or changes. The INWORKS status remains displayed in the change order until the Proposed Change Approval is completed, or until change tasks are routed if no proposed change approval is required in the change order.
|
|
ROUTED |
When change tasks are routed, the change order status specifies ROUTED.
|
|
PRERELEASED |
The PRERELEASED status is only displayed in the change order once all change tasks have been signed off. The change order will remain PRERELEASED until the effective date of the change order is met.
|
|
CLOSED |
The CLOSED status is displayed in the change order record when the effective date and expiration date (if applicable for Deviations) are met.
|
The following rights must be assigned to a user to manage or view Change Order Statuses:
Rights |
Description |
|
CST_MANAGE |
Allows administrator to Add New Change Order Statuses, modify existing Statuses, or delete Statuses.
|
|
CST_VIEW |
Allows user to access Issue Status to View and select.
|
Please see Rights Groups to assign Rights Groups to users
· Global Change Order Statuses will be inherited by all local organizations.
· Local Change Order Statuses will only be viewed and used within that local organization.
1. From the main menu select Admin > Setup. Under Document select Change Order Status.
2. Right click and select Add.
3. Enter the Change Order Status
4. Select the Primary Status.
|
Note: Primary Statuses are internally coded and CANNOT be edited |
Primary Status |
Description |
|
ABORTED |
Change Order is aborted. |
|
INWORKS |
This is the status the Change Order becomes when it is first created. |
|
PRERELEASED |
The change order approval is completed, but the effective date has not occurred. |
|
RELEASED |
The Change Order's effective date occurred. |
5. Click the Save button.
Click the Add Another check box to add additional statuses as needed.
Newly created change order statuses can be edited, deleted and managed accordingly by an administrator.
1. From the SmartSolve© menu select Admin > Setup. Under Document select Change Order Status.
The Change Order Statuses list displays.
2. Click the ![]() icon to switch to local view (if applicable).
icon to switch to local view (if applicable).
3. Select the check box of the Change Order Status to edit, then select Action > Edit from the main menu (or right click).
4. Edit any information for your Change Order Status.
5. Click the Save button.
All changes should now be reflected in the list.
Change Order statuses can only be deleted from SmartSolve© if the status has not been attached to any SmartSolve© records.
1. From the SmartSolve© menu select Admin > Setup. Under Document select Change Order Status.
The Change Order Statuses list displays.
2. Click the ![]() icon to switch to local view (if applicable).
icon to switch to local view (if applicable).
3. Select the check box of the Change Order Status to delete, then select Action > Delete from the main menu (or right click).
4. Click the Save button.
The object has now been removed from the system.
Change Order Phases indicate all possible phases within the change order workflow. When each step in the change order is completed, the change order record is updated to the phase specified by the step to indicate the current stage or milestone in the change order's life cycle. Change Order phases are setup in the audit review model.
|
NOTE: The Phase is used in the change order to help identify where you are in the process. To enhance overall usability, you may wish to edit the existing default phases to better indicate the phase. The diagram below shows an example of change order phases used by current customers. |
The following default phases are applied to the change order workflow listed below in the order that they would appear:
Phase |
Description |
|
PROPOSED CHANGE APPROVAL |
This phase shows up in the change order once the change order has been routed for proposed change approval.
|
|
|
Suggestion: some customers rename this phase UNDER PROPOSED CHANGE APPROVAL.
|
|
IN CHANGE |
This phase shows up in the change order once the change tasks have been routed and are underway.
|
|
|
Suggestion: some customers rename this phase CHANGES UNDERWAY.
|
|
CHANGE REVIEW |
This phase shows up in the change order once all change tasks are closed and the final review of the change order (or document records attached) are under review to release the changes.
|
|
|
Suggestion: some customers rename this phase UNDER CHANGE APPROVAL.
|
|
COMPLETE |
This phase shows up once the final change approval has been completed and the status of the change order is changed to PRERELEASED. This phase remains in the change order once the status of the change order also changes to CLOSED.
|
|
|
Suggestion: some customers rename this phase ALL CHANGES COMPLETE.
|
The following rights must be assigned to a user to manage or view change order phases:
Rights |
Description |
|
CPS_MANAGE |
Allows administrator to Add New Change Order Phases, modify existing Phases, or delete Phases.
|
|
CPS_VIEW |
Allows user to access Change Order Phase to view and select.
|
Please see Rights Groups to assign Rights Groups to users
· Global Change Order Phases will be inherited by all local organizations.
· Local Change Order Phases will only be viewed and used within that local organization.
1. From the main menu select Admin > Setup. Under Document select Change Order Phase.
2. Right click and select Add.
3. Enter the Change Order Phase.
4. Click the Save button.
Newly created Change Order Phases can be edited, deleted and managed accordingly by an administrator.
1. From the SmartSolve© menu select Admin > Setup. Under Document select Change Order Phase.
The Phases list displays.
2. Click the ![]() icon to switch to local view (if applicable).
icon to switch to local view (if applicable).
3. Select the check box of the Phase to edit, then select Action > Edit from the main menu (or right click).
4. Edit any information for your Phase.
5. Click the Save button.
All changes should now be reflected in the list.
Change Order Phases can only be deleted from SmartSolve© if the phase has not been attached to any SmartSolve© records.
1. From the SmartSolve© menu select Admin > Setup. Under Document select Change Order Phase.
The Phases list displays.
2. Click the ![]() icon to switch to local view (if applicable).
icon to switch to local view (if applicable).
3. Select the check box of the Change Order Phase to delete, then select Action > Delete from the main menu (or right click).
4. Click the Save button.
The object has now been removed from the system.
Please see Priority under System Wide Setup.
Please see Groups under System Wide Setup.
The Change Order Policy automates the Change Order workflow. The following information is setup in the Change Order Policy:
· Which fields can drive the Change Order Policy?
· Who will own and manage the change order throughout its life cycle?
· Which type of approvals will be performed within the Change Order?
· Which approval groups may be attached to the Change Order?
The Change Order Policy can be written for any combination of the fields in the Change Order Create screen. Some common fields which may drive the Change Order Policy may include:
· Change Order Category – may drive Ownership and Workflow
· Org Unit – may drive Ownership
The following rights must be assigned to a user to manage or view Change Order Policies:
Rights |
Description |
|
CPL_MANAGE |
Allows administrator to add new Change Order Policies, modify existing Policies, or delete Policies.
|
|
CPL_VIEW |
Allows user to access Change Order Policy to view and select.
|
Please see Rights Groups to assign Rights Groups to users
· Global Change Order Policies will be inherited by all local organizations.
· Local Change Order Policies will only be viewed and used within that local organization
To write a Change Order Policy, you must be familiar with writing a test condition in SQL using the un-translated field names of the Change Order template entries to drive the policy. These SQL statements are not checked; therefore, human intervention is required.
The following are lists of translated and untranslated fields for Issue:
Translated Field |
Untranslated Field |
|
Category |
COC_CATEGORY |
|
Title |
DOC_TITLE |
|
Due Date |
CHO_DUE_DATE |
|
Effective Date |
DOC_EFFECTIVE_DATE |
|
Expiration Date |
DOC_EXPIRATION_DATE |
|
Org Unit |
CHO_ORU_CODE |
|
Product |
CHO_PRD_CODE |
|
Process |
CHO_PRC_CODE |
|
Priority |
CHO_XPR_RANK |
|
Plant Area |
CHO_PLA_CODE |
|
Description |
DOC_MEMO |
1. From the main menu select Admin > Policy. Under Document select Change Order Policy.
2. Right click and select Add.
3. Enter Sequence Number (system looks from lowest to highest to meet requirement).
4. Enter the Test Condition using the un-translated field name(s).
5. Enter Test Description. (This better explains what the Test Condition means in lay mens terms.)
6. Zoom to select Owner Role and Owner and Approval Groups.
7. Check the Proposed Change Required box if proposed change approval is required.
8. Click the Save button.
Change Order Policies can be edited, deleted and managed accordingly by an administrator.
1. From the SmartSolve© menu select Admin > Policy. Under Document select Change Order Policy.
The object list displays.
2. Click the ![]() icon to switch to Local view (if applicable).
icon to switch to Local view (if applicable).
3. Select the check box of the Policy to edit, then select Action > Edit from the main menu (or right click).
4. Edit any information for your Policy.
5. Click the Save button.
All changes should now be reflected in the list.
1. From the SmartSolve© menu select Admin > Policy. Under Document select Change Order Policy.
The object list displays.
2. Click the ![]() icon to switch to Local view (if applicable).
icon to switch to Local view (if applicable).
3. Select the check box of the Policy to delete, then select Action > Delete from the main menu (or right click).
4. Click the Save button.
The object has now been removed from the system.
Scenario: An inspector dropped the preferred inspection equipment used to perform final qc checks on your finished product. This inspection equipment must be sent out to a vendor for repair and will take two weeks to complete. This equipment is referenced in several inspection work instructions that are looked up by inspectors on a daily basis in SmartDocTM. For the next two weeks, you must identify the replacement equipment (serial #) that must be used until the preferred equipment is repaired and returned. There is no need to revise these work instructions; instead, a temporary change form can be attached to all work instructions affected by this change.
Deviations are temporary changes that may affect CURRENT documents. Revising the document is not necessary because the temporary change is only for a brief time (therefore they may automatically need to EXPIRE). Using a manual system (before SmartDocTM), Pilgrim customers managed the temporary change process by completing a form and attaching the hard copy form to any hard copy documents which have been affected by the temporary changes.
Using Deviations with SmartDocTM will automate this process, presenting the temporary change when a user is viewing a document affected by that change. Auto Expire is used for deviations to deactivate any temporary changes that have since expired. This enhances the user experience.
Requests for temporary changes can be initiated by creating a Change Request record in SmartDocTM. It is recommended that Pilgrim customers still maintain their temporary change form in the system and actually make it available in SmartDocTM as a form to fill out.
The following steps could be executed in the system to execute the deviation process:
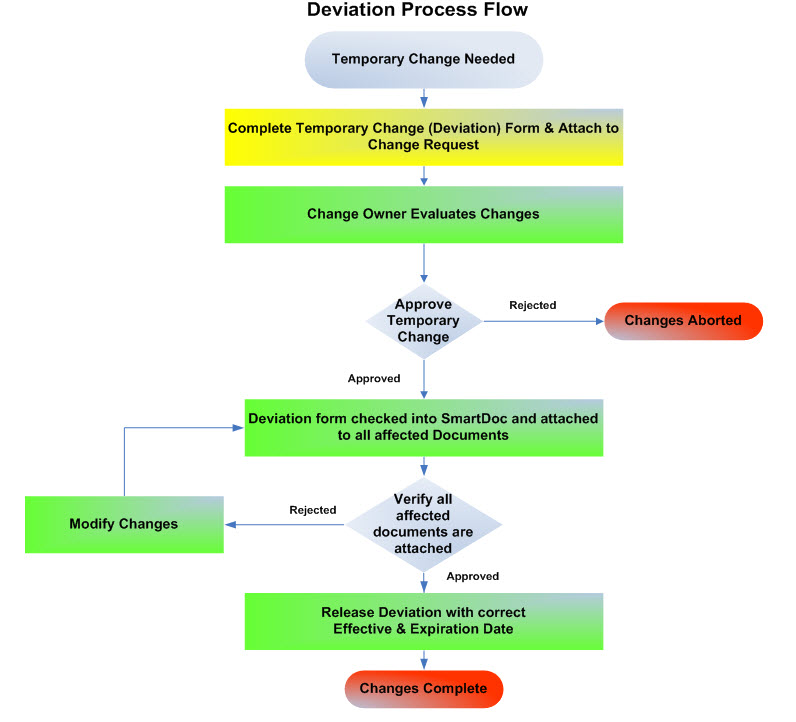
Deviations are attached to all of their affected documents automatically by using the Change Order and selecting the Deviation Change Type. Once attached, these documents will be linked together and can be seen in document view and under the References folder in the document record.

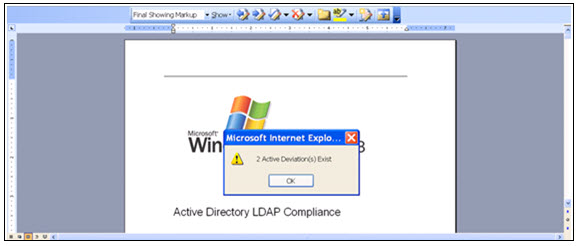
When an end user views a document that has an active deviation, the system prompts a pop up window indicating that active deviations exist and the end user can view the deviations from the original document view.
Once the deviation expires, it will drop off the pop up window and remain in the references folder for reference and history.
Scenario: An inspector needs to access a work instruction from the Document Repository. As the inspector clicks on the view link to launch the document, a pop up window displays if any active deviations are currently attached to the document and can be viewed from the browser.
The following are suggested methods for setting up deviations in your SmartDocTM system. Please work with your Pilgrim representative to discuss these options in more detail.
1. Create a Deviation Document Type and set the Type to Auto Expire
Please see Document Types
2. Attach your Temporary Change Form (Deviation) Template to the Deviation Document Type (if you wish to use a template)
3. Configure a Change Order Policy to follow your temporary change process
Please see Change Order Policy
Please see Deviations under the SmartDocTM End User Guide.