Select the object link below for more information on how to configure the object.
Object |
Shared with other SmartSolve© Applications |
Required for SmartComplaintsTM |
Yes |
Yes |
|
No |
No |
|
Yes |
Yes |
|
Yes |
Yes |
|
Yes |
No |
|
Yes |
No |
|
Yes |
No |
|
No |
Yes |
|
No |
No |
|
No |
Yes |
|
Yes |
No |
|
Yes |
No |
|
No |
No |
|
No |
No |
|
No |
No |
|
No |
No |
Please see Exception Type under System Wide Setup.
This feature uses the Fill button to import lot number information directly from another data warehouse into SmartComplaintsTM. The Fill button must be made visible using Forms Configurator. Please see Forms Designer for instructions on how to make hidden objects visible.
The following three procedures should be followed in order to configure the Lot Number:
1. Identify the lot number database information.
2. Configure the database in the web.config file.
3. Configure the LotNumberInfo.xml file.
If the Lot information already exists in the database warehouse, gather the following information:
1. Database name.
2. Tables or views where the lot number information is located.
3. Column names that will be used to populate the data when the complaints are created.
You will require column names for the following items:
Lot Number
Part Number
Part Name
Work Center code
Manufacture Date
Expiration Date
NOTE: All the source columns must be properly mapped into the correct Pilgrim table/column format. |
1. From the SmartSolve© application Root folder, open the Web.config file.
2. Scroll down to the <databases> section and add a new database node. This is similar to the SmartSolve© database.
3. Assign a proper value for the id, db, and ConnectionString properties of the database node.
Example: <database db="YOURDATABASEDBID" display="YourCompany warehouse" db="ORACLE" dbVer ="9.0" ConnectionString="Password=YourPassword;UserID=YourCompanyWarehouse;Data Source=INTER"/>
Save the Web.Config file.
1. From the Settings folder, open the LotNumberInfo.xml file. The file will look similar to that shown below:
<?xml version="1.0" encoding="UTF-8" ?>
<ExternalDataSourceInfo>
<DataSource TableName="PartLotView" SourceDBID="YOURDATABASEDBID">
<SelectStatement>
<! [CDATA[
Select
LotNumber as EPL_LOT_NUMBER,
PartNumber as PXP_PRODUCT_CODE,
PartName as PXP_PRODUCT_NAME,
WorkCenter as QXP_ORU_CODE,
Workcenter as QXP_ORU_NAME
MfrdDate as EPL_MANUFACTURING_DATE,
ExpDate as EPL_EXPIRATION_DATE
from PartLotView]]>
</SelectStatement>
<PartNumberColumn>PartNumber</PartNumberColumn>
<LotNumberColumn>LotNumber</LotNumberColumn>
<PartSelectionColumn>PXP_PRODUCT_NAME</PartSelectionColumn>
</DataSource>
</ExternalDataSourceInfo>
2. Find the SourceDBID location and enter the value for the properties of the Database node.
This must be same as the value entered for the Database ID in the Web.Config file.
3. Enter the proper Select statement under the <SelectStatement> node.
Make sure the Source column is mapped to the proper Pilgrim column as provided in the sample select statement.
4. Enter the proper source column name on the <PartNumberColumn> and <LotNumberColumn> node.
5. Enter the proper column name on the <PartSelectionColumn> node for displaying the part selection.
6. Save the LotNumberInfo.xml file.
See Numbering Scheme under System Wide Setup.
See Priority under System Wide Setup.
See Activity Types under System Wide Setup.
See Activity Signatures under the Application Options Utility.
See Reference Types under System Wide Setup.
See Requested Action under System Wide Setup.
See Sample Location under System Wide Setup.
See Exception Resolution under System Wide Setup.
See Exception Policies under SmartCAPATM Setup.
See Exception Auto Rules under SmartCAPATM Setup.
Please see SetExceptionStatusAsOpenUponReopen under the Application Options Utility.
The following Response Letters come with the SmartComplaintsTM application and can be generated right from the complaint exception Detail tab. These letters are pre-configured to pick up key information from the complaint detail and insert the information into the letter that is generated (product information, customer information, investigation results, etc.).
Response Letters can be launched and exported into the following formats:
· To PDF
· To Browser
· To Word
· To Excel
· To Excel Record
Response Letter |
Instructions |
Customer Acknowledgement Letter
|
A letter can be generated and sent to the customer to acknowledge that the complaint was received by your organization and is under investigation. This letter comes with the SmartComplaintsTM system in a Word template and can be configured based on your letter requirements. The letter can be generated from the Complaint Exception record.
|
|
NOTE: In order to view this letter from the Complaint Detail at least one contact type under the Contacts tab must display as CUSTOMER.
|
No Response Letter |
The supplier/manufacturing plant responsible for investigating your complaint may indicate that no response has been received regarding the investigation. A letter can be generated from the complaint exception record in SmartComplaintsTM. The Word template for the letter can be configured based on your letter requirements.
|
|
NOTE: In order to view this letter from the Complaint Detail at least one contact type under the Contacts tab must display as SUPPLIER.
|
Customer Closure Letter |
A closure letter can be generated and sent to the customer to give the customer investigation results. This Word template is automatically a part of the SmartComplaintsTM system and can be configured based on your requirements. The letter can be generated from the complaint exception record.
|
|
NOTE: In order to view this letter from the Complaint Detail at least one contact type under the Contacts tab must display as CUSTOMER.
|
Rights are not needed at this time to setup additional Response letters as these letters are configured using Crystal Reports.
· Global Response Letters will be inherited by all local organizations.
· Local Response Letters will only be viewed and used within that local organization.
The following options are available for response letters and can be managed accordingly by an administrator:
Default response letters can be edited using Crystal Reports
· The output destination can be changed for each letter to output to Word, Excel, PDF, etc.
· Security can be applied to each unique letter by role and user right.
· New letters can be added to the system.
Default Response Letters
Response Letters must be modified using Crystal Report Writer which does not come with SmartSolve©. Please see Crystal Reports under SmartSolve Reporting & Analytics.
1. Log into the organization where the letter has been created.
2. From the Portal Page, click Smart Solutions tab > Admin and Report > Report. Under Exception/Issue Reports, select Complaint.
The Report list displays.
3. Click the ![]() icon
to switch to Local view (if applicable).
icon
to switch to Local view (if applicable).
4. Select the check box of the Letter to edit, then select Action | Edit from the main menu.
5. Change the letter destination by entering information in only the following field:
Field |
Description |
Destination |
Select an output destination for the letter. |
6. Click the Save button.
Changes are now reflected in the letter.
1. Log into the organization where the Letter has been created
2. From the Portal Page, click Smart Solutions tab > Admin and Report > Report. Under Exception/Issue Reports, select Complaint.
The Report list displays.
3. Click the ![]() icon
to switch to Local view (if applicable).
icon
to switch to Local view (if applicable).
4. Select the check box of the Letter to edit, then select Action | Edit from the main menu.
5. Apply security by entering information in only the following fields:
Field |
Description |
Role Name |
Zoom to select a role so that security is applied to the letter by role.
|
Right |
Zoom to select the right so that security is applied to the letter by individual right.
|
6. Click the Save button.
All changes are now reflected in the letter.
Response Letters must be modified using Crystal Report Writer which does not come with SmartSolve©. Please see Crystal Reports under SmartSolve Reporting & Analytics.
SmartComplaints provides a powerful decision making tree. This feature provides pre-populated questionnaires within a strong engine for making rapid decisions on what forms are required for submission. A decision tree can be executed for each supported country's regulatory agency. The decision tree is fully configurable by your system administrator. You can even add a new decision tree and more questions (or change existing questions) if you wish more conclusions to be documented within complaint exceptions (i.e., potentially reportable questions).
Decision Trees can be configured by administrators to affect the following:
a) Change the responses available to your users.
b) Default your responses to a blank value, this forces the user to respond instead of clicking through the questions.
c) Modify or delete questions for an existing decision tree.
d) Add questions to an existing decision tree.
e) Add reports or conclusions to an existing tree.
f) Add a new decision tree, assign new reports as the conclusions and a new set of questions.
g) Develop the policies so that specific answers to questions will generate a report.
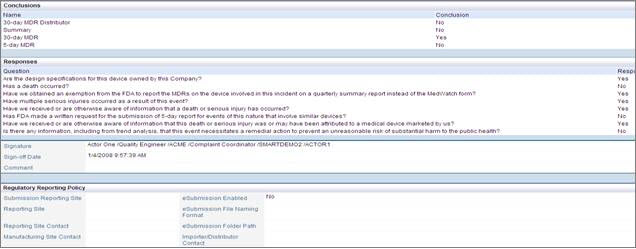
SmartComplaintsTM currently supports the following regulatory agency report templates:
FDA - MedWatch, MedWatch ADE (DRUG)
EU – MDV
Canada - MDPR
Japan – ARR
Australia – TGA
Decision trees can be configured to be unique to each organization.
The following options are available for decision trees and can be managed accordingly by an administrator:
· Default decision trees can be edited to add or remove questions and response.
· New decision trees can be added to the system.
· Default response option can be set to blank to force end user to select this option.
· Tool tips can be created to help end users clarify questions asked in the decision tree.
NOTE: Please do not merge different decision trees (i.e., FDA, EU). Regulatory Agencies have been known to issue findings if you should decide to do this in the system. |
Open the IIS Services Directory.
Locate SmartSolve© under the Web Sites directory.
Select the Submission Forms folder under the SmartSolve© directory.
Open the DecisionTree.xml file.

Put your questions in ..\Pilgrim\SmartSolve\SubmissionForms DecisionTree.xml
Make sure the decision tree names are referenced correctly in …\Pilgrim\smartsolve8210\SubmissionForms\FormConfig.xml
To modify mapped fields to the PDF report,
Access the combo of 3 files for each report to be submitted. The xml file has all the untranslated fields from the Adobe file. XSL field does the mapping from the fields in the SmartSolve© application.
See Forms Designer in the Studio Designer Help System for more information on how to add tool tips to the decision tree.
See Forms Designer in the Studio Designer Help System for more information on how to set the default drop down to a blank validated value in the Decision Tree.
See CaptureReasonForChangeInComplaint under the Application Options Utility.
The Complaint Synchronization Agent (CSA) manages compliance with industry regulations and improves company performance by automatically capturing complaint data from web sites, customer relationship management (CRM) or other field and legacy systems by creating and updating complaint records, and notifying complaint managers. Captured data can be sent to the appropriate complaints group and additional information collecting, investigations, and reporting can be completed. Please contact your Pilgrim representative for CSA Integration options.