Please select the object link below for more information on how to configure the object.
Object |
Shared with other SmartSolve© Applications |
Required for SmartCAPATM |
Yes |
No |
|
Yes |
No |
|
Yes |
No |
|
Yes |
No |
|
No |
No |
|
No |
No |
|
No |
No |
|
No |
No |
|
No |
No |
Please see Groups under System Wide Setup.
Please see Checklist under System Wide Setup.
Review Escalation defines the action that must occur in the system to ensure that the review process does not stop. If a reviewer does not respond to the review in the allowed time, an additional action may be enforced.
If the Escalation Policy is attached to the Review Group, the policy will be enforced on every level identified with the Review Group (for example, if review group has three levels of reviewers, the escalation could apply the same for all three levels).
Also, each level of reviewers listed in the Review Group can have a unique escalation policy attached. The system first looks for the level specific escalation policy and, if not found, will apply the Escalation Policy attached to the Review Group.
The following right must be assigned to a user to manage and view Review Escalations:
Rights |
Description |
RES_MANAGE |
Allows administrator to add new Review Escalation, modify existing Escalation, or delete Escalation.
|
RES_VIEW |
Allows user to access Review Escalation to View.
|
Please see Rights Group to assign Rights Groups to users
· Global Review Escalation will be inherited by all local organizations.
· Local Review Escalation will only be viewed and used within that local organization.
The following Escalation Steps can be applied to issue review.
Additional Action |
Description |
Escalate to Alternate |
The Review is re-assigned to the alternate actor (from Actor Role) |
Escalate to Manager |
The Review is re-assigned to the actor's manager |
NONE |
This step indicates that no additional action will be taken except for notification only |
Escalate to Owner |
The Review is re-assigned to the record owner. |
Skip |
The Review is no longer needed by this actor and moves to the next level. |
Stop |
The Review routing has stopped and the record has been sent back to the owner. |
Escalate to Org Unit Head |
The Review is re-assigned to the actor's org unit head. |
Example Issue Review Escalation Business Scenario
The following Reviewers are included in the Routing sheet for Final Issue Review:
· Level 1 QA Coordinator
· Level 2 QA Coordinator
· Level 2 QA Manager
Step 1 – No escalation will be used for Level two; however, the Level one QA Coordinators will have three business days to approve the issue from the date the issue has been routed to this Level. If three business days have passed, the system needs to skip these reviewers all together and route to the next Level (QA Manager).
The following steps will be applied to the Escalation Policy:
Step |
Additional Action |
Allowed Time |
1 |
Skip |
3 Business Days |
Review Escalation is an optional feature in the system and is attached to Groups (if Groups are used for Issue Reviews).
1. From the Portal Page, click Smart Solutions tab > Admin and Report > Policy. Under Issue Review, select Escalation.
2. Click Action > Add.
3. Enter the Code and name of your Escalation Policy.
4. Click the Save button.
5. Select the Step folder.
6. Click Action > Add.
7. Enter a number in the Step field and select the Additional Action which will occur in this step.
8. Enter the allowed time when the escalation will trigger if minimum requirements are not met within the review.
9. Click the Save button.
10. Add more steps if needed.
Additional Actions can be attached to each step configured within the Escalation Policy. For example, if a reviewer is skipped the system can be setup to also notify the record owner so that they know the Escalation Policy has taken affect.
The following Additional Actions can be applied to each Escalation Step:
Additional Action |
Description |
Add Alternate |
The Review is re-assigned to the alternate actor (from Actor Role). |
Add Manager |
The Review is re-assigned to the actor's manager. |
Add Org Unit Head |
The Review is re-assigned to the actor's org unit head. |
Notify Alternate |
The Actor’s alternate is notified of the escalation step taken. |
Notify Manager |
The Actor’s manager is notified of the escalation step taken. |
Notify Owner |
The Criteria owner is notified of the escalation step taken. |
Notify Org Unit Head |
The org unit head of the actor’s department is notified of the escalation step taken. |
1. From the Escalation Policy detail, select the Additional Actions folder.
2. Click Action > Add.
3. Select the Additional Action option to occur in this Step.
4. Click the Save button.
5. Add additional steps as needed.
The following options are available within Review Escalation and can be managed accordingly by an administrator.
Review Escalation can be edited and deleted.
Review Escalation must be attached to Review Groups in order to be used.
1. From the Portal Page, click Smart Solutions tab > Admin and Report > Policy. Under Issue Review, select Escalation.
The Review Escalation list displays.
2. Click the ![]() icon to switch to local view (if applicable).
icon to switch to local view (if applicable).
3. Select the check box of the Escalation to edit, then select Action > Edit from the main menu.
4. Edit any information for your Escalation.
5. Click the Save button.
All changes should now be reflected in the list.
Review Escalation can only be deleted from SmartSolve© if the escalation has not been attached to any Review Groups.
1. From the Portal Page, click Smart Solutions tab > Admin and Report > Policy. Under Issue Review, select Escalation.
The Review Escalation list displays.
2. Click the ![]() icon to switch to local view (if applicable).
icon to switch to local view (if applicable).
3. Select the check box of the Escalation to delete, then select Action > Delete from the main menu.
4. Click the Save button.
The object has now been removed from the system.
1. From the Portal Page, click Smart Solutions tab > Admin and Report > Setup. Under System Wide, select Group.
The Review Escalation list displays.
2. Click the ![]() icon to switch to local view (if applicable).
icon to switch to local view (if applicable).
3. Select the check box of the Group to attach the Escalation to, then select Action > Edit from the mein menu.
4. From the Escalation drop down menu select the Escalation Policy to be used within this Group.
5. Click the Save button.
The Escalation Policy has now been attached to the Group.
1. From the Portal Page, click Smart Solutions tab > Admin and Report > Setup. Under System Wide, select Group.
The Groups list displays.
2. Click the ![]() icon to switch to local view (if applicable).
icon to switch to local view (if applicable).
3. Access the Group Role tab by clicking the arrow for the group.
4. Select the Role link.
The Roles display.
5. Access the Level Detail tab by clicking the arrow for the role.
6. Select Level Detail.
Detail for that level displays.
7. Select Action > Edit from the main menu.
8. From the escalation drop down menu select the Escalation Policy to be used in this level.
9. Click the Save button.
The Escalation Policy has now been attached to the Group.
Please see Rules under System Wide Setup.
SmartCAPATM allows you to create as many Review Types as you need for your issue workflows. However, it is typical for an issue record to have one review attached which is used to verify that the issue record can be closed.
You MUST have at least one review attached to your issue in order to allow the issue status to change from INWORKS to CLOSED. Also, you can only have one active review at a time within an issue workflow. However, within that review you can have different levels of reviewers.
Some example Issue Review Types could include:
Review Types |
Description |
One-time Reviews |
Review which is performed one time prior to the issue being closed in the system.
|
Periodic Reviews |
Reviews that may need to be scheduled out in advanced and performed while the issue workflow is being implemented. An example of this type of review may be a 1 Month Periodic Review which will notify the issue owner to review the issue workflow and take further action if issue workflows are not being completed in a timely manner.
|
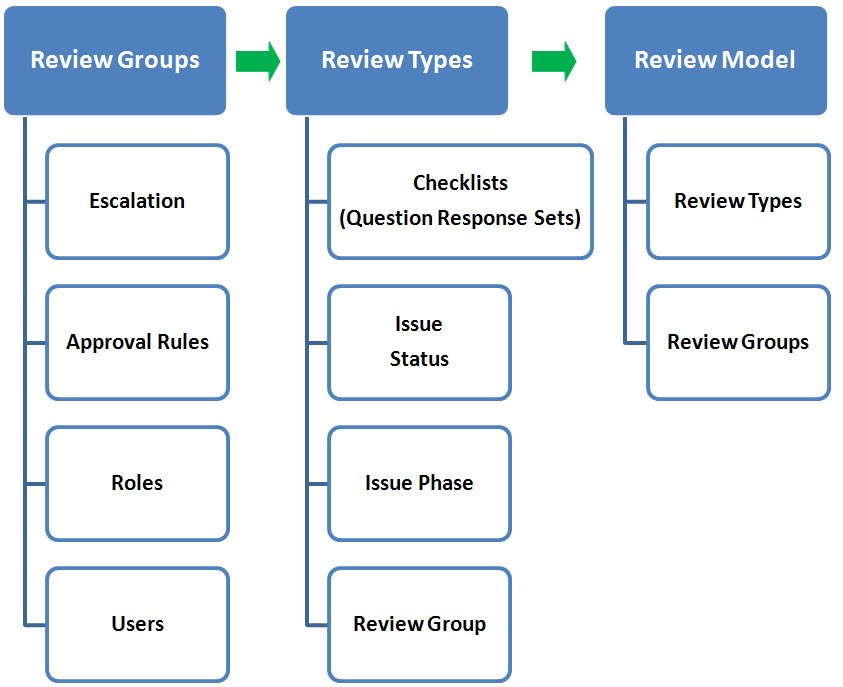
This Matrix illustrates the setup tables involved with Issue Review. You may not setup all of these tables for your issue workflows.
.
One default Criteria Review Type, called Default Issue Review, is already entered in the Issue Review Type master file upon installation. This Issue Review Type is provided as an optional Issue Review Type for use in the organization's Review Models. The default issue Review Type:
Is completely configurable.
Can be edited or deleted.
Automatically attaches to all new Review Models anytime a new model is configured, so if you do not want to use this default type, it must be detached.
NOTE: Most Pilgrim customers create their own Review Types or edit the name of the default under the global organization (i.e., Release Review). |
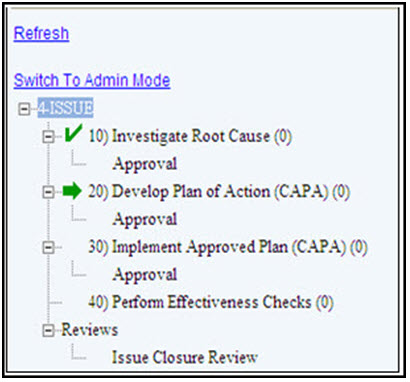
Example Issue Closure Review type as Viewed in the Issue Tree
The following rights must be assigned to a user to manage or view Issue Review Type.
Rights |
Description |
IRT_MANAGE |
Allows administrator to add new Issue Review Types, modify existing Review Type, or delete Review Type.
|
IRT_VIEW |
Allows user to access Issue Review Type to view and select.
|
Please see Rights Group to assign Rights Groups to users
Global Issue Review Types will be inherited by all local organizations.
Local Issue Review Types will only be viewed and used within that local organization.
1. From the Portal Page, click Smart Solutions tab > Admin and Report > Policy. Under Issue Review, select Review Type.
The Types window displays.
2. Enter information in the following fields:
Field Name |
Description |
Name |
The name of the review (will later show up under the issue record).
|
Review Purpose |
Statement that will be stamped for each approver signing off on the review.
|
Review Group |
If more than one approver must approve the issue set up a Review Group. Some common scenarios: Only the issue owner needs to approve (do not add Review Group and issue owner will automatically show up as Issue Reviewer) – most common scenario. Approval Groups may be specific to business units/operations who own issues within the type. If this is the case then Review Groups are setup at the Issue Review Model Policy rather than here under the Review Type.
|
Analysis Code
|
The purpose of the Analysis Code field is to enter a specific code representing the record to which it belongs. The record being created will be synonymous with the analysis code when a report is run. This field is typically not used by Pilgrim customers and can be hidden using the Forms Configurator.
|
Checklist |
Add quality checks to this review to ensure that the review is not closed until all checks have been addressed. This field is typically not used by Pilgrim customers and can be hidden using the Forms Configurator.
|
Auto Close |
If checked, the review automatically closes once the last approval rule is met (Approver Approves). If not checked, the issue owner is notified once the last approval is complete. The issue owner must manually close the review in the issue to change the status (this field is typically checked to eliminate extra clicking).
|
Applicable Status |
The status that will activate the review in the Issue (i.e., INWORKS). Always set the INWORKS status if this is the first review performed in the issue workflow.
|
NOTE: Failure to configure Applicable Status correctly will impact how the issue workflow performs.
|
|
To Status |
The status the issue will change to once the review is closed (i.e., CLOSED). Always set the CLOSED status if this is the only review performed in the issue workflow.
|
NOTE: Failure to configure To Status correctly will impact how the issue workflow performs.
|
|
Phase on Start |
The phase the issue will change to once the review is routed (i.e., UNDER FINAL REVIEW).
|
Phase on Close |
The phase the issue will change to once the review is closed (i.e., FINAL REVIEW COMPLETE).
|
3. Click the Save button.
The Review Type is displayed in the system.
Please see Groups to setup and assign Review Groups to Issue Review Types.
Please see Checklists to setup and assign Checklists to Issue Review Types.
Please see Issue Status to setup Issue Statuses.
Please see Issue Phase to setup Issue Phases.
The following options are available within issue Review Type and can be managed accordingly by an administrator.
Issue Review Types can be edited and deleted.
Issue Types can be attached to Issue Review Models or issue records directly.
1. From the Portal Page, click Smart Solutions tab > Admin and Report > Policy. Under Issue Review, select Review Type.
The Types window displays.
2. Click the ![]() icon to switch to local view (if applicable).
icon to switch to local view (if applicable).
3. Select the check box of the Issue Review Type to edit, then select Action > Edit from the main menu.
4. Edit any information for your Issue Review Type.
5. Click the Save button.
All changes should now be reflected in the list.
Issue Review Types can only be deleted from SmartSolve© if the Issue Review Type has not been attached to any Issue Review Models.
1. From the Portal Page, click Smart Solutions tab > Admin and Report > Policy. Under Issue Review, select Review Type.
The Types window displays.
2. Click the ![]() icon to switch to local view (if applicable).
icon to switch to local view (if applicable).
3. Select the check box of the Issue Review Type to delete, then select Action > Delete from the main menu.
4. Click the Save button.
The object has now been removed from the system.
Please see How to Create a Review Model.
Please see How to Create a Review Model.
Review Models are provided in order to define all of the Review Schedules that are necessary to define an issue workflow. Any amount of reviewers can be added to your Review Models. however, most customers only use one. Review Models configure the following requirements:
Which reviews need to be performed within the issue and who will be assigned.
When in the issue each review will be performed (at which Status and/or Phase).
What is the estimated time needed to complete the review (if applicable).
Issue Review Models MUST be attached to an Issue Policy in order to enforce the issue workflow.
The following rights must be assigned to a user to manage or view Issue Review Model:
Rights |
Description |
IRM_MANAGE |
Allows administrator to add new Issue Review Models, modify existing Models, or delete Models.
|
IRM_VIEW |
Allows user to access the Issue Review Model to view and select.
|
Please see Rights Group to assign Rights Groups to users
Global Issue Review Models will be inherited by all local organizations.
Local Issue Review Models will only be viewed and used within that local organization.
1. From the Portal Page, click Smart Solutions tab > Admin and Report > Policy. Under Issue Review, select Review Model.
2. Click Action > Add.
3. Enter information in the following fields:
Field Name |
Description |
Code |
Enter the code for the Review Model.
|
Name |
Enter a name for the Review Model.
|
Document Status |
Select a Document Status from the drop down list. (First status the Issue is in when first created).
|
Phase |
Select a Phase from the drop down list. (First phase the Issue is in when first created).
|
Add Another |
Click the box to add another review model.
|
4. Click the Save button.
The Review Models display.
5. From the newly created Review Model, click the Schedule link.
The Schedule displays.
6. Delete the Default Issue Review Type by checking the Review Type, and then clicking Action > Delete.
No Review Type should be listed in the Schedule.
7. Click Action > Attach to attach the Review Type you wish to first apply to the model.
8. Enter information in the following fields:
Field Name |
Description |
Review Type Name |
Zoom to select a review type name.
|
Review Option |
Select a review option.
|
Interval |
Enter the interval when the review will be scheduled. (If this is one time that will be routed after workflow is complete leave blank).
|
Advance Notice |
Enter an Advance Notice interval. The system will notify the issue owner that the review is upcoming based upon what is entered in this field.
|
Phase |
Select a phase from the drop down list.
|
Add Another |
Click the box to add another review model schedule.
|
9. Click the Save button.
The following options are available within Issue Review Model and can be managed accordingly by an administrator:
Issue Review Models can be edited and deleted.
Issue Review Models MUST be attached to the Issue Policy in order to enforce the issue workflow.
1. From the Portal Page, click Smart Solutions tab > Admin and Report > Policy. Under Issue Review, select Review Model.
The Review Models list displays.
2. Click
the ![]() icon to switch to Local view (if applicable).
icon to switch to Local view (if applicable).
3. Select the check box of the Issue Review Model to edit, then select Action > Edit from the main menu.
4. Edit any information for your Issue Review Model.
5. Click the Save button.
All changes should now be reflected in the list.
Issue Review Models can only be deleted from SmartSolve© if the Review Model has not been attached to any Issue Policies.
1. From the Portal Page, click Smart Solutions tab > Admin and Report > Policy. Under Issue Review, select Review Model.
The review Models list displays.
2. Click
the ![]() icon to switch to Local view (if applicable).
icon to switch to Local view (if applicable).
3. Select the check box of the Issue Review Model to delete, then select Action > Delete from the main menu.
4. Click the Save button.
The object has now been removed from the system.
Issue Review Models should be attached to Issue Policies if the Review Model will be used to enforce the issue workflow.
1. From the Portal Page, click Smart Solutions tab > Admin and Report > Policy. Under Exception/Issue Related, select Issue Policy.
The Issue Policies list displays.
2. Click
the ![]() icon to switch to Local view (if applicable).
icon to switch to Local view (if applicable).
3. Select the check box of the Issue Policy to attach the Task Model to.
4. Select Action > Edit from the main menu.
5. From the Review Model drop down menu select the Task Model to be attached to the Issue Policy
6. Click the Save button.
The Review Model has now been attached to the Issue Policy
Please see Always Restart Issue Review under the Application Options Utility.
Please see AutoStart Issue Review under the Application Options Utility.
Please see Show All Issue Reviews in User Mode under the Application Options Utility.