Please select the object link below for more information on how to configure the object
Object |
Shared with other SmartSolve© Applications |
Required for SmartCAPATM |
No |
Yes |
|
Yes |
Yes |
|
No |
Yes |
|
No |
No |
|
Yes |
No |
|
No |
No |
When creating an issue, you are required to enter the type of issue that will be attached to the exception. The Issue Type ties together important information such as how the issue will be numbered in the system as well as how some of your issue policies may be defined. Issue Type could be a field that may later drive your task and review workflows.
Another important reason for defining different types of issues may be for reporting and analysis because issues lists can be sorted by issue type.
The following rights must be assigned to a user to manage or view Issue Types:
Rights |
Description |
ATY_MANAGE |
Allows administrator to add New Audit Types, modify existing Audit Types, or delete Audit Types.
|
ATY_VIEW |
Allows user to access Audit Type to view and select.
|
Please see Rights Group to assign rights groups to users
· Global Issue Types will be inherited by all local organizations.
· Local Issue Types will only be viewed and used within that local organization.
1. From the Portal Page, click Smart Solutions tab > Admin and Report > Setup. Under Exception/Issue, select Issue Type.
2. Click Action > Add.
3. Enter the Name of your Issue Type.
4. Select the Auto Numbering Scheme which will apply to Issues of this Type.
5. Click the Save button.
The following options are available within Issue Type objects and can be managed accordingly by an administrator:
Issue Types can be edited and deleted.
Issue Types can later be attached when Creating Issues and Issue Policies.
1. From the Portal Page, click Smart Solutions tab > Admin and Report > Setup. Under Exception/Issue, select Issue Type.
The object list displays.
2. Click
the ![]() icon to switch to Local view (if applicable).
icon to switch to Local view (if applicable).
3. Select the check box of the Issue Type to edit, then select Action > Edit from the main menu.
4. Edit any information for your Issue Type.
5. Click the Save button.
All changes should now be reflected in the list.
Issue Types can only be deleted from SmartSolve© if the issue type has not been attached to any SmartSolve© records.
1. From the Portal Page, click Smart Solutions tab > Admin and Report > Setup. Under Exception/Issue, select Issue Type.
The object list displays.
2. Click
the ![]() icon to switch to Local view (if applicable).
icon to switch to Local view (if applicable).
3. Select the check box of the Issue Type to delete, then select Action > Delete from the main menu.
4. Click the Save button.
The object has now been removed from the system.
Please see Numbering Scheme under System Wide Setup.
Issue Status indicates the point in the workflow of the issue. The following statuses come as defaults with the system and can be changed if you wish to apply your own terminology, or if needed LOCAL Organizations can create their own statuses and apply them to their issue workflows.
NOTE: Issue Status works very closely with Issue Review Type. Please see Issue Review Type for more information on configuring Issue Status. |
The following statuses that are applied to the issue are listed below in the order that they would appear in the off the shelf workflow:
Status |
Description |
INWORKS |
When an issue is first created, the INWORKS status is displayed. The INWORKS status remains displayed in the issue until an Issue Review is completed.
|
|
NOTE: Issue Review Closure is the only transaction that can change an Issue Status.
|
CLOSED |
The CLOSED status is displayed in the issue record when the Final Review attached in the issue is CLOSED. Please see Issue Review Type for more information
|
ABORTED
|
Instead of deleting issue records, an issue owner with supervisory rights can abort the issue to keep the issue in the system, but with a status of ABORTED, rather than CLOSED.
|
|
NOTE: When an issue is aborted, all information documented within the issue that applies to attached exceptions or failure modes will automatically be removed from these associated tables as if the issue never existed.
|
The following rights must be assigned to a user to manage or view Issue Statuses:
Rights |
Description |
IST_MANAGE |
Allows administrator to Add New Issue Statuses, modify existing Statuses, or delete Statuses.
|
IST_VIEW |
Allows user to access Issue Status to View and select.
|
Please see Rights Group to assign Rights Groups to users
· Global Issue Statuses will be inherited by all local organizations.
· Local Issue Statuses will only be viewed and used within that local organization.
1. From the Portal Page, click Smart Solutions tab > Admin and Report > Setup. Under Exception/Issue, select Issue Status.
2. Click Action > Add.
3. Enter the new Secondary Status.
4. Select the appropriate Primary Status from the drop down (i.e., INWORKS).
Primary Status |
Description |
ABORTED |
The Issue is in an Aborted status and is no longer used. |
INWORKS |
The Issue has not yet been Closed. |
5. Click the Save button.
The following options are available within Issue Status objects and can be managed accordingly by an administrator:
Newly created Issue Statuses can be edited and delete.
When new Issue Statuses are created, the new status must be assigned to the organization’s Issue Review Types and Issue Review Model. Failure to do this will impact system performance and cause system errors when the issue record is created.
1. From the Portal Page, click Smart Solutions tab > Admin and Report > Setup. Under Exception/Issue, select Issue Status.
The object list displays.
2. Click
the ![]() icon to switch to Local view (if applicable).
icon to switch to Local view (if applicable).
3. Select the check box of the Issue Status to edit, then select Action > Edit from the main menu.
4. Edit any information for your Issue Status.
5. Click the Save button.
All changes should now be reflected in the list.
Issue Statuses can only be deleted from SmartSolve© if the issue status has not been attached to any SmartSolve© records.
1. From the Portal Page, click Smart Solutions tab > Admin and Report > Setup. Under Exception/Issue, select Issue Status.
The object list displays.
2. Click
the ![]() icon to switch to local view (if applicable).
icon to switch to local view (if applicable).
3. Select the check box of the Issue Status to delete, then select Action > Delete from the main menu.
4. Click the Save button.
The object has now been removed from the system.
Phases indicate all possible issue phases. Phases are used by tasks and reviews, and are incorporated into task and review models. When the task or review is completed, the issue is updated to the phase specified by that task or review to indicate the current stage or milestone in the issue's life cycle. The application provides five phases, however additional phases can be added:
· CONTAINMENT
· CORRECTION
· IMPLEMENTATION
· INVESTIGATION
· REVIEW
It is not necessary to link tasks or reviews to phases; however, it may be helpful for more complicated Issue Models that incorporate many tasks and/or reviews. The progress of the issue can be easily determined by looking at the issue's current phase.
The following rights must be assigned to a user to manage or view Issue Phases:
Rights |
Description |
IPH_MANAGE |
Allows administrator to add new Issue Phases, modify existing Phases, or delete Phases.
|
IPH_VIEW |
Allows user to access Issue Phase to view and select.
|
Please see Rights Group to assign Rights Groups to users
Global Issue Phases will be inherited by all local organizations.
Local Issue Phases will only be viewed and used within that local organization.
1. From the Portal Page, click Smart Solutions tab > Admin and Report > Setup. Under Exception/Issue, select Issue Phase.
2. Click Action > Add.
3. Enter the Issue Phase
4. Click the Save button.
The following options are available within Issue Phase objects and can be managed accordingly by an administrator:
Newly created Issue Phases can be edited and delete.
When new Issue Phases are created, the new phase must be assigned to the organization’s Issue Review Types and Issue Review Model. Failure to do this will impact system behavior when the issue record is created.
1. From the Portal Page, click Smart Solutions tab > Admin and Report > Setup. Under Exception/Issue, select Issue Phase.
The object list displays.
2. Click
the ![]() icon to switch to local view (if applicable).
icon to switch to local view (if applicable).
3. Select the check box of the Issue Phase to edit, then select Action > Edit from the main menu.
4. Edit any information for your Issue Phase.
5. Click the Save button.
All changes should now be reflected in the list.
Issue Phases can only be deleted from SmartSolve© if the phase has not been attached to any SmartSolve© records.
1. From the Portal Page, click Smart Solutions tab > Admin and Report > Setup. Under Exception/Issue, select Issue Phase.
The object list displays.
2. Click
the ![]() icon to switch to local view (if applicable).
icon to switch to local view (if applicable).
3. Select the check box of the Issue Phase to delete, then select Action > Delete from the main menu.
4. Click the Save button.
The object has now been removed from the system.
Please see Priority under System Wide Setup.
The Issue Policy automates the issue workflow. It is where the Task Model and Review Model are joined together and identifies field parameters that drive how quality exceptions are resolved for an issue. The following information is setup in the Issue Policy:
· Which fields can drive the Issue Policy? (i.e., Issue Type, Org Unit, Product, etc.)
· Who will own and manage the issue throughout its life cycle?
· Which Task Model will be attached to the issue (if applicable)?
· Which Review Model will be attached to the issue (if applicable)?
· Will the issue workflow (Tasks and Reviews) automatically be routed once the issue is created?
The Issue Policy can be written for any combination of the fields in the Issue Create screen. Some common fields which may drive the Issue Policy may include:
· Issue Type– may drive ownership and workflow
· Org Unit (Source of Failure) – may drive ownership
· Product – may drive ownership and workflow
· Priority – may drive workflow
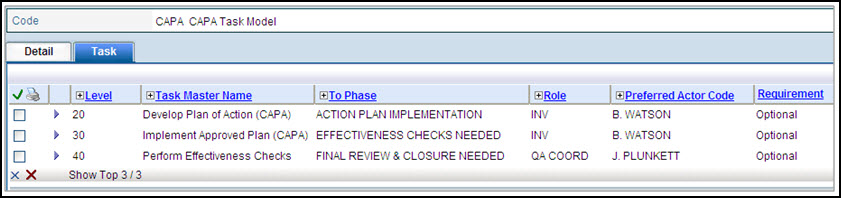
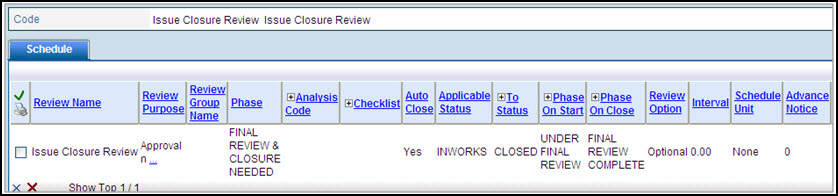
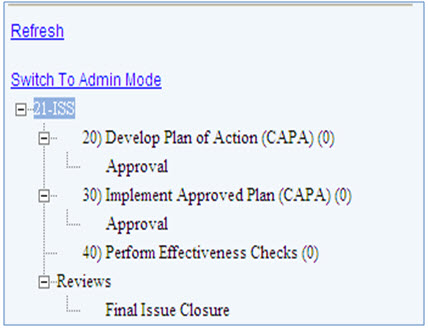
Issue with Task and Review Model
The following rights must be assigned to a user to manage or view Issue Types:
Rights |
Description |
ISP_MANAGE |
Allows administrator to add new Audit Types, modify existing Audit Types, or delete Audit Types.
|
ISP_VIEW |
Allows user to access Audit Type to view and select.
|
Please see Rights Group to assign Rights Groups to users
· Global Issue Policies will be inherited by all local organizations.
· Local Issue Policies will only be viewed and used within that local organization.
To write an Issue Policy, you must be familiar with writing a test condition in SQL using the un-translated field names of the Issue template entries to drive the policy. These SQL statements are not checked; therefore, human intervention is required.
The following are lists of translated and untranslated fields for Issue:
Translated Field |
Untranslated Field |
Title |
DOC_TITLE |
Issue Type |
QEI_ITY_NAME |
Org Unit |
QEI_ORU_CODE |
Product |
QEI_PRD_CODE |
Process |
QEI_PRC_CODE |
Priority |
QEI_XPR_RANK |
Plant Area |
QEI_PLA_CODE |
Description |
DOC_MEMO |
1. From the Portal Page, click Smart Solutions tab > Admin and Report > Policy. Under Exception/Issue Related, select Issue Policy.
2. Click Action > Add.
3. Enter information in the following fields:
Field |
Description |
Test Sequence |
Enter the Sequence Number (system looks from lowest to highest to meet requirement).
|
Test Condition |
Enter the Test Condition using the un-translated field name(s).
|
Test Description |
Enter a Test Description. (This explains what the Test Condition means in laymen’s terms.)
|
Owner Role |
Zoom to select Owner Role. (If no owner is defined the user who creates the issue automatically becomes the issue owner).
|
Owner |
Zoom to select the Owner. (If no owner is defined the user who creates the issue automatically becomes the issue owner).
|
Task Model |
Select the Task Model from the drop down list.
|
Review Model |
Select the Review Model from the drop down list.
|
Start Workflow |
Click the Start Workflow check box if you wish the Issue Workflow to auto start when created.
|
|
NOTE: Start Workflow must be checked if you wish the issue workflow to start as soon as the issue record is created.
|
Add Another |
Click this box to add another issue policy.
|
4. Click the Save button.
The Issue Policy has been added.
Issue policies can be edited, deleted and managed by an administrator.
1. From the Portal Page, click Smart Solutions tab > Admin and Report > Policy. Under Exception/Issue Related, select Issue Policy.
The object list displays.
2. Click
the ![]() icon to switch to Local view (if applicable).
icon to switch to Local view (if applicable).
3. Select the check box of the Policy to edit, then select Action > Edit from the main menu.
4. Edit any information for your Policy.
5. Click the Save button.
All changes should be reflected in the list.
1. From the Portal Page, click Smart Solutions tab > Admin and Report > Policy. Under Exception/Issue Related, select Issue Policy.
The object list displays.
2. Click
the ![]() icon to switch to Local view (if applicable).
icon to switch to Local view (if applicable).
3. Select the check box of the Policy to delete, then select Action > Delete from the main menu.
4. Click the Save button.
The object has now been removed from the system.