Please select the object link below for more information on how to configure the object.
Object |
Shared with other SmartSolve© Applications |
Required for SmartAuditTM |
No |
No |
|
Yes |
Yes |
|
No |
Yes |
|
No |
No |
|
Yes |
No |
|
Yes |
No |
|
Yes |
No |
|
Yes |
No |
|
No |
No |
|
No |
No |
|
No |
Read Only |
|
No |
No |
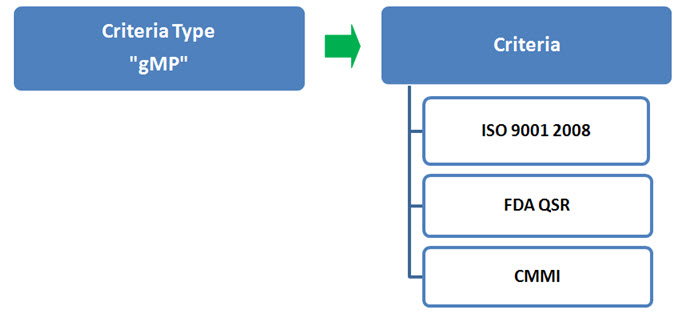
Criteria records in SmartAuditTM contain the auditor’s checklist of sections and questions. Criteria are attached to an audit record in SmartAuditTM so that the auditor can complete the sections and questions and provide response.
All Criteria records created in SmartAuditTM must be assigned to a Criteria Type. Criteria stored in SmartAuditTM are based upon the Criteria Type template. These templates contain properties inherited by criteria based on the type. This provides consistency across criteria and avoids unnecessarily entering the same information.
Any number of Criteria Types can be created. However, criteria can only be attached to one type. It is recommended that you sort criteria into groups according to their common properties and create one criteria type for each group. In the future, each time a criteria from that group is created and based on its respective type, it will contain the same properties as other criteria within the group.
Properties inherited from the Criteria Type can be configured in the criteria record. Therefore, it is not necessary to create Criteria Types that must exactly match the needs of the criteria.
Criteria Type Policies can enforce:
· Criteria Ownership
· Approval Requirements (Approval Groups by Business Unit and/or by Criteria Type)
· Criteria Access (Viewing, Managing, etc.)
· Criteria Number specifications (auto numbering)
· Certification Information associated Training Requirements for company employees
NOTE: Typically customers define only one Criteria Type for Audit Checklists in their SmartAuditTM system to start, but are not limited to this amount. |
Before configuring criteria in the system determine your criteria workflow for a specific type of criteria and how it may be maintained in SmartAuditTM. This is an example of a common criteria type setup managed in SmartAuditTM. This is used by customers who have a centralized audit management system where the QA Audit Team owns criteria.
· This Criteria Type will be named gMP and will house all audit criteria.
· This criteria type record will be owned by the Lead Auditor Group.
· Only members from the Lead Auditor Group can create criteria records and own them.
· All SmartAuditTM users can view a criteria record; therefore, no security is required.
· All criteria will be numbered 1-CRITERIA, 2-CRITERIA, etc. with revision style of A, B, C, etc.
· A training interval of two weeks will be placed as a default for this criteria type and can be adjusted at the criteria record level later by the Lead Auditor if needed.
· After expiration, criteria must stay in the SmartAuditTM system for a retention time of seven years.
· New revisions released that are referenced to these criteria must supersede the old reference.
· Criteria will be approved and released by the Lead Auditor who creates and manages the criteria.
· Once the criteria record is released it will have a one year interval scheduled for an Effectiveness Review. The Lead Auditor will be notified of this review one month in advance.
· Training on these criteria will be controlled within the individual criteria record and not from criteria type.
The following rights must be assigned to a user to manage or view Criteria Type:
Rights |
Description |
CTP_CREATE |
Allows administrator to create a Criteria Type record.
|
CTP_DELETE |
Allows administrator to delete a Criteria Type record.
|
CTP_MANAGE |
Allows administrator to modify and manage existing Criteria Types.
|
CTP_SUPERVISOR |
Allows administrator to Change Administrator Role in Criteria Type.
|
CTP_VIEW |
Allows user to view Criteria Types.
|
ATN_VIEW |
Allows user to access numbering scheme to view and select.
|
ROL_VIEW |
Allows user to access owner role to view and select (if applicable)
|
ACT_VIEW |
Allows user to access owner to view and select (if applicable)
|
CRM_VIEW |
Allows user to access criteria review model to view and select (if applicable)
|
GRP_VIEW |
Allows user to access Review Group to View and select (if applicable)
|
Please see Rights Group to assign Rights Groups to users.
Criteria type created in the global organization can be used to create criteria records by both the global organization and any local organizations. If logging into the global organization and viewing a global criteria type, the user will only see the criteria records created under this type which was created within the global organization (not any that were created under the local organization).
1. From the Portal Page, click Smart Solutions tab > Admin and Report > Setup. Under Audit, select Auditee.
2. Click Action > Add
The Criteria Type window displays.
3. Enter information in the following fields:
Field |
Description |
Type |
Enter the name of the criteria type.
|
Description |
Enter the description of the criteria type.
|
Administrator Role |
Zoom and select an Administrator Role for this criteria type. (Only actors under this role can edit this criteria type- all others can view only.) The administrator role is assigned when the criteria type is created and can be changed only by right clicking over the Criteria Type Detail screen (it is not seen when you edit). The Criteria Type Manage and Criteria Type Supervisor rights are required to perform this function. Only actors who have this role in the system can manage (modify) the criteria type properties assigned in the system. As company policies and criteria requirements change throughout a company, the Administrator Role will allow only appropriate users to be able to modify the criteria type (approval policies, training requirements, etc.). Typically it is the Criteria Control Group who owns criteria types or even a designated system administrator. Please see How to Create a Role Please see Administrator Role
|
Apply Security |
Select the security that will be used for criteria records belonging to this type (if applicable). None – security is not applied (free for all to view and edit) Manage – security is applied for editing only (by Roles); anyone can view the criteria Manage & View – security is applied for both editing and viewing criteria by role Please see Security
|
Secured Inworks |
Click the Secured Inworks check box to keep any users with rights from being able to view or manage criteria that are in the Inworks status.
|
Secured Expire |
Click the Secured Expire check box to keep any users with rights from being able to view or manage criteria that are in the Expired status.
|
Numbering Scheme |
Select the appropriate Criteria Numbering Scheme to be used for criteria of this type. Please see How to Create a Numbering Scheme
|
Force AutoNumber in Criteria |
Click the Force AutoNumber in Criteria check box if you wish this numbering scheme to be required for criteria of this type.
|
Criteria Owner Role |
Zoom and select a Criteria Owner Role for Criteria of this type. (If an owner is not entered, the actor logged into the system when creating the Criteria automatically becomes the Owner of the Criteria.) Please see How to Create a Role
|
Criteria Owner |
Zoom and select a Criteria Owner for criteria of this type. (If an owner is not entered, the actor logged into the system when creating the criteria automatically becomes the owner of the criteria.) Please see How to Create a User
|
Grace Period For Release |
Enter the Grace Period for Release duration (for criteria training). The Grace Period is sometimes referred to as the training period for a criteria record which has been approved and is now ready for release.
Enter a numeric value in the Grace Period For Release field to specify the length of time after the criteria becomes PRERELEASED in which users will need to be trained. Once the effective date is met (after the grace period) the criteria will automatically change to a status of CURRENT and can then be used in Audit records.
|
Retention Time |
Enter a numeric value in the Retention Time field to specify the length of time after the criteria is EXPIRED in which it can later be Purged from the system by a user with appropriate rights. This value is overridden if a Date to Purge entry has already been specified in the criteria record.
|
Supersede Previous Rev. in Reference |
Check the Supersede Previous Revision In Reference check box to ensure that each new revision of a criteria record replaces the previous revision in the criteria's References folder. OR Uncheck the Supersede Previous Revision in Reference check box and criteria revisions will not update in the criteria's References folder. NOTE: This check box is typically ALWAYS checked by Pilgrim customers.
|
Allow Multiple Inworks |
Check the Allow Multiple Inworks check box to allow multiple INWORKS copies of the same criteria to exist. OR Uncheck the Allow Multiple Inworks check box and multiple INWORKS copies of the same criteria are not allowed to exist.
NOTE: This check box is typically ALWAYS unchecked by Pilgrim customers.
|
Automatically Expire Previous Revision |
Check the Automatically Expire Previous Revision check box to automatically expire a previous revision of a criteria when the new criteria becomes current. The previous revision's expiration date is updated to the date the new revision is made CURRENT. OR Uncheck the Automatically Expire Previous Revision check box to move the previous revision of a Criteria record to REVISED status. NOTE: This check box is typically ALWAYS checked by Pilgrim customers unless you wish to maintain multiple CURRENT versions of Criteria.
|
Auto Expire |
Check the Auto Expire check box to allow the criteria to move to EXPIRED status automatically when the criteria's expiration date has been met. OR Uncheck this option if you wish Review Closure instead to EXPIRE criteria when a new revision of the criteria is created and the criteria type's Automatically Expire Previous Revision check box is checked.
|
Review Model |
Review Models contain types of reviews which occur within a criteria’s life cycle and are the driving force behind standardizing your Criteria Workflow. It is recommended that review models be setup in criteria type. Without it, your criteria owner would have to manually attach reviews to every criteria record created in order to get criteria to change status. Please see How to Create a Review Model
|
Review Group |
Review Groups contain a list of predefined actors who may be responsible for approving criteria records that exist within a criteria type. If a review group is not attached to a criteria type, then the responsibility of assigning reviewers is delegated to the criteria owner. If standard approvals are required for particular criteria types, assign review groups at the criteria type level to save your criteria owner the work of having to always add approvers every time a new criteria or revision is created. Multiple review groups can be attached to a criteria type through the policies folder within the criteria type record. This configuration would take place if many different business units share the same criteria types. Please see How to Create a Group
|
Add Another |
Click this box to add another Criteria Type.
|
NOTE: Any of the options above can be changed by right clicking over the Criteria Type Detail window. |
4. Click the Save button.
Criteria Types can be edited and deleted within criteria type and can be managed accordingly by an Administrator.
1. From the Portal Page, click Smart Solutions tab > Admin and Report > Policy. Under Criteria, select Criteria Type.
The Criteria Types list displays.
2. Click
the ![]() icon to switch to local view (if applicable).
icon to switch to local view (if applicable).
3. Select the check box of the Criteria Type to edit, then select Action > Edit from the main menu.
4. Edit any information for your Criteria Type.
5. Click the Save button.
All changes should now be reflected in the list.
1. From the Portal Page, click Smart Solutions tab > Admin and Report > Policy. Under Criteria, select Criteria Type.
The Criteria Types list displays.
2. Click
the ![]() icon to switch to local view (if applicable).
icon to switch to local view (if applicable).
3. Select the check box of the Criteria Type to delete, then select Action > Delete from the main menu.
4. Click the Save button.
The object has now been removed from the system.
Sometimes an existing criteria type is similar to a criteria type that needs to be created. In those instances, it is convenient to copy the existing criteria type and make changes to the copy. The Copy function saves time and prevents duplication of efforts.
All information (e.g., review model, retention time) from the existing criteria type is copied to the new criteria type.
If all criteria types share some common information, it is possible to create a master criteria type containing this information. A copy of the master criteria type can be made each time a new criteria type is created. This common information is therefore, not re-entered in every criteria type.
Criteria Type Manage and Criteria Type Create rights are required to copy a criteria type. The administrator role is not required.
1. From the Criteria Types window, click the Type link of the criteria type to copy.
The Criteria Type window appears.
2. Click Action > Copy.
3. Enter information in the following fields:
Fields |
Description |
Type |
This field will display the name of the Criteria Type which is being copied. |
New Type |
Enter a unique identifier for the new type. |
Description |
Enter information about the criteria type. |
4. Click the Save button to save the copied criteria type.
1. From the Criteria Type Detail, right click and select Change Administrator Role option.
2. Zoom from the Administrator Role field and select new Role.
3. Click the Save button.
The Smart Criteria View right is required to view criteria records.
If security is applied to INWORKS criteria, criteria are accessible when the status is PRERELEASED and CURRENT. The number of actors who can view the criteria once it is PRERELEASED and CURRENT is limited by the Apply Security setting in the criteria type.
If security is not applied to INWORKS criteria, the criteria records are accessible to actors as soon as they are created according to the criteria type's Apply Security setting.
NOTE: Security for INWORKS criteria is set up in the criteria 's type. If the Secured Inworks check box is enabled, the INWORKS criteria is only accessible to those actors listed in the criteria type's Securities folder. Security for EXPIRED criteria is set up in the criteria 's type. If the Secured Expired check box is enabled, the EXPIRED criteria is only accessible to those actors listed in the criteria type's Securities folder. |
1. From the Portal Page, click Smart Solutions tab > Admin and Report > Policy. Under Criteria, select Criteria Type.
2. Select the Criteria Type.
3. Click Action > Edit.
4. Change the Apply Security option to Manage or Manage and View.
Option |
Description |
None |
All Actors with the criteria view right can view the documents |
Manage & View |
The Actor Role must be listed in the Criteria Type | Securities folder |
Manage |
If the criteria is: · not in INWORKS or EXPIRE status, then all actors with the Criteria View right can view the criteria. · in INWORKS status and the criteria type > Criteria Type folder > Secured Inworks check box is enabled, then the actor role must be listed in the criteria type | Securities folder and the actor must be assigned the Criteria Inwork right. · in INWORKS status and the criteria type > Criteria Type folder > Secured Inworks check box is disabled, then all actors can view the criteria. · in EXPIRE status and the document type > Document Type folder > Secured Expire check box is enabled, then the actor role must be listed in the document type >Securities folder. · in EXPIRE status and the document type > Document Type folder > Secured Expire check box is disabled, then all actors with the Smart Document View right can view the document. |
5. Click the Save button
6. Select the Criteria Type.
7. In the Criteria Type, select the Security tab.
8. Click Action > Add.
9. Zoom from the Role field and tag to select all Roles which will have access to criteria of this type.
10. Click the appropriate check boxes to Allow Edit, Allow Delete, and Allow Create options.
(View rights are added when Role is added.)
11. Click the Save button.
Who will your criteria owners be? Who will be your default criteria reviewers? In SmartAuditTM a Criteria Type Policy is used to define these types of ownerships. When you create your policy, any fields in the criteria creation screen can drive your policy. If needed, you may define different criteria reviewers for different areas creating criteria for the same types.
Criteria Type itself can drive the policy for criteria, and review ownership. The Policy tab is only used to identify if there is specific meta-data in the criteria creation process which may override this policy (i.e., different organization units or processes for criteria may have different review groups).
The policy can be driven by any of the zoomable field entries during criteria creation.
To configure a Criteria Type Policy, you must be familiar with writing the test condition in SQL statement format using the un-translated field names of any of the criteria creation entries you wish to drive the policy. These SQL statements are not checked; therefore, human intervention is required.
The Table below provides the un-translated field codes for the criteria creation screen:
Translated Field |
Code to Use for Writing the Policy |
Type |
DOT_TYPE
|
Title |
DOC_TITLE
|
Audit Duration |
CRI_AUDIT_DURATION
|
Response Type |
CRI_ART_NAME
|
Organization Unit |
DUT_ORU_CODE
|
Process |
DUT_PRC_CODE
|
Product |
DUT_PRD_CODE
|
Plant Area |
DUT_PLA_CODE
|
Comment |
DOC_MEMO
|
1. From the Portal Page, click Smart Solutions tab > Admin and Report > Policy. Under Criteria, select Criteria Type.
2. Select the Criteria Type then select the Policy tab.
3. Click Action > Add.
The Policy window displays.
4. Enter information in the following fields:
Field |
Description |
Test Sequence |
Enter a sequence number. The system looks from lowest to highest to meet the requirement.
|
Test Condition |
Enter the un-translated field name.
|
Test Description |
Enter a description that explains what the test condition means.
|
Document Role |
Zoom to select a Document Role
|
Document Owner |
Zoom to select a Document Owner.
|
Review Group |
Zoom to select a Review Group.
|
Review Model |
Enter or select a Review Model.
|
Add Another |
Click Add Another to add another policy.
|
5. Click the Save button.
Do you wish to track criteria training using SmartAuditTM? There may be certain company audit criteria which employees are required to read and understand. The Certification Information tab is available in Criteria Types and within every criteria record in order for customers to track employee training and sign-off on such criteria.
Criteria Training Requirements are setup under the Certification Information folder by role. Any users who have since been assigned a role that has been added to the Certification Information folder must now read the criteria and sign-off on it in the system as it may have been made a training requirement.
Option |
Definition |
Certification Information – Criteria Type |
Any roles setup under the Certification Information folder at Criteria Type level will transfer to every criteria record which is created and maintained under this type. If the criteria owner wishes to remove the role at the criteria level they can do so with appropriate rights.
|
Certification Information - Criteria |
If roles are not assigned at the Criteria Type under Certification Information, the criteria owner can assign roles needing training under the individual criteria record. Any user with this role will be notified once the criteria has been released and will be required to sign-off that they have read and understood the criteria.
|
A Requirement is a criteria record that one must read and understand. It usually contains information necessary for an individual to fulfill their job function. Decisions need to be made such as:
· What criteria record training requirements are needed and for whom?
· How long does a person have to complete the requirement?
· Whether trainer sign off is required to obtain the certification.
1. From the Portal Page, click Smart Solutions tab > Admin and Report > Policy. Under Criteria, select Criteria Type.
2. Select the Criteria Type.
3. From the Criteria Type select the Certification Information tab.
4. Click the Edit Certification Information button and identify appropriate information.
Fields |
Description |
Must Have |
If the requirement is a must have for the roles it is associated with. The setting can be changed for the requirement at the role level.
|
Complete within Duration Days |
The number of days allowed for completion of the requirement. If not specified, the completion date is the day the requirement is associated with the actor record.
|
Need Training |
Does not apply unless you have SmartTrainTM.
|
Need Assessment |
Does not apply unless you have SmartTrainTM.
|
Refresher Certification Required |
Does not apply unless you have SmartTrainTM. |
Refresher Advance Notice Days |
Does not apply unless you have SmartTrainTM.
|
Requires Training if Previously Trained |
Does not apply unless you have SmartTrainTM.
|
Need Trainer Sign-off |
If trainer sign off is required in order for the requirement to be fulfilled.
|
Revision Certification Required? |
If Yes, revision certification is required anytime criteria is revised.
|
Refresher Interval Days |
Refresher certification is required, in the days specified, when the criteria is revised.
|
Grace Days for Refresher |
The number of days after the refresher interval occurs that an individual must be re-certified. If the refresher is not completed within that time frame, certification is expired.
|
5. Click Action > Add.
6. Zoom from the Role field and select all the roles which would require certification on any criteria records of this type (if applicable).
7. Click the Save button.
Please see Numbering Schemes under System Wide Setup.
Criteria Statuses represent the different stages of a criteria’s life cycle; however they are specifically used to activate reviews. Statuses are used when setting up a Criteria Review Type and review model schedule. These statuses can be configured to the company's standard by adding new statuses or editing the label of the existing statuses; however, this is not recommended as most Pilgrim customers use the system defaults.
Additional statuses are only needed if you perform more than one review between the following statuses:
· INWORKS and PRERELEASED (i.e., Content Review, Management Review, Training Review)
· CURRENT and PREEXPIRED (i.e., Effectiveness Review, Expiration Review)
NOTE: In a typical implementation of SmartAuditTM customers have not added additional reviews to the current criteria workflow as the single reviews have met requirements. When more reviews are added this means more clicking for end users; therefore, it is not recommended you use additional reviews or add additional statuses. |
Default Statuses
Primary Status |
Description |
INWORKS |
Typically the first Status of the Criteria workflow. This Status activates the first review in the Criteria workflow which usually needs to be performed in order to release the criteria for training and use.
|
PRERELEASED |
Once the Release review is Closed, the Criteria Status will automatically change to a PRERELEASED Status and remain in this Status until the Effective Date is met within the criteria record. The PRERELEASED Status works with the Grace Period for Release option in Criteria Type and typically represents the training period for the criteria.
|
CURRENT |
Once the Effective Date is met in the document record, SmartComm will automatically change the Criteria Status from PRERELEASED to CURRENT.
This Status allows for the Criteria to now be used in Audit records.
This Status may also activate an optional periodic review which may be used for specific types of criteria in which verification for effectiveness needs to be determined (1, 2, 3 year Periodic review to determine if criteria is still valid).
|
PREEXPIRE |
If a Review is performed after criteria has become current (i.e., periodic review) and it is determined that criteria is no longer valid and will not be revised in the system, then once the periodic review is closed by the criteria owner the document will change to a Status of PREEXPIRE.
|
EXPIRED |
Once the Expiration Date is met in the criteria record, SmartComm will automatically change the Criteria Status from PREEXPIRE to EXPIRED. If a Retention Date is set at Criteria Type for the criteria, the system will automatically post a Purge Date in the criteria when it expires; however, the criteria administrator would later need to purge the criteria from the system.
|
The following rights must be assigned to a user to manage or view criteria status:
Rights |
Description |
CSS_MANAGE |
Allows administrator to add new criteria status, modify existing status, or delete status.
|
CSS_VIEW |
Allows user to access criteria status to view and select.
|
Please see Rights Group to assign Rights Groups to users.
· Global Criteria Statuses will be inherited by all local organizations.
· Local Criteria Statuses will only be viewed and used within that local organization.
1. From the Portal Page, click Smart Solutions tab > Admin and Report > Setup. Under Audit, select Criteria Status.
2. Click Action > Add.
3. Enter information in the following fields:
Fields |
Description |
Status |
Enter a secondary status. |
Primary Status |
From the drop down select the appropriate primary status. Primary Status = INWORKS if new status will be before criteria becomes CURRENT Primary Status = CURRENT if new status will be after criteria is made CURRENT and before expiration |
Add Another |
Click this box to add another criteria status. |
4. Click the Save button.
Criteria statuses can be edited and deleted within criteria status and be managed accordingly by an administrator.
1. From the Portal Page, click Smart Solutions tab > Admin and Report > Setup. Under Audit, select Criteria Status.
The Criteria Statuses list displays.
2. Click
the ![]() icon to switch to local view (if applicable).
icon to switch to local view (if applicable).
3. Select the check box of the Criteria Status to edit, then select Action > Edit from the main menu.
4. Edit any information for your Criteria Status.
5. Click the Save button.
All changes should now be reflected in the list.
Criteria statuses can only be deleted from SmartSolve© if the status has not been attached to any SmartSolve© records.
1. From the Portal Page, click Smart Solutions tab > Admin and Report > Setup. Under Audit, select Criteria Status.
The Criteria Statuses list displays.
2. Click
the ![]() icon to switch to local view (if applicable).
icon to switch to local view (if applicable).
3. Select the check box of the Criteria Status to delete, then select Action > Delete from the main menu.
4. Click the Save button.
The object has now been removed from the system.
Criteria Phases are used in criteria records, and are incorporated into Criteria Review Models. When a review is completed, the phase may be changed to indicate the current stage or milestone in the criteria lifecycle.
It is not necessary to link reviews to phases; however, it may be helpful for more complicated criteria models that incorporate many reviews. The progress of the criteria can be easily determined by looking at the criteria's current phase.
Example Phases:
Status = |
INWORKS |
CURRENT |
EXPIRED |
Phase = |
PENDING APPROVAL or UNDER RELEASE REVIEW (if Approval is Started) |
PERIODIC REVIEW SCHEDULED or UNDER REVIEW (if Approval is Started) |
PURGE DATE SCHEDULED |
The following right must be assigned to a user to view criteria phases:
Rights |
Description |
PHS_MANAGE |
Allows administrator to add new criteria phase, modify existing phase, or delete phase.
|
CPH_VIEW |
Allows user to access criteria phase to view and manage.
|
Please see Rights Group to assign Rights Groups to users.
· Global Criteria Phases will be inherited by all local organizations.
· Local Criteria Phases will only be viewed and used within that local organization.
1. From the Portal Page, click Smart Solutions tab > Admin and Report > Setup. Under Audit, select Criteria Phase.
2. Right click and select Add.
3. Enter information in the following fields:
Fields |
Description |
Name |
Enter a name for the phase. |
Description |
Enter a description of the phase. |
Add Another |
Click this box to add another criteria phase. |
4. Click the Save button.
Criteria Phases can be edited and deleted within the criteria phase and can be managed accordingly by an administrator.
1. From the Portal Page, click Smart Solutions tab > Admin and Report > Setup. Under Audit, select Criteria Phase.
The Phases list displays.
2. Click
the ![]() icon to switch to Local view (if applicable).
icon to switch to Local view (if applicable).
3. Select the check box of the Criteria Phase to edit, then select Action > Edit from the main menu.
4. Edit any information for your Criteria Phase.
5. Click the Save button.
All changes should now be reflected in the list.
Criteria Phases can only be deleted from SmartSolve© if the phase has not been attached to any SmartSolve© records.
1. From the Portal Page, click Smart Solutions tab > Admin and Report > Setup. Under Audit, select Criteria Phase.
The Phases list displays.
2. Click
the ![]() icon to switch to local view (if applicable).
icon to switch to local view (if applicable).
3. Select the check box of the Criteria Phase to delete, then select Action > Delete from the main menu.
4. Click the Save button.
The object has now been removed from the system.
Please see Groups under System Wide Setup.
Please see Checklist under System Wide Setup.
Review Escalation defines the action that must occur in the system to ensure that the review process does not stop. If a reviewer does not respond to the review in the allowed time defined, an additional action may be enforced.
If the escalation policy is attached the review group, then the policy will be enforced on every level identified within the review group. For example, if review group has three levels of reviewers, the escalation could apply the same for all three levels.
Also, each level of reviewers listed in the review group can have a unique escalation policy attached. The system looks first for the level specific escalation policy and if not found will apply the escalation policy attached to the review group.
The following right must be assigned to a user to manage and view review escalations:
Rights |
Description |
RES_MANAGE |
Allows administrator to add new review escalation, modify existing escalation, or delete escalation.
|
RES_VIEW |
Allows user to access review escalation to view.
|
Please see Rights Group to assign Rights Groups to users.
· Global Review Escalation will be inherited by all local organizations.
· Local Review Escalation will only be viewed and used within that local organization.
The following escalation steps can be applied to criteria review:
Additional Action |
Description |
Escalate to Alternate |
The review is re-assigned to the alternate actor (from Actor Role)
|
Escalate to Manager |
The review is re-assigned to the actor's manager
|
None |
This step indicates that no additional action will be taken except for notification only
|
Escalate to Owner |
The review is re-assigned to the record owner.
|
Skip |
The review is no longer needed by this actor and moves to the next level.
|
Stop |
The review routing has stopped and the record has been sent back to the owner.
|
Escalate to Org Unit Head |
The review is re-assigned to the actor's org unit head.
|
The following Reviewers are included in the Routing sheet for Criteria Review:
· Level 1 Lead Auditor
· Level 2 Auditor
· Level 2 Auditor
· Level 3 QA Coordinator
Step 1 – No escalation will be used for level 1 or level 3; however, the level 2 auditors will have 3 business days to approve the criteria from the date the criteria has been routed to this level. If 3 business days have passed, the system needs to skip these reviewers all together and route to the next level.
The following steps will be applied to the escalation policy:
Step |
Additional Action |
Allowed Time |
1 |
Skip |
3 Business Days |
Review Escalation is an optional feature in the system and is attached to Groups (if groups are used for criteria reviews).
1. From the Portal Page, click Smart Solutions tab > Admin and Report > Policy. Under Criteria, select Escalation.
2. Click Action > Add.
3. Enter information in the following fields:
Fields |
Description |
Code |
Enter a code for the policy. |
Name |
Enter a description of the escalation policy. |
Add Another |
Click this box to add another escalation. |
4. Click the Save button
5. Select the Step tab.
6. Click Action > Add.
7. Enter information in the following fields:
Fields |
Description |
Step |
Enter a number in the field. |
Additional Action |
Click the drop down list and select the additional action to occur in this step. |
Allowed Time |
Enter the time the escalation will trigger if minimum requirements are not met within the review. |
Add Another |
Click this box to add more steps if needed. |
8. Click the Save button.
Additional actions can be attached each step configured within the escalation policy. For example, if a reviewer is skipped the system can be setup to also notify the record owner so that they know the escalation policy has taken effect.
The following Addition Actions can be applied to each Escalation Step:
Additional Action |
Description |
Add Alternate |
The review is re-assigned to the alternate actor (from Actor Role)
|
Add Manager |
The review is re-assigned to the actor's manager
|
Add Org Unit Head |
The review is re-assigned to the actor's org unit head.
|
Notify Alternate |
The actor’s alternate is notified of the escalation step taken.
|
Notify Manager |
The actor’s manager is notified of the escalation step taken.
|
Notify Owner |
The criteria owner is notified of the escalation step taken.
|
Notify Org Unit Head |
The org unit head of the actor’s department is notified of the escalation step taken.
|
1. From the escalation policy detail, select the Additional Actions folder.
2. Click Action > Add.
3. Select the Additional Action option which will occur in this Step.
4. Click the Save button.
The following options are available within Review Escalation and can be managed accordingly by an administrator:
· Review Escalations can be edited and deleted
· Review Escalations must be attached to review groups in order to be used.
1. From the Portal Page, click Smart Solutions tab > Admin and Report > Policy. Under Criteria, select Escalation.
The Review Escalations list displays.
2. Click
the ![]() icon to switch to local view (if applicable).
icon to switch to local view (if applicable).
3. Select the check box of the escalation to edit, then select Action > Edit from the main menu.
4. Edit any information for your Escalation.
5. Click the Save button.
All changes should now be reflected in the list.
Review Escalations can only be deleted from SmartSolve© if the escalation has not been attached to any review groups.
1. From the Portal Page, click Smart Solutions tab > Admin and Report > Policy. Under Criteria, select Escalation.
The Review Escalations list displays.
2. Click
the ![]() icon to switch to local view (if applicable).
icon to switch to local view (if applicable).
3. Select the check box of the escalation to delete, then select Action > Delete from the main menu.
4. Click the Save button.
The object has now been removed from the system.
1. From the Portal Page, click Smart Solutions tab > Admin and Report > Setup. Under System Wide, select Group.
The Groups list displays.
2. Click
the ![]() icon to switch to local view (if applicable).
icon to switch to local view (if applicable).
3. Select the check box of the group to attach the escalation to, then select Action > Edit from the main menu.
4. From the escalation drop down menu select the escalation policy to be used within this group
5. Click the Save button.
The escalation policy has now been attached to the group.
1. From the Portal Page, click Smart Solutions tab > Admin and Report > Setup. Under System Wide, select Group.
The Groups list displays.
2. Click
the ![]() icon to switch to local view (if applicable).
icon to switch to local view (if applicable).
3. Access the Group Role folder by left clicking over the and selecting Role.
4. Access the Level Detail folder by left clicking over the and selecting Level Detail.
5. Select the check box of the level to attach the escalation to, then select Action > Edit from the main menu.
6. From the Escalation drop down menu select the escalation policy to be used within this level
7. Click the Save button.
The escalation policy has now been attached to the group.
Please see Rules under System Wide Setup.
SmartAuditTM allows you to create as many Review Types as you need for your criteria workflows. However, it is typical for a criteria record to have two reviews attached which are used for criteria release and criteria expiration. SmartAuditTM comes with a review library containing configured types of reviews which need to be performed within criteria workflows.
You must have at least one review attached to your criteria in order to get the criteria status from INWORKS to CURRENT. Also, you can only have one active review at a time within a criteria workflow; however, within that review you can have different levels of reviewers.
Some example Criteria Reviews could include:
Review Types |
Description |
One-time Reviews |
Review which is performed one time prior to the criteria becoming CURRENT (when the draft has been completed and needs to be approved for release).
|
Periodic Reviews |
Reviews that may need to be performed after the criteria has been issued (made CURRENT). An example of this type of review may be a three year periodic review on certain types of criteria to ensure criteria records are still valid and can be used in audits.
|
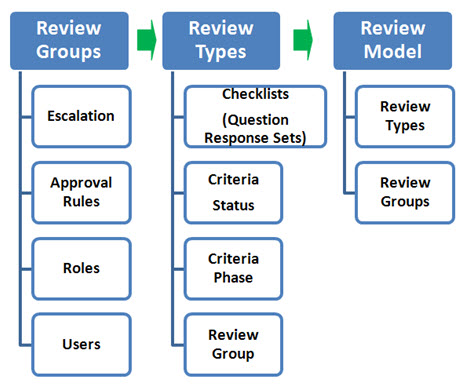
This Matrix illustrates the setup tables involved with criteria review. You may not setup all of these tables for your criteria workflows.
One default criteria review type, called DEFAULT CRITERIA is already entered in the criteria review type master file upon installation. This criteria review type is provided as an optional criteria review type for use in the organization's review models. The default criteria review type:
Is completely customizable
Can be edited or deleted
Automatically attaches to all new Review Models anytime a new model is configured. If you do not need to use this default type, it must be detached.
NOTE: Most Pilgrim customers create their own review types or edit the name of the default under the GLOBAL Organization (i.e., Release Review.) |
The following rights must be assigned to a user to manage or view criteria review type:
Rights |
Description |
RTC_MANAGE |
Allows administrator to add new criteria type, modify existing criteria type, or delete criteria type.
|
RTC_VIEW |
Allows user to access criteria type to view and select.
|
Please see Rights Group to assign rights groups to users
· Global Criteria Review Types will be inherited by all local organizations.
· Local Criteria Review Types will only be viewed and used within that local organization.
1. From the Portal Page, click Smart Solutions tab > Admin and Report > Policy. Under Criteria, select Review Type.
The Types window displays.
2. Click Action > Add.
3. Enter information in the following fields.
Field Name |
Description |
Name |
The name of the review (will later show up under the criteria record).
|
Review Purpose |
Statement that will be stamped for each approver signing off on the review.
|
Review Group |
If more than one approver must approve the criteria set up a review group. Some common scenarios: Only the criteria owner needs to approve (do not add review group and criteria owner will automatically show up as criteria reviewer) – most common scenario. Approval groups may be specific to business units/operations who own criteria within the type. If this is the case then review groups are setup at the criteria type policy level rather than here under the review type.
|
Analysis Code |
The purpose of the analysis code field is to enter a specific code representing the record to which it belongs. The record being created will be synonymous with the analysis code when a report is run. This field is typically not used by Pilgrim customers and can be hidden using the Forms Configurator.
|
Checklist |
Add quality checks to this review to ensure that the review is not closed until all checks have been addressed (see next section). This field is typically not used by Pilgrim customers and can be hidden using the Forms Configurator.
|
Auto Close |
If checked, the review automatically closes once the last approval rule is met (approver approves). If not checked, the criteria owner is notified once the last approval is complete. The criteria owner must manually close the review in the criteria to change the status (this field is typically checked to eliminate extra clicking).
|
Applicable Status |
The status that will activate the review in the criteria (i.e., INWORKS). Always set the INWORKS status if this is the first review performed in the criteria workflow. Always set to CURRENT if you are attaching a Periodic Review Type.
|
NOTE: Failure to configure Applicable Status correctly will impact how the criteria workflow performs. |
|
To Status |
The status the criteria will change to once the review is closed (i.e., PRERELEASED). Always set the PRERELEASED status if this is the first review performed in the criteria workflow. Always set to PREEXPIRED if you are attaching a Periodic Review Type.
|
NOTE: Failure to configure To Status correctly will impact how the criteria workflow performs. |
|
Phase on Start |
The phase the criteria will change to once the review is routed (i.e., UNDER RELEASE REVIEW).
|
Phase on Close |
The phase the criteria will change to once the review is closed (i.e., EFFECTIVENESS REVIEW SCHEDULED).
|
Add Another |
Click this box to add another type.
|
4. Click the Save button.
The Review Type is now displayed in the system.
Example Criteria Review Type:
Please see Groups to setup and assign Review Groups to Criteria Review Types.
Please see Checklists to setup and assign Checklists to Criteria Review Types.
Please see Criteria Status to setup Criteria Statuses.
Please see Criteria Phase to setup Criteria Phases.
The following options are available within Criteria Review Type and can be managed accordingly by an administrator:
· Criteria Review Types can be edited and deleted.
· Criteria Types can be attached to Criteria Review Models or directly to criteria records.
1. From the Portal Page, click Smart Solutions tab > Admin and Report > Policy. Under Criteria, select Review Type.
The Types list displays.
2. Click
the ![]() icon to switch to local view (if applicable).
icon to switch to local view (if applicable).
3. Select the check box of the Criteria Review Type to edit, then select Action > Edit from the main menu.
4. Edit any information for your criteria review type.
5. Click the Save button.
All changes should now be reflected in the list.
Criteria review types can only be deleted from SmartSolve© if the criteria review type has not been attached to any criteria review models.
1. From the Portal Page, click Smart Solutions tab > Admin and Report > Policy. Under Criteria, select Review Type.
The Types list displays.
2. Click
the ![]() icon to switch to local view (if applicable).
icon to switch to local view (if applicable).
3. Select the check box of the Criteria Review Type to delete, then select Action > Delete from the main menu.
4. Click the Save button.
The object has now been removed from the system.
Please see How to Create a Criteria Review Model
Please see How to Create a Criteria Review Model
Review Models are provided in order to define all of the review schedules that are necessary to define a criteria workflow. Any number of reviews can be added to your review models; however, most customers only use one or two. Review Models configure the following requirements:
· Which reviews need to be performed within the criteria and who will be assigned.
· When in the criteria each review will be performed (at which Status and/or Phase).
· What is the estimated time needed to complete the review (if applicable).
· Criteria Review Models MUST be attached to criteria types in order to enforce the criteria workflow.
The following rights must be assigned to a user to manage or view criteria review model:
Rights |
Description |
CRM_MANAGE |
Allows administrator to add new criteria models, modify existing models, or delete models.
|
CRM_VIEW |
Allows user to access the criteria model to view and select.
|
Please see Rights Group to assign Rights Groups to users
· Global Criteria Review Models will be inherited by all local organizations.
· Local Criteria Review Models will only be viewed and used within that local organization.
1. From the Portal Page, click Smart Solutions tab > Admin and Report > Policy. Under Criteria, select Review Model.
2. Click Action > Add.
The Review Model window displays.
3. Enter information in the following fields:
Fields |
Description |
Code |
Enter a review model code.
|
Name |
Enter a name for the review model.
|
Document Status |
Select a status from the drop down list. This is the start status of the Criteria (i.e., INWORKS).
|
Phase |
Select a phase from the drop down list. This is the start phase of the Criteria (i.e., NEEDS RELEASE REVIEW).
|
Add Another |
Click this box to add more steps if needed.
|
4. Click the Save button.
The Review Model displays.
5. From the newly created Review Model, click the Schedule link.
The Schedule displays.
6. Delete the DEFAULT CRITERIA Review Type by checking off the Review Type and clicking Action > Delete.
No Review Type should be listed in the Schedule now
7. Click Action > Attach to attach the Review Type you wish to first apply to the model.
8. Zoom from the Attach field and select a Review Type Name.
9. Select a Review Option.
10. Enter the Interval when the Review will be Scheduled (if this is one time that will be routed after workflow is complete leave blank).
11. Enter an Advance Notice interval for when the system notifies the Criteria Owner that the Review is upcoming (only use if step 8 above is setup).
12. Select a Phase.
13. Click the Save button.
The following options are available within Criteria Review Model and can be managed accordingly by an administrator:
· Criteria Review Models can be edited and deleted
· Criteria Review Models MUST be attached to criteria types in order to enforce the criteria workflow.
1. From the Portal Page, click Smart Solutions tab > Admin and Report > Policy. Under Criteria, select Review Model.
The Review Models list displays.
2. Click
the ![]() icon to switch to local view (if applicable).
icon to switch to local view (if applicable).
3. Select the check box of the criteria review model to edit, then select Action > Edit from the main menu.
4. Edit any information for your criteria review model.
5. Click the Save button.
All changes should now be reflected in the list.
Criteria review models can only be deleted from SmartSolve© if the review model has not been attached to any criteria types.
1. From the Portal Page, click Smart Solutions tab > Admin and Report > Policy. Under Criteria, select Review Model.
The Review Models list displays.
2. Click
the ![]() icon to switch to local view (if applicable).
icon to switch to local view (if applicable).
3. Select the check box of the criteria review model to delete, then select Action > Delete from the main menu.
4. Click the Save button.
The object has now been removed from the system.
Criteria review models MUST be attached to criteria types in order to enforce the criteria workflow
1. From the Portal Page, click Smart Solutions tab > Admin and Report > Policy. Under Criteria, select Criteria Type.
The Criteria Types list displays.
2. Click
the ![]() icon to switch to local view (if applicable).
icon to switch to local view (if applicable).
3. Select the check box of the criteria type to attach the review model to, then select Action > Edit from the main menu.
4. From the Review Model drop down menu select the review model to be attached to the criteria type
5. Click the Save button.
The Review Model has now been attached to the Criteria Type
Upon installation, the Criteria Library contains the ISO Checklist.
The Criteria Library allows users to create custom criteria by using the copy function and then pasting the selected criteria into a criterion record.
NOTE: The Criteria Library master file is not modifiable. |
The following rights must be assigned to a user to view the criteria library:
Rights |
Description |
STL_VIEW |
Allows user to access the criteria library to view and select.
|
Please see Rights Group to assign Rights Groups to users
Applicable standards are the actual source names of industry standard checklists which can be referenced in criteria records.
The following rights must be assigned to a user to manage or view applicable standards:
Rights |
Description |
APS_MANAGE |
Allows administrator to add new applicable standards, modify existing standards, or delete standards.
|
APS_VIEW |
Allows user to access applicable standards to view and select.
|
Please see Rights Group to assign Rights Groups to users
· Global Applicable Standards will be inherited by all local organizations.
· Local Applicable Standards will only be viewed and used within that local organization.
1. From the Portal Page, click Smart Solutions tab > Admin and Report > Setup. Under Audit, select Applicable Standard.
The Applicable Standards window displays.
2. Click Action > Add.
3. Enter the Standard Name and Description.
4. Click the Save button.
The following options are available within Applicable Standard objects and can be managed accordingly by an administrator:
Applicable Standards can be edited and deleted
Applicable Standards can later be attached to Audit Criteria and Audit Records.
1. From the Portal Page, click Smart Solutions tab > Admin and Report > Setup. Under Audit, select Applicable Standard.
The Applicable Standards list displays.
2. Click
the ![]() icon to switch to local view (if applicable).
icon to switch to local view (if applicable).
3. Select the check box of the Applicable Standard to edit, then select Action > Edit from the main menu.
4. Edit any information for your Applicable Standard.
5. Click the Save button.
All changes should now be reflected in the list.
Applicable Standards can only be deleted from SmartSolve© if the standard has not been attached to any SmartSolve© records.
1. From the Portal Page, click Smart Solutions tab > Admin and Report > Setup. Under Audit, select Applicable Standard.
The Applicable Standards list displays.
2. Click
the ![]() icon to switch to local view (if applicable).
icon to switch to local view (if applicable).
3. Select the check box of the applicable standard to delete, then select Action > Delete from the main menu.
4. Click the Save button.
The object has now been removed from the system.