Please select the object link below for more information on how to configure the object
Object |
Shared with other SmartSolve© Applications |
Required for SmartCAPATM |
No |
No |
|
No |
No |
|
No |
No |
|
No |
No |
|
No |
No |
|
No |
No |
|
No |
No |
|
No |
No |
|
No |
No |
|
No |
No |
|
No |
No |
|
No |
No |
|
No |
No |
|
Yes |
No |
|
No |
No |
|
Yes |
No |
|
No |
No |
|
No |
No |
|
No |
No |
SmartCAPATM comes with five main Task Types that can be setup in your system:
· Task
· Correction and Product Correction
Each Task Type may involve different inputs and different end user transactions based on the policies the administrator enables within each type during setup.
You do NOT have to use all tasks (you choose which ones you need).
Some Tasks have built in requirements such as approvals (Correction, Investigation, & Implementation).
You can build a library of many tasks underneath each Task Type (you will name your tasks).
Tasks can have sub tasks (these later become Task Items in the issue record).
You define the order of your tasks (sequential/parallel), who performs them, and the minimum requirements for completing tasks.
You can make tasks Optional, Recommended, or Required within an issue (Required tasks cannot be deleted or aborted by the issue or task owner).
Tasks can be Escalated to other users or emails can be sent if tasks are late in response.
The following rights must be assigned to a user to manage or view Issue Tasks:
Rights |
Description |
TSM_MANAGE |
Allows administrator to add new Issue Task Types, modify existing Task Types, or delete Task Types.
|
TSM_VIEW |
Allows user to access Issue Tasks Types to view and select.
|
Please see Rights Group to assign Rights Groups to users
· Global Issue Task Types will be inherited by all local organizations.
· Local Issue Task Types will only be viewed and used within that local organization.
Tasks, better known as General Tasks, are anything you need them to be. There is no built in business logic for this type of task (no approvals) and the only thing required of the task owner assigned is to sign-off the task once it is complete.
Some examples of General Tasks could include:
· Notify Affected Party
· Notify Customer
· Send Customer Closure Letter
· Notify FDA (send 30-day MDR)
· Schedule a Meeting with MRB
· Notify Corporate
NOTE: Tasks can also be attached as Sub Tasks to other Tasks |
The following end user transactions could occur in this Task Type based on configurations made by an administrator:
Step |
Transaction |
Description |
1 |
Assign Task Items (Sub Tasks) |
Optional Task owner can assign other users to the task.
|
2 |
Sign-off Task Items (Sub Tasks) |
Optional Task item owner can sign-off task items.
|
3 |
Sign-off Checklist |
Optional Sign-off is required only if a checklist is attached. Task owner must sign-off on all checklist questions.
|
4 |
Sign-off Task |
Required Task owner must sign-off task in order to close the task.
|
1. From the Portal Page, click Smart Solutions tab > Admin and Report > Policy. Under Issue Task Type select Task.
2. Click Action > Add.
3. Enter information in the following fields:
Task Fields |
Description |
Name |
Enter a name for the task.
|
Analysis Code |
Analysis code is a free text field used in reporting. The purpose of the Analysis Code field is to enter a specific code representing the record to which it belongs. The record being created will be synonymous with the analysis code when a report is run.
|
Reference Document No. |
If using SmartDocTM, SmartAuditTM, or SmartTrainTM, you can associate a procedure or work instruction with the task. Zoom to select the record from this field.
|
Checklist |
An administrator can add quality checks to the task to ensure that the task cannot not be signed-off until all checks have been addressed. Please see How to Create Checklists.
|
Description |
Enter a description for the task.
|
Add Another |
Click this box to add another task.
|
4. Click the Save button.
The task has now been added to the system.
Containment Tasks (or immediate actions) are anything you need them to be. There is no built in business logic for this type of task (no approvals) and the only thing required of the task owner assigned is to sign-off the task once it is complete.
Some examples of Containment Tasks could include:
· Immediate Action
· Move Product To NC Hold Area
· Move Product To Quarantine
You may find that your end users could be handling most if not all of their containment tasks within the exception itself, rather than using a containment task in an issue. The Activity folder within the exception record can be used to document containment actions. The exception owner can enter all activities associated with the quality exception.
It is usually only when you need to assign other individuals to containment or immediate action activities that you may choose to use the Containment Task in the issue.
The following end user transactions could occur in this Task Type based on configurations made by an administrator:
Step |
Transaction |
Description |
1 |
Assign Task Items (Sub Tasks) |
Optional Task owner can assign other users to the task.
|
2 |
Sign-off Task Items (Sub Tasks) |
Optional Task item owner can sign-off task items.
|
3 |
Sign-off Checklist |
Optional Sign-off is required only if a checklist is attached. Task owner must sign-off on all checklist questions.
|
4 |
Sign-off Task |
Required Task owner must sign-off task in order to close the task. Task can also be set to auto close when all dispositions have been signed off (Step 2 above).
|
1. From the Portal Page, click Smart Solutions tab > Admin and Report > Policy. Under Issue Task Type select Containment.
2. Click Action > Add.
The Containment Task window displays.
3. Enter information in the following fields:
Task Fields |
Description |
Name |
Enter a name for the containment task.
|
Analysis Code |
Analysis code is a free text field used in reporting. The purpose of the Analysis Code field is to enter a specific code representing the record to which it belongs. The record being created will be synonymous with the analysis code when a report is run.
|
Reference Document No. |
If using SmartDocTM, SmartAuditTM, or SmartTrainTM, you can associate a procedure or work instruction with the task. Zoom to select the record from the field.
|
Checklist |
An administrator can add quality checks to the task to ensure that the task cannot not be signed-off until all checks have been addressed. Please see How to Create Checklists
|
Description |
Enter a description for the containment task.
|
Add Another |
Click the check box to create another containment task.
|
4. Click the Save button.
The task has now been added to the system.
As defined in the QSR Manual, correction refers to repair, rework, or adjustment and relates to the existing nonconformity. Correction (MRB) Tasks contain all of the elements needed to perform MRB review and disposition of defective products. You can define requirements to complete the task when you use the Correction Task.
What is MRB?
MRB (Material Review Board) may be needed with certain types of product nonconformances. Within the Correction Task, you can pre-define who is on these boards. The MRB recommends the types of dispositions needed to be carried out for the complaint.
What are Dispositions?
In SmartCAPATM, dispositions are considered task items within the Correction Task and contain the actions needed to be carried out for the product.
Some examples of Disposition Sub Tasks could include:
· Repair
· Return To Vendor
· Use As Is
· Rework
· Re-inspect
Which task do you use for correction? It depends on how you are recording exceptions and how many types of dispositions need to be recorded within your correction process. Use the matrix below to learn how these two types of Correction Tasks differ and which one would best fit your correction process.
Task Type |
Task Type Description |
Correction |
Use if: · only recording one primary part and one failure mode in the product exception. · you only need to apply one MRB approval within the issue prior to sign off of dispositions. · you wish to assign multiple dispositions to one single Failure Mode.
|
Product Correction |
Use if · recording more than one failed part in the Product Exception. · recording more than one Failure Mode in the Product Exception. · you need to apply multiple MRB approvals with different Disposition Types (i.e., Preliminary, Final, etc.) to the correction. · you need to assign multiple dispositions to multiple Failure Modes.
|
The following end user transactions could occur in this task type based on configurations made by an administrator:
Step |
Transaction |
Description |
1 |
Assign Task Items
|
Optional Task owner can assign other users to the task.
|
2 |
Sign-off Task Items
|
Optional Task item owner can sign-off task items.
|
3 |
Assign Dispositions (Sub Tasks) |
Optional Task owner can assign disposition sub tasks to users who will later have to mark them complete.
|
4 |
Perform MRB Approval
|
Optional Approval sign-off is required only if a disposition is attached that requires approval or if MRB approval is required in the Correction Task. Approval routing must be completed by designated rule before disposition sub tasks can be signed-off (see Step 5).
|
5 |
Sign-off Dispositions (Sub Tasks) |
Optional Sign-off is required only if a disposition sub task is attached. All dispositions must be marked as complete in order for the correction task to be able to be closed (see Step 7).
|
6 |
Sign-off Checklist |
Optional Sign-off is required only if a checklist is attached. Task owner must sign-off on all checklist questions.
|
7 |
Sign-off Task |
Required Task owner must sign-off task in order to close the task; or task can be set to auto close when all dispositions have been signed off (Step 5 above).
|
1. From the Portal Page, click Smart Solutions tab > Admin and Report > Policy. Under Issue Task Type select Correction.
2. Click Action > Add.
3. Enter information in the following fields:
Task Fields |
Description |
Name |
Enter a name for the correction task.
|
Analysis Code |
Analysis code is a free text field used in reporting. The purpose of the Analysis Code field is to enter a specific code representing the record to which it belongs. The record being created will be synonymous with the analysis code when a report is run.
|
Reference Document No. |
If using SmartDocTM, SmartAuditTM, or SmartTrainTM, you can associate a procedure or work instruction with the task. Zoom to select the record from the field.
|
Checklist |
An administrator can add quality checks to the task to ensure that the task cannot not be signed-off until all checks have been addressed. Please see How to Create Checklists.
|
Description |
Enter a description for the correction task.
|
Add Another |
Click the check box to create another correction task.
|
4. Click the Save button.
The task has now been added to the system.
1. From the Portal Page, click Smart Solutions tab > Admin and Report > Policy. Under Issue Task Type select Product Correction.
2. Click Action > Add.
The Product Correction Task entry window displays.
3. Enter information in the following fields.
Task Fields |
Description |
Name |
Enter a name for the product correction task.
|
Analysis Code |
Analysis code is a free text field used in reporting. The purpose of the Analysis Code field is to enter a specific code representing the record to which it belongs. The record being created will be synonymous with the analysis code when a report is run.
|
Capture Failure Mode by Disposition |
Check this box to assign failure modes when the disposition is created and have the failure modes display in the task form.
|
Enforce Quantity on Closure |
Check this box if you want the system to ensure that each part/lot/org unit defined within the task is fully dispositioned. This makes sure the Qty Affected is equal to the Finished Disposition Quantity.
|
Reference Document No. |
If using SmartDocTM, SmartAuditTM, or SmartTrainTM, you can associate a procedure or work instruction with the task. Zoom to select the record from the field.
|
Checklist |
An administrator can add quality checks to the task to ensure that the task cannot not be signed-off until all checks have been addressed. Please see How to Create Checklists.
|
Description |
Enter a description for the product correction task.
|
Add Another |
Click this box to add another product correction task.
|
4. Click the Save button.
The Task has now been added to the system.
Dispositions are considered task Items within the correction and product correction task and contain the actions to be carried out for the product correction.
Do not set these up if you are not using any of the correction task types.
1. From the Portal Page, click Smart Solutions tab > Admin and Report > Policy. Under Issue Task Type select Disposition.
2. Click Action > Add.
3. Enter information in the following fields:
Task Fields |
Description |
Name |
Enter a name for the disposition.
|
Disposition Type |
Only select Disposition Type if using the Product Correction task.
|
Finished Quantity |
Check this box to make the dispositioned quantity update the Finished Disposition Qty in the Part Summary.
|
Approval Requirement |
Check this box if this disposition must be approved before being routed for completion.
|
Approval Group |
Select the specific approval group needed for this disposition.
|
Analysis Code |
Analysis code is a free text field used in reporting. The purpose of the Analysis Code field is to enter a specific code representing the record to which it belongs. The record being created will be synonymous with the analysis code when a report is run.
|
Reference Document No. |
If using SmartDocTM, SmartAuditTM, or SmartTrainTM, you can associate a procedure or work instruction with the task by selecting the record by zooming from the Reference Document No. field.
|
Checklist |
An administrator can add quality checks to the task to ensure that the task cannot not be signed-off until all checks have been addressed. Please see How to Create Checklists
|
Description |
Enter a description for the disposition.
|
Add Another |
Click this box to add another disposition.
|
4. Click the Save button.
The disposition has now been added to the system.
Disposition Types are only used if you incorporate the Product Correction Task Type into your workflow. The system allows you to identify different levels of dispositions that may be applied to your correction process. The following default Disposition Types come with the SmartCAPATM system; however, you can add additional types if needed:
Disposition Type |
Description |
ACCEPT |
Conforming parts defined where there is no failure mode associated with the disposition. The user will not enter any failure mode associated with the disposition.
|
FINAL |
Conforming parts defined where the failure mode associated with the disposition is captured. Also nonconforming parts where the failure modes capture actual defective quantity per failure mode . Initial dispositions. When capturing failure by disposition, the system allows the user to enter the actual defective quantity by failure mode for each part/lot.
|
PRELIMINARY |
Conforming parts define where the failure mode's actual defective quantity results are captured. Also nonconforming parts define where the failure mode's actual defective quantity per failure mode can be captured. When capturing failure by disposition, the system allows the user to enter the actual defective quantity by failure mode for each part/lot.
|
1. From the Portal Page, click Smart Solutions tab > Admin and Report > Setup. Under System Wide select Disposition Type.
2. Click Action > Add.
3. Enter the Name of your Disposition Type.
4. Click the Save button.
The object has been added to the system.
The Investigation Task contains all of the elements needed to delegate an investigation response which requires Root Cause and Proposed Action Plan entry. You can also perform approval for proposed Action Plans and Root Cause prior to completing the investigation.
What is Response?
The Response Task Item is an optional task within the Investigation Task and can be used by the lead investigator to assign someone else to provide the results of the investigation (Root Cause and/or Proposed Action Plans).
Results of Investigation
The Investigation Task contains a Results of Investigation field where investigators can summarize their response in addition to proposing root cause and actions (if applicable).
What is Response Approval?
Response Approval may be needed when certain types of products non-conform. Within the investigation task, you can pre-define who is involved with approving response. The response approval sign-off may be needed prior to actually implementing your proposed action plans.
Root Cause and Proposed Action Plans
Depending on the different types of quality exceptions that may be recorded in the SmartSolve systems (i.e., product exceptions, customer complaints, audit findings, etc.) there may be different types of information, for different exceptions, that needs to be provided by your investigators.
The Investigation Task allows a system administrator to identify different requirements needed for these different investigations (i.e., some Investigations may require Root Cause analysis, some may not).
Root Cause
If Root Cause analysis will be performed and recorded within certain types of investigations, it is important to make sure you identify which types of investigation require Root Cause. Root Cause helps investigators track the history of cause on particular types of failures because the cause is automatically tied to the failures in the system.
Proposed Action Plans
Proposed Action Plans can also be assigned to certain types of investigation tasks. These are used if you allow investigators to propose corrective and/or preventive plans of action to correct the quality exception and provide a plan to prevent the exception from reoccurring.
Please note that the investigation task only holds the proposed actions. If you wish to assign these actions to be signed off; you will also use the Implementation Task with the Investigation Task. Please see Implementation for more information.
The following end user transactions could occur in this Task Type based on configurations made by an administrator:
Step |
Transaction |
Description |
1 |
Assign Task Item (Sub Task) |
Optional Task owner can assign other users to the task.
|
2 |
Attach Root Cause |
Optional Root Cause is required only if the administrator sets up the Task Type with root cause required. The task or subtask owner must attach at least one root cause to the Investigation Task in the issue.
|
3 |
Attach Proposed Action Plans |
Optional Action plans are required only if the administrator sets up the Task Type with proposed action plans required. The task or subtask owner must attach at least one Proposed Action Plan to the investigation task in the issue.
|
4 |
Sign-off Task Item (Sub Task) |
Optional Task item owner can sign-off task items.
|
5 |
Sign-off Checklist |
Optional Sign-off is required only if a checklist is attached. Task owner must sign-off on all checklist questions.
|
6 |
Sign-off Task |
Required Task owner must sign-off task in order to complete the task and if needed, route the Investigation Response Approval.
|
7 |
Perform Response Approval
|
Optional Approval sign-off is required only if the investigation task requires approval. Approval routing must be completed by designated rule before the Investigation Tasks can be closed.
|
8 |
Revise Investigation |
Optional Revise investigation is required only if the Investigation Task has been rejected. Step 6 above must be completed in order for the Response Approval to be rerouted.
|
The following examples are provided for future reference when determining how investigation tasks may be setup for your customer quality exceptions.
Investigation Types |
Investigation Requirements |
Initial Investigation – no Root Cause |
May be performed by the business unit owner who owns the task. Only results of investigation are needed (no Root Cause or Proposed Action Plans). QA team is assigned to approve the investigation results. If rejected, business owner revises investigation results.
|
Initial Investigation – w/ Root Cause |
May be performed by the business unit owner (Response sub task). May be owned by the QA team. Root Cause may be required. QA team may determine if further actions need to be assigned to correct and/or prevent occurrence (see below) – Checklist could be used for yes or no justification. No Approval needed because task is owned by QA team.
|
Develop Action Plans |
May be performed by the business unit owner who owns the task. Proposed Actions would be required (no Root Cause required). QA team is assigned to approve the proposed action plans. If rejected, business owner revises proposed actions.
|
CAPA Investigation |
May be performed by the business unit owner who owns the task. Root Cause is required by task owner. Proposed Action Plans are required by task owner. QA team is assigned to approve the investigation results. If rejected, business owner revises investigation results.
|
1. From the Portal Page, click Smart Solutions tab > Admin and Report > Policy. Under Issue Task Type, select Investigation.
2. Click Action > Add.
3. Enter information in the following fields:
Task Fields |
Description |
Name |
Enter a name for the task.
|
Root Cause Required |
If this box is checked Root Cause must be attached to the investigation prior to signing off.
|
Action Plan Required |
If this box is checked Action Plans must be attached to the investigation prior to signing off.
|
Analysis Code |
Analysis code is a free text field used in reporting. The purpose of the Analysis Code field is to enter a specific code representing the record to which it belongs. The record being created will be synonymous with the analysis code when a report is run.
|
Reference Document No. |
If using SmartDocTM, SmartAuditTM, or SmartTrainTM, you can associate a procedure or work instruction with the task. Zoom to select the record in the field.
|
Checklist |
An administrator can add quality checks to the task to ensure that the task cannot not be signed-off until all checks have been addressed. Please see How to Create Checklists
|
Description |
Enter a description for the task.
|
Add Another |
Click the Add Another check box to add another task.
|
4. Click the Save button.
The task has now been added to the system.
Response Sub Tasks may later transfer to an investigation task as a task item. Response is used if the investigation task owner needs to delegate work to be completed within the investigation task before it can be signed-off and closed.
Do not set these up if your task owner will respond to the investigation.
1. From the Portal Page, click Smart Solutions tab > Admin and Report > Policy. Under Issue Task Type, select Response (sub-task).
2. Click Action > Add.
3. Enter information in the following fields:
Task Fields |
Description |
Name |
Enter a name for the response.
|
Analysis Code |
Analysis code is a free text field used in reporting. The purpose of the Analysis Code field is to enter a specific code representing the record to which it belongs. The record being created will be synonymous with the analysis code when a report is run.
|
Reference Document No. |
If using SmartDocTM, SmartAuditTM, or SmartTrainTM you can associate a procedure or work instruction with the task. Zoom to select a record.
|
Checklist |
An administrator can add quality checks to the task to ensure that the task cannot not be signed-off until all checks have been addressed. Please see How to Create Checklists
|
Description |
Enter a description for the task.
|
Add Another |
Click this box to add another response task.
|
4. Click the Save button.
The response task has now been added to the system.
Currently, the system comes with two default Action Plan Types: Corrective and Preventive. You can add additional Action Plan Types for better searching, sorting, and reporting.
Please see Action Plan Types under System Wide Setup.
The Implementation Task contains the action plans required to correct and/or prevent the quality exception from recurring. If Action Plans were identified during the Investigation Task, those Action Plans can be transferred into the Implementation Task as Task Items which need to be signed-off once completed. However, if you are not using the Investigation Task, you can also add Action Plans and take them through approval prior to carrying out the task items.
What are Action Plans?
In SmartCAPATM, Action Plans are considered task items that either transfer to the implementation task from the investigation task or are added within the implementation task. They contain actions needed to correct or prevent the problem from recurring.
What is Action Plan Approval?
Action Plan Approval may be needed when you are adding new Action Plans or changing Action Plans that have been approved and transferred from the investigation task. You can pre-define who is in this approval group. The Action Plan Approvals make the final decision on which Action Plans need to be carried out for the quality exception.
Some examples of Action Plan Sub Tasks could include:
· Create New SOP (Document)
· Revise SOP (Document)
· Provide Training
· Re-Audit Area
In SmartCAPATM, the investigation task is designed to work with the implementation task. Proposed action plans, when approved during investigation, can transfer to the implementation task for action plans to be signed-off.
Remember, in the investigation tasks Action Plans can only be proposed (and marked as complete, but only by the investigation task owner). If some Action Plans require sign off by the users assigned, the implementation task can be used along with the investigation task to fulfill this requirement.
Proposed Action Plans from the investigation task are transferred to the first open implementation task at the same level or the next level from the investigation task, while the associated root causes are transferred to the Issue Root Cause, if the system implementation task is still open. The system Implementation Task is the Implementation Task at the highest Task Level at the time the issue was created.
NOTE: To prevent orphaned Root Causes within the issue, either set Root Cause Required to Not Required, or make sure all root causes are addressed within the system implementation task if you have multiple Implementation Tasks attached to the Issue. |
The image below illustrates how Action Plans which were proposed in the investigation task can later be “pushed down” or transferred into the implementation task:
Step 1 – Investigation Task is Level 1 and Implementation Task is Level 2 below

Step 2 – Action Plans are Proposed in the Investigation Task (see Investigation Task below)
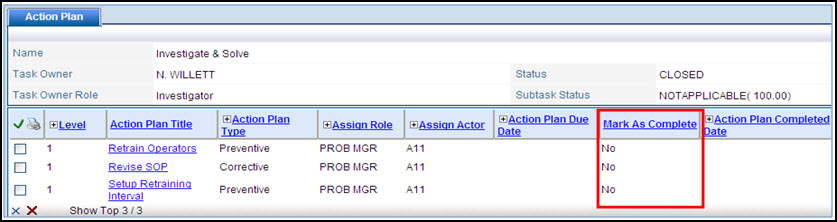
Step 3 – Once the Investigation Task is Closed, all Action Plans transfer to the Implementation Task and require completion (see Implementation Task below)

The following end user transactions could occur in this Task Type based on configurations made by an administrator:
Step |
Transaction |
Description |
1 |
Assign Task Items
|
Optional Task owner can assign other users to the task.
|
2 |
Sign-off Task Items
|
Optional Task item owner can sign-off task items.
|
3 |
Assign Action Plans (Sub Tasks) |
Optional Task owner can assign Action Plan Sub Tasks to users who will later have to mark them complete.
|
4 |
Perform Action Plan Approval
|
Optional Approval sign-off is required only if an Action Plan is attached that requires approval or if Action Approval is required in the Implementation Task. Approval Routing must be completed by designated rule before Action Plan Sub Tasks can be signed-off (see Step 5).
|
5 |
Sign-off Action Plans (Sub Tasks) |
Optional Sign-off is required only if an Action Plan Sub Task is attached. All Action Plans must be marked as complete in order for the Implementation Task to be able to be closed (see Step 7).
|
6 |
Sign-off Checklist |
Optional Sign-off is required only if a checklist is attached. Task owner must sign-off on all checklist questions.
|
7 |
Sign-off Task |
Required Task owner must sign-off task in order to close the task. Task can be set to auto close when all Action Plans have been signed off (Step 5 above).
|
The following examples are provided for future reference when determining how implementation tasks may be setup for your customer quality exceptions.
Implementation Types |
Implementation Requirements |
CAPA |
Investigation Task is completed (with Proposed Action Plans.) Action Plans transfer down to the implementation task. Action Plan Assignees complete all Action Plans. If any Action Plans are modified or new Action Plans added, an approval can be triggered in this implementation task preventing Action Plan completion until the changes are approved. Either the implementation task auto-closes, or you can require a final sign-off to be performed by an implementation task owner.
|
Implementation – w/ Approval |
May be performed by the business unit owner (no investigation task needed). Root Cause may be required. Proposed actions would be required. QA team is assigned to approve the proposed action plans. Action Plan Assignees complete all Action Plans. Either the implementation task auto-closes, or you can require a final sign-off to be performed by an implementation task owner.
|
Implementation – no Approval |
May be performed by the business unit owner (no investigation task needed). Root Cause may be required. Proposed Actions would be required. Action Plans are routed to assignees. Action Plan Assignees complete all Action Plans. Either the implementation task auto-closes, or you can require a final sign-off to be performed by an implementation task owner.
|
1. From the Portal Page, click Smart Solutions tab > Admin and Report > Policy. Under Issue Task Type, select Implementation.
2. Click Action > Add.
3. Enter all relevant information in the following fields.
Task Fields |
Description |
Name |
Enter a name for the task.
|
Root Cause Required |
If this box is checked, Root Cause must be attached.
|
Change Requires Approval Options:
|
None – Approval is not required for anything Transferred – Approval required if you change the action plans that transferred from the investigation task Any – Approval required for any changes or new additions
|
Show Root Cause in Form |
If this box is checked, Root Cause is transferred from the investigation task and can be seen from the implementation task form during implementation.
|
Auto Start |
If this box is checked, when using the investigation task with implementation, the Action Plans are automatically routed to the assignees once the investigation task is closed.
|
Analysis Code |
Analysis code is a free text field used in reporting. The purpose of the Analysis Code field is to enter a specific code representing the record to which it belongs. The record being created will be synonymous with the analysis code when a report is run.
|
Reference Document No. |
If using SmartDocTM, SmartAuditTM, or SmartTrainTM, you can associate a procedure or work instruction with the task. Zoom to select the record.
|
Checklist |
An administrator can add quality checks to the task to ensure that the task cannot not be signed-off until all checks have been addressed. Please see How to Create Checklists
|
Description |
Enter a description for the task.
|
Add Another |
Click this check box to add another implementation task.
|
4. Click the Save button.
The task has now been added to the system.
The application designates certain tasks as "system tasks." System tasks are selected from the tasks attached to an issue. There can only be two system tasks designated in an issue:
· One investigation task
· One implementation task
If there are multiple tasks of either type attached to the issue, the task that is selected depends on how the task was attached to the issue.
Multiple Investigation Tasks
The first investigation task at the lowest level that is not in CLOSED or ABORTED status is selected as the system task.
If all investigation tasks are closed, then a system investigation task is automatically added to the issue.
If the system task is deleted from the issue, the same task of that type at the lowest, incomplete level (i.e., not in CLOSED or ABORTED status) becomes the system task.
SmartAuditTM and SmartCAPATM applications must be installed.
The application designates a system investigation task only when an audit exception is attached to an issue. If an audit exception is attached to an issue, that exception's incomplete (i.e., not in COMPLETED or ABORTED status) action plans are transferred to that issue's investigation task. As there may be more than one investigation task attached to the issue, the application selects the system investigation task as the task in which to transfer the action plans.
To receive the transferred action plans, the investigation task cannot be:
· CLOSED.
· ABORTED .
· Signed off in a review.
If a system investigation task already exists and any of the three conditions above apply, a warning message appears when attaching an audit exception with incomplete action plans. Clicking Yes in the warning message attaches the audit exception without the action plans; clicking No does not attach the audit exception or action plan.
| WARNING! Clicking Yes in the warning message does not attach the action plans to the issue and removes the action plans from the audit exception / Action Plans folder. The action plans are lost. |
When the action plans are transferred, if there is no system investigation task or an incomplete (i.e., not in CLOSED or ABORTED status) investigation task in the issue, an investigation task is automatically added to the issue and designated as the system investigation task. The action plans are then transferred to the new system investigation task. This prevents an error from occurring when there is no task in which to receive the transferred action plans.
The new system investigation task is added at the next highest level that has not been completed.
The reason for designating a system implementation task is similar to an investigation task. When the investigation task is signed off and approved, the approved action plans are transferred to the implementation task to be implemented. As there may be more than one implementation task attached to the issue, the application selects the system implementation task as the task in which to transfer the action plans.
Additionally, the Issue / Implemented Actions link / Action Plan folder displays only the action plans entered in the system implementation task, even if there is more than one implementation task containing action plans. The Action Plan folder provides a quick view of which action plans were implemented.
Multiple Implementation Tasks
· The first implementation task attached to the issue, either from the task model or manually, is the system task.
· If the system task is deleted from the issue, the same task of that type at the lowest, incomplete level (i.e., not in CLOSED or ABORTED status) becomes the system task.
· If multiple implementation tasks were attached or transferred to the issue at the same time but at different levels, the task at the lowest, incomplete level (i.e., not in CLOSED or ABORTED status) becomes the system task.
· If multiple implementation tasks were attached or transferred to the issue at the same time and at the same level, then the first task added to the task model or issue is the system task.
The following options are available within Task Types and can be managed accordingly by an administrator:
· Task Types can be Edited and Deleted
· Task Types can be attached to Task Models or Issue records directly
1. From the Portal Page, click Smart Solutions tab > Admin and Report > Policy. Under Issue Task Type, select the Task Type.
The object list displays.
2. Click
the ![]() icon to switch to local view (if applicable).
icon to switch to local view (if applicable).
3. Select the check box of the Task Type to edit, then select Action > Edit from the main menu.
4. Edit any information for your Task Type.
5. Click the Save button.
All changes should now be reflected in the list.
1. From the Portal Page, click Smart Solutions tab > Admin and Report > Policy. Under Issue Task Type, select the Task Type.
The object list displays.
2. Click
the ![]() icon to switch to Local view (if applicable).
icon to switch to Local view (if applicable).
3. Select the check box of the Task Type to delete, then select Action > Delete from the main menu.
4. Click the Save button.
The object has now been removed from the system.
Please see How to Create a Task Model
Please see How to Create a Task Model
Please see Capture Signature on Task Item Closure under the Application Options Utility.
Please see Update Completed Date with Sign-off under the Application Options Utility.
Please see Checklist under System Wide Setup.
Task Escalation defines the action that must occur in the system to ensure that the task process does not stop or get held up. If a task owner does not respond to the task from the issue in the allowed time defined, an additional action may be enforced.
If the Escalation Policy is attached the Task Type within the Task Model, then the policy will be enforced within the Issue Workflow once the task is in a ROUTED status.
The following rights must be assigned to a user to manage and view Task Escalations:
Rights |
Description |
TES_MANAGE |
Allows administrator to add new Task Escalation, modify existing Escalation, or delete Escalation.
|
TES_VIEW |
Allows user to access Task Escalation to view.
|
Please see Rights Group to assign Rights Groups to users.
· Global Task Escalation will be inherited by all local organizations.
· Local Task Escalation will only be viewed and used within that local organization.
The following escalation steps can be applied to Task Escalation:
Additional Action |
Description |
Escalate to Alternate |
The Task is re-assigned to the alternate actor (from Actor Role).
|
Escalate to Manager |
The Task is re-assigned to the actor's manager.
|
NONE |
This step indicates that no additional action will be taken except for notification only.
|
Escalate to Owner |
The Task is re-assigned to the record owner.
|
Escalate to Org Unit Head |
The Task is re-assigned to the actor's org unit head.
|
Customer wishes to setup an Escalation Policy for Investigations:
Step 1 - Investigators will have 10 business days to respond to the investigation task. If 10 business days have passed, the system needs to reassign the investigation task to the investigator’s manager.
Step 2 – The manager has five business days to respond to the investigation. If five business days have passed, the system needs to reassign the investigation task to the QA team who will be setup in the system as manager alternates.
The following Steps will be applied to the Escalation Policy:
Step |
Additional Action |
Allowed Time |
1 |
Escalate to Manager |
10 Business Days |
2 |
Escalate to Alternate |
5 Business Days |
1. From the Portal Page, click Smart Solutions tab > Admin and Report > Policy. Under Issue Task Type, select Escalation.
2. Click Action > Add.
3. Enter information in the following fields:
Fields |
Description |
Code |
Enter a code for the escalation policy. |
Name |
Enter a name for your escalation policy. |
4. Click the Save button.
5. Select the Step tab.
6. Click Action > Add.
7. Enter information in the following fields:
Fields |
Description |
Step |
Enter a step number.
|
Additional Action |
Select additional action to occur in this step.
|
Additional Action |
Select additional actions to occur in this step.
|
Allowed Time |
Enter the allowed time when the escalation will trigger if minimum requirements are not met in the review. A negative value can be configured here so that the user can be notified using the Escalation Before Due Date.
|
Is Recurring |
Check this option if Escalation will be a recurring event (usually used for Notification options).
|
Escalation Based On |
What will trigger the escalation? Options include:
|
Add Another |
Click this check box to add another task escalation step.
|
8. Click the Save button.
9. Add more steps if needed.
Additional actions can be attached with each step configured within the escalation policy. For example, if a new task owner is assigned, the system can be setup to also notify the record owner so that they know the escalation policy has taken effect.
The following Addition Actions can be applied to each Escalation Step:
Additional Action |
Description |
Notify to Actor |
Zoom to enter the Actor who is notified of the escalation step taken. |
Notify to Alternate |
The Actor’s alternate is notified of the escalation step taken. |
Notify Current Owner |
The Current Owner is notified of the escalation step taken. |
Notify to Email |
This option is used only for new workflows, please see Workflow Designer. |
Notify to Group |
Zoom to enter the Group who is notified of the escalation step taken. |
Notify Manager |
The Actor’s manager is notified of the escalation step taken. |
Notify Owner |
The task owner is notified of the escalation step taken. |
Notify Org Unit Head |
The org unit head of the actor’s department is notified of the escalation step taken. |
1. From the Escalation Policy detail, select the Additional Actions folder.
2. Click Action > Add.
3. Select the Additional Action option which will occur in this Step.
Enter Subject - this option is used only for new workflows, please see Workflow Designer.
Enter Message - this option is used only for new workflows, please see Workflow Designer.
Click the Save button.
Add additional steps as needed.
The following options are available within Task Escalation and can be managed accordingly by an administrator:
Task Escalations can be edited and deleted.
Task Escalations must be attached to Review Groups in order to be used.
1. From the Portal Page, click Smart Solutions tab > Admin and Report > Policy. Under Issue Task Type, select Escalation.
The Task Escalations list displays.
2. Click the ![]() icon to switch to local view (if applicable).
icon to switch to local view (if applicable).
3. Select the check box of the Escalation to edit, then select Action > Edit from the main menu.
4. Edit any information for your escalation.
5. Click the Save button.
All changes should now be reflected in the list.
Task Escalations can only be deleted from SmartSolve© if the escalation has not been attached to any review groups.
1. From the Portal Page, click Smart Solutions tab > Admin and Report > Policy. Under Issue Task Type, select Escalation.
The Task Escalations list displays.
2. Click the ![]() icon to switch to Local view (if applicable).
icon to switch to Local view (if applicable).
3. Select the check box of the Escalation to delete, then select Action > Delete from the main menu.
4. Click the Save button.
The object has now been removed from the system.
1. From the Portal Page, click Smart Solutions tab > Admin and Report > Policy. Under Issue Task Type, select Escalation.
The Task Escalations list displays.
2. Click the ![]() icon to switch to Local view (if applicable).
icon to switch to Local view (if applicable).
3. Select the check box of the Group to attach the Escalation to, then select Action > Edit from the main menu.
4. From the Escalation drop down menu select the Escalation Policy to be used within this Task Type.
5. Click the Save button.
The Escalation Policy has been attached to the Task Type.
Please see Groups under System Wide Setup.
The Task Model automates the issue workflow. It is where all task types needed are pulled together and a workflow is setup to automate the following requirements for the quality exception resolution:
Which tasks need to be performed and who will be assigned.
The order tasks will be performed within the issue.
Which tasks are required, and which can be skipped depending on the type of issue.
What is the estimated time needed to complete each task (if applicable).
Which types of task approvals will be enforced.
How will phases be attached to issue workflows.
NOTE: Task models can be copied in the system to ease task model setup. |
The following rights must be assigned to a user to manage or view Task Model:
Rights |
Description |
TKM_MANAGE |
Allows administrator to add new Task Models, modify existing Models, or delete Models.
|
TKM_VIEW |
Allows user to access the Task Model to view and select.
|
Please see Rights Group to assign Rights Groups to users
· Global Task Models will be inherited by all local organizations.
· Local Task Models will only be viewed and used within that local organization.
1. From the Portal Page, click Smart Solutions tab > Admin and Report > Policy. Under Issue Tasks, select Task Model.
2. Click Action > Add.
3. Enter information in the following fields.
Field |
Description |
Code |
Enter the task model code.
|
Name |
Enter the task model name.
|
Phase Name |
Select a phase name from the drop down list. This is the first phase to be identified in the issue as it is created.
|
Add Another |
Click this check box to add another task escalation step.
|
4. Click the Save button.
5. Select the Task tab.
6. Click Action > Edit.
7. Select the first Type of Task you wish to Attach to this model.
Please see Task Type Setup.
8. Enter information in the following fields:
Field |
Description |
Level |
Enter the order the task will be performed in the workflow. If level 0 is defined, this task can be performed at anytime in the workflow.
|
Task Master Name |
This zoom field will take the administrator to the General Task Library.
|
Estimated Time |
If Estimated Time for completion is entered, the due date on the task will show up automatically on the date the task was routed. This should align to Task Escalation setup.
|
Requirement |
The following rules apply to each Requirement: Optional – task can be aborted by task or issue owner. Recommended – task can be aborted by task or issue owner. Required – task cannot be aborted and must be completed as a minimum.
|
Role |
Zoom from here to select the role the user must have in order to perform and sign-off on this task.
|
Preferred Actor Code |
If applicable, zoom from here to select the individual actor who must perform and sign-off on this task (can later be setup at the issue if this cannot be defined here).
|
Substitute Option |
The following options are available: Anyone with the Same Role – any user with the same Role assigned to this task can perform and sign-off the task – this is the recommended option None– only the preferred actor code assigned to the task from the task model or later from the issue can perform and sign-off the task.
|
To Phase |
Once this task is CLOSED (signed off), identify which phase will show up next in the issue workflow (typically is the same name as the next task or review which will be attached to the model). In some cases where tasks are on the same level, tasks may not have a To Phase (use Estimated Time to best configured where To Phase will be used with your Task Models).
|
Escalation |
If escalation will be used with this task select an escalation option (must first be setup before Task Model).
|
Close Active Exception |
Very important for meeting company metrics on closure rate of exceptions. Based on the issue workflow, when can the attached exceptions be closed and which task in the model be, checked if applicable. See examples below: NCR Model – typically after MRB (Correction Task has this checked). CAPA or Investigation Model – typically once Investigation Task has been approved and Closed (Investigation Task has this checked).
|
Auto Close on Sub Task Complete |
Check this box for the following scenarios: General | Containment Task – if task owner does not need to perform final sign-off on the task once sub tasks have been completed (if sub tasks are attached). Correction | Product Correction Task – if task owner does not need to perform final sign-off on the task once dispositions have been completed (if dispositions are attached). Investigation Task – if task owner does not need to perform final sign-off on the task once sub tasks have been completed (if Response Sub Tasks are attached). Implementation Task – if task owner does not need to perform final sign-off on the task once action plans have been completed (if Action Plans are attached).
|
Transfer Sub Tasks as Task Item |
This check box only applies for the following scenarios: General | Containment Task – if any predefined standard sub tasks are attached to these tasks from this task model. Investigation Task – if any predefined standard response sub tasks are attached to this task from this Task Model. This option does not apply to Implementation tasks or Correction or Product Correction Tasks.
|
Status |
When an issue is created the first review attached is activated (meaning that the review can now be routed and signed off, even though the workflow is not completed). Enter a status here (i.e., INWORKS) if there are certain tasks that must be CLOSED before review can be started.
|
Approval Requirement |
Select whether approval is required from the drop down.
|
Approval Group |
Zoom to select an approval group if needed.
|
9. Click the Save button.
10. Attach other Task Types as needed to complete the Task Model
Once the Task Models have been created, you may also need to add Sub Tasks. Sub Tasks can also be added to the task after the issue is created by the issue owner. Attaching Sub Tasks at the Task Model level allows you to enforce corporate or quality standards or set procedures for the way quality exceptions should be handled.
The following Sub Tasks can be predefined within each of the five main Task Types which are attached to your specific Task Model:
Task Type |
Sub Task Used |
Description |
Task |
Task |
Please see Task. |
Containment |
Task |
Please see Task. |
Correction |
Disposition |
Please see Dispositions. |
Product Correction |
Disposition |
Please see Dispositions. |
Investigation |
Response |
Please see Response. |
Implementation |
Action Plans |
These Sub Tasks are not setup under Task Model. Please see Implementation. |
NOTE: The more sub tasks you add to the system the more work will need to be done in the system. Work closely with your Pilgrim representative to discuss what business requirements you wish to achieve before setting up these workflows. |
1. From the Task Model List, click the arrow next to the main task.
2. Click then select the Task option.
3. Once in the Task folder, click Action > Attach.
4. Select the first Type of Sub Task you want to attach to this model.
See the Task Type Setup.
5. Enter the Level of the task as it will appear in the issue workflow.
6. Enter all other appropriate information.
7. Click the Save button.
The following options are available within Task Model and can be managed accordingly by an administrator:
· Task Models can be edited and deleted
· Task Models can be copied
· Task Models should be attached to Issue Policies if the Task Model will be used to enforce the Issue Workflow
· Task Models can be attached to an issue record directly by the issue owner
1. From the Portal Page, click Smart Solutions tab > Admin and Report > Policy. Under Issue Tasks, select Task Model.
The Task Models list displays.
2. Click the ![]() icon to switch to Local view (if applicable).
icon to switch to Local view (if applicable).
3. Select the check box of the Task Model to edit.
4. Select Action > Edit from the main menu.
5. Edit any information for your Task Model.
6. Click the Save button.
All changes should now be reflected in the list.
Task Models can only be deleted from SmartSolve© if the Task Model has not been attached to an Issue Policy.
1. From the Portal Page, click Smart Solutions tab > Admin and Report > Policy. Under Issue Tasks, select Task Model.
The Task Models list displays.
2. Click the ![]() icon to switch to Local view (if applicable).
icon to switch to Local view (if applicable).
3. Select the check box of the Task Model to delete, then select Action > Delete from the main menu.
4. Click the Save button.
The object has now been removed from the system.
Task Models can be copied in order to expedite the Task Model configuration process. This is especially helpful for customers who define “who specifically” can perform tasks when issues are created. Preferred actors are not needed when creating Task Models. However, if you can clearly define task owners, for example by department or business unit, then setting these up in the Task Model saves your end users work. They do not have to assign the same task owners to the issue (eliminating extra keystrokes and end user frustration).
A customer wishes to setup a different department head as a task owner for CAPA investigations:
Step 1 – Create first CAPA Task Model and title it, for example MFG CAPA Task Model, and attach all tasks and assign mfg manager (or preferred actor) to the investigation task.
Step 2 – Copy first CAPA Task Model and title it for next department (i.e., Engineering CAPA Task Model. Attach all tasks and assign eng manager (or preferred actor) to the investigation task. Repeat step 2 for each and every department.
1. From the Portal Page, click Smart Solutions tab > Admin and Report > Policy. Under Issue Tasks, select Task Model.
2. From the Task Model List select the arrow for the main Task to Copy and select the Detail link.
3. Click Action > Copy.
4. Enter information in the following fields:
Field |
Description |
Existing Model |
Information is automatically entered from the task model being copied. |
Code |
Enter a new task model code. |
Name |
Enter a new task model name. |
5. Click the Save button.
All Tasks from the selected Task Model will now be displayed in the Task Model it was copied to.
Task Models should be attached to Issue Policies if the Task Model will be used to enforce the Issue Workflow
1. From the Portal Page, click Smart Solutions tab > Admin and Report > Policy. Under Exception/Issue Related, select Issue Policy.
The Issue Policies list displays.
2. Click the ![]() icon to switch to Local view (if applicable).
icon to switch to Local view (if applicable).
3. Select the check box of the Issue Policy to attach the Task Model to, then select Action > Edit from the main menu.
4. From the Task Model drop down menu select the Task Model to be attached to the Issue Policy
5. Click the Save button.
The Task Model has now been attached to the Issue Policy
Please see How to Attach a Task Model to an Issue in the SmartCAPATM End User Guide.
Please see Get External Data for Task Sign-off under the Application Options Utility.
Please see Do Not Assign Issue Owner as Task Owner under the Application Options Utility.