The Audit can be recorded by the Auditor in three different ways:
Option |
Description |
Audit Entry |
The auditor can enter results and notes from the Audit Entry screen. Although this is an option, the other two alternatives are preferred by auditors. This is not the preferred method as it may cause unnecessary clicking for your audit users. Please see How to Perform Audit Response Sign-off.
|
Online Rapid Editing |
The auditor can checkout audit data (Criteria) to a template and enter results and notes into one place to be checked back into the audit entry. The auditor must be logged into the SmartAuditTM system to complete this form online. This is the preferred method as it allows audit users to complete the worksheet on a simple to use form with less clicking. Please see Online Rapid Editing.
|
Offline Rapid Editing |
The auditor can check out audit data (Criteria), if using Microsoft© InfoPath©, and enter results and notes into one place to be checked back into the audit entry. The auditor can log in, check out the checklist, perform the audit and enter results and notes, then log back into SmartAuditTM and check in the completed form. This is the nice to have method and must be purchased at an additional cost. Please see your Pilgrim representative for more information. Please see Offline Rapid Editing.
|
Check Out Audits
Audits can be checked out of SmartAuditTM to respond off-line to the sections and questions in an audit record. This mechanism provides audit team members flexibility to work on an audit record at their discretion. The online editor window displays the sections, subsections, questions and sub questions for an audit record along with any notes and responses already recorded.
These audit entries can be modified and saved temporarily so that an auditor can continue with the audit at a later time. If a check out audit record is accessed from SmartAuditTM, the audit's Detail window | Content Status field displays CheckedOut and the audit record is locked and cannot be modified or routed for approval.
When an auditor is finished recording the notes and responses, the audit record is checked back into SmartAuditTM to continue with the audit process. If an auditor needs to cancel the checked out audit then the Undo CheckOut button brings the audit record back into SmartAuditTM.
Check In Audits
Once an auditor is finished recording responses and notes for an audit record, the audit is checked back into SmartAuditTM. The auditor clicks the CheckIn button on the on-line editor window. The audit's Detail window > Content Status field displays CheckedIn and the audit record is unlocked and can be modified or routed for approval.
Access History
Auditors can view the history of an audit record's check in and check-out activity using the Audit window > Access History button. The Access History folder displays the actor's user ID and the date the audit record was checked in and out.
SmartAuditTM Offline allows SmartAuditTM users to edit audits without access to a server or database.
Check Out Audits
Audits can be checked out of SmartAuditTM and downloaded to a local machine, such as an auditor's laptop, in InfoPathR XML format. The process of downloading an audit to a local machine is referred to as taking the audit "offline." Offline audits are portable and independent of a server or database, which gives auditors the ability to:
· Take the electronic audit record to the auditee site.
· Edit the audit record off-site.
· Respond to the sections and questions in an audit record offline.
· Manage audit notes offline.
The offline editor window allows the following audit entries to be edited for an audit record along with any notes and responses already recorded:
· Section
· Subsections
· Questions
· Sub questions
Audit entries can be modified and saved on the local machine so that an auditor can continue with the audit at a later time.
Within the SmartAuditTM application, when an audit is being performed offline, the offline audit's Content Status field displays CheckedOut and the audit record is locked and cannot be modified or routed for approval. An Undo CheckOut option is provided for auditors to cancel the check out and check the audit back in without changes.
Check In Audits
Once an auditor is finished recording responses and notes for an audit record, the audit is checked back into the Online Editor. The auditor clicks the CheckIn button on the Online Editor window. The audit's Detail window | Content Status field displays CheckedIn and the audit record is unlocked and can be modified or routed for approval.
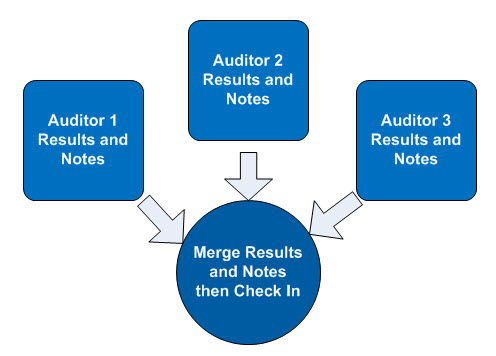
Merging Forms
InfoPath© allows auditors to work on the same audit at the same time from different locations. Upon completing the audits, the auditors use the InfoPath© feature to merge the two audit forms together before checking the single audit back into SmartAuditTM.
Access History
Auditors can view the history of an audit record's check in and check-out activity from the Audit window | Access History button. The Access History folder displays the actor's user ID and the date the audit record was checked in and out.
Audit Offline InfoPath and Templates
Microsoft© InfoPath© creates easy-to-use forms for effectively gathering information. SmartSolve© requires InfoPath© 2003 to be installed on the local computer that will store and edit offline audits. InfoPath© is sold as a single application or as part of Microsoft© Office© 2003.
NOTE: InfoPath© 2003 version 11.6357.6360 SP1 is recommended for use with SmartAuditTM Offline. |
InfoPath© works in conjunction with SmartSolve© to convert checked out (offline) audits to online forms. The audits can then be edited and saved independent of the SmartSolve© application.
NOTE: InfoPath© allows auditors to work on the same audit at the same time from different locations. Upon completing the audits, the auditors use the InfoPath© feature of merging the two audit forms together before checking the single audit back in to SmartAuditTM. In this situation, a failing result assigned to an audit will always override a passing result assigned to an audit when the two forms are merged. |
Please see http://www.microsoft.com/office/infopath/prodinfo/default.mspx for more information about Microsoft© InfoPath©.
The Get Support Data button, located in the audit record Content section, generates the records in the following collections to an AuditSupport.xml file:
· Note type
· Response type
· Severity
· Priority
Changes made to the collections above will not display unless the original AuditSupport.xmlin the local directory is overwritten with the audit record's newly generated xml file. This process is performed:
· each time an audit is taken offline.
· after changes have been made to the collections.
1. From the Audit record's Content section, click the Get Support Data button.
The File Download window appears.
NOTE: The procedure to get support data is dependent upon the browser. |
2. Click the Save button to save the support data to local storage.
The Save As window displays.
3. From the local drive Program Files > Pilgrim Software, Inc. > SmartAudit Offline folder, select AuditSupport.xml.
4. Click the Save button.
5. Click the Yes button in the Save As warning message box.
The Download complete window displays.
6. Click the Close button to return to the audit record.
The Undo Check Out button is provided to revoke a checked out audit. The undo checkout process:
· Is only available when a file is checked out.
· Does not check in a file or update content.
· Returns the CheckedOut status to CheckedIn and the file is available for checkout.
The Content Status must display Checked Out in order to perform this transaction.
1. From the audit record, click the Undo Check Out button.
The Undo Check Out window appears.
2. Enter a reason for undoing the audit check out.
3. Click the Undo Check Out button.
Checking Out the audit data allows the auditor to record audit results from either the online or offline form provided in SmartAuditTM.
Checking In audit data allows the auditor to update audit results in the audit profile of SmartAuditTM using either the online or offline form. See the steps below for checking in data offline or online.
1. From the Audit Profile screen, click on the Check Out button.
The Check Out Audit window displays.
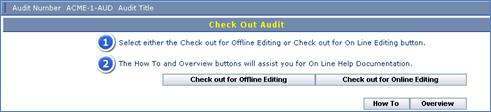
2. From the Check Out Audit screen, select either the Checkout For Offline Editing (if available) or Checkout For Online Editing button.
3. The Online or Offline form displays.
4. Enter appropriate Results and Notes. Make sure you save your work.
Please see the following information about checking in audit data.
1. From the Audit Profile screen, click the Check In button (click F5 to refresh if needed).
2. Look for Check In Successful at the top left corner of the Rapid Editing screen.
3. Close out of the Online Rapid Editing screen and return to the Audit Profile.
Audit has successfully been Checked In.
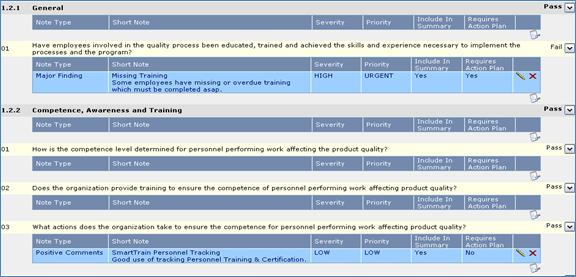
4. Select the Finding Summary folder in your Audit tree to view Notes which have been summarized
5. Select the Finding No. to make External Attachments for evidence.
1. From the Audit Profile screen, click the Check In button (click F5 to refresh if needed).
2. Click the Browse button, locate your file and click the Check In button.
The Offline Rapid Editing screen displays.
3. Look for Check In Successful at the top left corner of the Rapid Editing screen.
4. Close out of the Online Rapid Editing screen and return to the Audit Profile.
Audit has successfully been Checked In.
5. Select the Finding Summary folder in your Audit tree to view Notes which have been summarized.
6. Select the Finding No to make External Attachments for evidence.