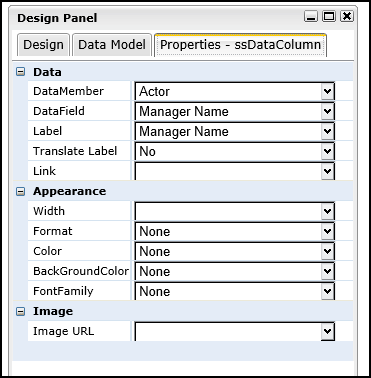
Adding Data Columns from Data Model Tab
Follow the steps below to add data columns (from the Data Model tab) to the report:
- Select the Data Model tab on the Design Panel located on the right side of the window.
- Left click the Data Model folder, and then click the appropriate sub folder, such as Fields, to expand it.
- Drag and drop the desired object from the expanded folder to the Report Data section of the Designer canvas.
Result: The object now displays in the Report Data section in its own column.

- Click the object just placed in the Report Data section of the canvas.
Result: The Properties dialog for the object is displayed in the Design panel located on the right side of the window.

- Set any other applicable properties.
- Save the report by selecting Report > Save from the main menu.
The following table provides descriptions for the report data column property settings available for reports:
| Property | Description | Grouping |
|---|---|---|
|
Data Member |
Determines the table or view used for the data column. |
Data |
|
Data Field |
Determines the field or expression used to generate the data column.
Choices are:
|
Data |
|
Label |
The name of the data column (if other than the data field selected above).
Choices are:
|
Data |
|
Translate Label |
Determines if the label will be translated when a report is run by a user. NOTE: Translations must exist in the Translation File for this property to work. Choices are:
|
Data |
|
Link |
Determines the page to be displayed when the data column is selected.
Choices are:
|
Data |
|
Width |
Determines the width of the data column.
Choices are:
|
Appearance |
|
Format |
Determines the date format in which a Date field value will display.
Choices are:
|
Appearance |
|
Color |
Determines the color of the data displayed in the field.
Choices are:
|
Appearance |
|
Background Color |
Determines the background color of the field . Choices are:
|
Appearance |
|
Font Family |
Determines the Font Family used for the displayed data. Choices are:
|
Appearance |
|
Image URL |
Determines if an image from an external link is to be displayed Choices are:
|
Image |
See Also