Please select the object link below for more information on how to configure the object
Object |
Shared with other SmartSolve© Applications |
Required for SmartTrainTM |
|
No |
Yes |
|
|
Yes |
Yes |
|
|
Yes |
Yes |
|
|
Yes |
Yes |
|
|
Yes |
No |
|
|
No |
Yes |
|
|
No |
No |
|
|
No |
Yes |
|
|
No |
No |
|
|
No |
No |
|
|
No |
No |
A Position is typically the employee’s primary job title within an organization such as a QA Manager, Product Manager, Process Engineer, etc. The following rules apply when determining Positions:
· A person can have one position assigned to them at a time within each organization.
· Position roles can be attached to positions which contain the document and course requirements needed as a minimum for any employees who are assigned this position.
· To expedite creating positions, copy positions within your organization that have similar roles.
· Positions cannot be applied to person records until they have been activated.
· Positions can be expired in the application if they will no longer be applied to person records.
· Positions and their requirements are typically owned by the business unit line manager; however they are maintained in the system by the training coordinators (QA Group).
The following rights must be assigned to a user to manage or view Positions:
Rights |
Description |
|
PST_MANAGE |
Allows administrator to add new positions, modify existing positions, or delete positions.
|
|
PST_VIEW |
Allows user to access positions to view and select.
|
Please see Rights Groups to assign Rights Groups to users.
· Global Positions and any Global Roles attached will be inherited by all local organizations using the Position for Local Person records.
· Local Positions can only be viewed and used within the unique local organization and cannot be used by other Local Organizations.
1. From the Portal Page, click Smart Solutions tab > Admin and Report > Setup. Under Training, select Position.
The Positions list displays.
2. Right click and select Add.
3. Enter information in the following fields:
Fields |
Description |
|
Position |
Enter the name of the position. |
|
Description |
Enter a description for the position. You could copy and paste the job description. |
|
Add Another |
Click this box to add another position. |
4. Click the Save button.
Position Definitions
The following tabs are available in the default position record for SmartTrainTM:
Folders (tabs) |
Description |
|
Detail |
The Detail tab contains all detail about the position.
|
|
Role |
The Role tab contains all possible Roles in which any Person who is assigned this Position later must fulfill. Every person who is assigned this position will be required as a minimum to fulfill any Roles (and Requirements within each Role) which are not flagged as Ad-Hoc.
|
|
Person |
The Person tab contains all persons within the organization who have been assigned this position. This is a view only tab.
|
The following can be managed accordingly by an administrator for positions:
· Positions can be edited
· Positions can be activated
· Positions can be copied
· Positions can be expired
· Positions can be deleted from the system
· Roles can be attached to positions
If you wish to change the name or the description of the position this can be done at anytime and will update in any records containing the position.
1. From the Portal Page, click Smart Solutions tab > Admin and Report > Setup. Under Training, select Position.
2. Click the ![]() icon to switch to Local view (if applicable).
icon to switch to Local view (if applicable).
3. Click the check box next to the Position record to change.
4. Right click and select Edit.
5. Make appropriate changes as needed.
6. Click the Save button.
The position is updated.
A position must be activated before it can be assigned to person records. Before activating a position, make sure it is the proper time to activate it.
Activation Impacts:
Once activated, the position can be attached to any person record.
During activation, any roles attached to the position record that have not yet been activated will also activate along with the position. (They can be deactivated if needed.)
Once activated, the position cannot be deleted from the system. (See instruction for how to Expire a Position.)
Activating a position from the global organization will make it active from the global organization as well as all local organizations. (Activation and expiration of global positions can only be managed from the global organization.)
SmartCommTM must be running properly for Position Activate to occur.
1. From the Portal Page, click Smart Solutions tab > Admin and Report > Setup. Under Training, select Position.
2. Click the check box next to the position record to activate.
3. Right click and select Activate.
4. Click the Ok button to confirm.
Status will now specify Active.
If there is already a position that exists in the application which has many of the roles attached to it that are needed for the new position, use this procedure to quickly create a new position. When copying positions all position roles from the source position are copied to the new position (target position).
1. From the Portal Page, click Smart Solutions tab > Admin and Report > Setup. Under Training, select Position.
2. Click the ![]() icon to switch to Local view (if applicable).
icon to switch to Local view (if applicable).
3. Click the check box next to the Position record to copy.
4. Right click from the record and select Copy.
5. Enter a new Position name in the Target Position field.
6. Click the Save button.
When a Position is not needed and is not assigned to any active person, it can be expired.
Expiration Impacts
· Positions cannot be expired if they are attached to any person record. Please see the SmartTrainTM End User Guide for instructions on How to Change Positions in a person record.
· Once expired, the position will be deleted from the system.
· The only way an expired position can be brought back into the system is by recreating it. (Be careful when making the decision to expire.)
§ Another option may be not to expire the position, just rename it to EXPIRED + Position Name and do not attach it to any new person records. In this way, you can bring the position and all of its roles back if needed.
· Expiring a position from the global organization will expire it from the global organization as well as all local organizations. (Expiration of global positions can only be managed from the global organization.)
1. From the Portal Page, click Smart Solutions tab > Admin and Report > Setup. Under Training, select Position.
2. Click the ![]() icon to switch to Local view (if applicable).
icon to switch to Local view (if applicable).
3. Click the check box next to the Position record to expire.
4. Right click and select Expire.
5. Enter information in the following fields:
Fields |
Description |
|
Comment |
Explain why the position is being expired. |
|
Confirm Password |
Enter your password. |
6. Click the Save button.
Position is deleted from the system.
The following rules apply when deleting a position:
· A position can only be deleted from the system if it has a status of pending
· Deleting a position from the global organization will delete it from the global organization and all local organizations. (Deletion of global positions can only be managed from the global organization.)
1. From the Portal Page, click Smart Solutions tab > Admin and Report > Setup. Under Training, select Position.
2. Click the ![]() icon to switch to Local view (if applicable).
icon to switch to Local view (if applicable).
3. Click the check box next to the Position record to delete.
4. Right click and select Delete.
5. Select Ok to confirm.
The position is deleted from the system.
One or more roles can be added (attached) to a position. The following rules apply when attaching roles to a position:
If you are adding a role to an active position, you must manually activate the role before it appears in the person records.
A role that is attached to a position transfers to a person record and can only be deactivated from the position record, not from the person record
1. From the Portal Page, click Smart Solutions tab > Admin and Report > Setup. Under Training, select Position.
2. Click the ![]() icon to switch to Local view (if applicable).
icon to switch to Local view (if applicable).
3. Click the ![]() next to the position record.
next to the position record.
4. Click the Role link.
The Roles tab for the record displays.
5. Right click and select Add.
6. Enter information in the following fields:
Fields |
Description |
|
Role |
Zoom from the role field and tag all roles you wish to attach to the position. Click a Select option to add it to the role. If there is more than one role selected, an asterisk displays in the field. Click the folder link to see all of the roles.
|
|
Primary Role |
Identify the role that is primary. The primary role is the role used by the user to log into any SmartSolve© system.
|
|
|
NOTE: the first Role attached to the Position becomes the Primary Role. If you wish to change Primary Role you must edit the Role attached to the Position and select the Primary Role option.
|
|
Ad Hoc Role |
If checked, any user with appropriate Rights will later be able to remove this Role which transfers to any Person record who has been assigned this Position. If not checked, the Role will not be able to be removed from the Person record and is considered a Must Have Role.
|
|
Activate Now |
Check this box for any roles you need to activate within the position.
|
|
Add Another |
Click this box to add another role.
|
7. Click the Save button.
Only roles which have a status of Pending can be activated within a position. The following rules apply when activating position roles:
· If you are attaching inactive roles to an active position, you must activate the role in order for it to display in the person’s records (not applicable until it is activated).
· You do not have to activate the role from position; you could also do this from the person record.
· Activating a position which has many inactive roles could also activate all roles.
1. From the Portal Page, click Smart Solutions tab > Admin and Report > Setup. Under Training, select Position.
2. Click the ![]() icon to switch to Local view (if applicable).
icon to switch to Local view (if applicable).
3. Click the ![]() next to the position record.
next to the position record.
4. Select the Role link.
5. Check off all Roles you wish to Activate which are in the Pending status.
6. Click the Detail tab.
7. Right click and select Activate.
8. Click Ok.
The role displays a status of Active
Position roles can only be deactivated from within the position record, not a person record. The following rules apply when deactivating roles attached to positions:
· Only roles that have an Active status can be deactivated.
· Once roles have been deactivated, they are removed from the position
1. From the Portal Page, click Smart Solutions tab > Admin and Report > Setup. Under Training, select Position.
2. Click the ![]() icon to switch to Local view (if applicable).
icon to switch to Local view (if applicable).
3. Click the check box next to the Position record to deactivate the role(s).
4. Click the ![]() next to the position record.
next to the position record.
5. Select the Role link.
6. Check off all Roles you wish to Deactivate which are in the Active status.
7. Right click and select Deactivate.
8. Enter a deactivation Comment.
9. Check off if you wish these roles to be kept in any current person records.
10. If roles will not be kept in person records select one of the following options:
Option |
Description |
|
Deactivate |
Role and all associated requirements are removed from the person record.
|
|
Suspend |
Role and all associated requirements are suspended in the person record. A decision can be made later whether to keep or deactivate this role and associated requirements.
|
|
Keep |
Role will no longer be associated with the old position. It is kept in the person record and is classified as an ad hoc role.
|
11. Enter your Password.
12. Click the Save button.
The role will now be removed from the position.
Each position record contains a read-only person tab where all persons attached to this position can be viewed.
1. From the Portal Page, click Smart Solutions tab > Admin and Report > Setup. Under Training, select Position.
2. Click the ![]() icon to switch to Local view (if applicable).
icon to switch to Local view (if applicable).
3. Click the check box next to the position record view.
4. Click the ![]() next to the position record.
next to the position record.
5. Select the Person link.
The persons attached to the position display.
Roles consist of job functions performed by a person as part of their position or outside of their position (i.e., different hats one might wear. Example roles could include Trainer, Auditor, Manager, QC Tester, Lab Technician, etc. Within each job function, the appropriate courses and documents can be applied as minimum requirements for any employee who is assigned this role.
Roles can be assigned to positions as well as individual employees. Roles are typically owned by the business unit Line Managers but managed in the system by the Training Coordinators (QA Group).
The following rules apply when determining roles:
· A Person can have both Position Roles and Ad Hoc assigned to them at a time within each organization.
· Position roles cannot be removed from the person record.
· Ad hoc roles can be added and removed from the person as needed (as long as they did not transfer from the position).
· A role is not required to be fulfilled by the person until the role has been activated.
· Once a person fulfills all requirements within a role that role status will indicate that the person is current on all certifications within that role.
· If any certifications have since expired in the role, the system will notify the person and role status will indicate that the role has expired.
It is important to understand the types of roles that are used with the SmartTrainTM system before configuring roles for your users.
Role Type |
Description |
|
UNIVERSAL REQUIREMENT ROLE |
This role is automatically attached to every person record created in the SmartTrainTM system. It is the role that may contain all document and/or course requirements needed by any employee within your organization (for example, Quality Manual, New Employee Orientation, Company wide Policies and Procedures, etc.).
|
|
Position Roles |
Typically there are not many roles attached to a position. It is important to note that any roles attached to a position will later transfer to any person record which has that position attached and these roles cannot be deactivated from the person record as an ad hoc role can. Some example roles attached a position would be the Job Title (Position Title) Role and maybe a departmental universal role, or in some cases if the position is a management role a management role may also be attached.
|
|
Ad Hoc Roles |
Ad hoc roles are roles that are attached specifically to a person record. These are typically roles that the employee has outside of their department or position or sometimes are referred to as cross functional roles.
|
|
User Roles |
User roles are roles assigned to SmartTrainTM and other SmartSolve© system users in order for the user to gain access into the SmartSolve© product. For example, some SmartTrainTM user roles may include a Training Coordinator, Trainer, Person Managers, and of course Trainees.
NOTE: when attaching Roles to Person and Actor records, the Administrator can configure which Roles are User versus which Roles are only specific for Training needs. This will cut down on the number of Roles the User may see when accessing the Change Role option in the system. Please see How to Attach Roles to Person records for more information.
|
|
NOTE: it is important to work with your Pilgrim representative when you begin to setup your SmartTrainTM roles to ensure you get the best use of the SmartTrainTM product. |
Person, Position, and Roles Example
The diagram below illustrates an example of position for a QA Manager. The following roles will be attached at the position and person (Ad Hoc) records.
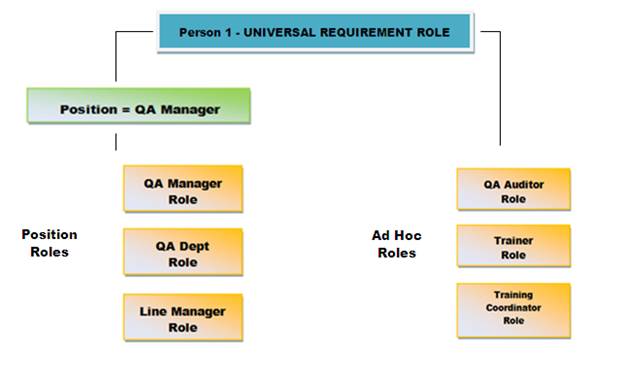
Position and Role Impacts
· Any person will have to fulfill the UNIVERSAL REQUIREMENT ROLE.
· Anyone who is assigned the QA Manager position will at a minimum have to fulfill the following roles:
o QA Manager Role
o QA Departmental Role
o Line Manager Role
· Position roles cannot be removed from a person record (be careful with setup).
· Each person assigned this position can have ad hoc roles attached to their person record. In the example above one QA Manager may have the following ad hoc roles:
o QA Auditor Role
o Trainer Role
o Training Coordinator Role
· Ad hoc roles can be removed from a person record if needed.
The following rights must be assigned to a user to manage or view roles:
Rights |
Description |
|
UMG_VIEW |
Allows administrator to view the User Management Console. |
|
ROL_MANAGE |
Allows administrator to add new roles, modify existing roles, or delete roles. |
|
ROL_VIEW |
Allows user to access roles to view and select. |
|
DTN_VIEW |
Allows user to access document requirements to view and select. |
|
SDC_VIEW |
Allows user to access documents records to view |
|
CUR_VIEW |
Allows user to access course requirements to view and select. |
|
PER_SUPERVISOR |
Allows user to view any person's training and person record including the requirements, certification information, and job history and training history folders. |
|
PER_VIEW_SUPERVISOR |
Allows user to view, sign off and modify any person's training and person record including the requirements, certification information, and job history and training history folders. Must also be used with the PSN_MANAGE Right. |
|
PSN_MANAGE |
Allows user to sign-off on their employee's training records, edit their employee's person detail and view their employees’ requirements, certification information, job history and training history folders. |
|
PSN_VIEW |
Allows user to view only their employee's training records and view their employees’ requirements, certification information, job history and training history folders. |
Please see Rights Groups to assign Rights Groups to users.
· Global Roles and any Global Requirements could be inherited by all local organizations (however, they cannot be viewed from the Local Organization in the Role detail).
· Local roles can only be viewed and used within the unique local organization and cannot be used by other Local Organizations.
1. From the Portal Page, click Smart Solutions tab > Admin and Report > Setup. Under User Management, select Role.
Only roles created within this organization will display.
2. Select the show all ![]() icon to view all shared roles (roles created in global).
icon to view all shared roles (roles created in global).
3. Right click and select Add.
4. Enter information in the following fields:
Field |
Description |
|
Role |
Enter the role code. |
|
Name |
Enter a name for the role. |
|
Add Another |
Click the Add Another check box to add another role. |
5. Click the Save button.
The following tabs are available in the off-the-shelf role record for SmartTrainTM:
Tabs |
Description |
|
Detail |
Name and code for the role displays. |
|
Requirement |
All courses and/or documents that must be fulfilled by any person assigned this role. |
|
Users |
This tab is used to attach multiple users to this role. |
|
Position |
This tab displays all positions which have this role attached. |
|
Requirement History |
This tab displays a history of all course and documents that have since been attached to the role and activated or deactivated. |
The following can be managed accordingly by an administrator for roles:
Roles can be edited.
Roles can be activated.
Roles can be copied.
Roles can be expired.
Roles can be deleted from the system.
Requirements can be attached to roles.
If you wish to change the name or the description of the role this can be done at anytime and will update any records containing the role.
1. From the Portal Page, click Smart Solutions tab > Admin and Report > Setup. Under User Management, select Role.
Only roles created within this organization will display.
2. Select the show all ![]() icon to view all Shared Roles (Roles created in GLOBAL).
icon to view all Shared Roles (Roles created in GLOBAL).
3. Right click and select Edit.
4. Make appropriate changes to the role.
5. Click the Save button.
New changes display in the role
The following rules apply when deleting a role:
· A role can only be deleted from the system if it has a status of Pending and has not been attached to a position or a person
· Deleting a role from the global organization will delete it from the global organization and all local organizations. (Deletion of global roles can only be managed from the global organization.)
1. From the Portal Page, click Smart Solutions tab > Admin and Report > Setup. Under User Management, select Role.
Only Roles created within this Organization will display.
2. Select the show all ![]() icon to view all shared roles (roles created in global).
icon to view all shared roles (roles created in global).
3. Check off all Roles you wish to delete which are in the Pending status
4. Right click and select Delete.
5. Select Ok to confirm.
The role will now be deleted from the system.
You decide how to define your requirements (courses and documents). SmartTrainTM offers the flexibility of being able to choose which way to achieve this in the system.
The requirements folder in the role lists requirements assigned to this role. A link to the requirement is provided in this folder. This folder also contains some detail about the requirement.
The following rules apply when attaching requirements to a role:
· if you are adding a requirement to an active role, you must manually activate the requirement before it appears in the person records.
· A requirement that is attached to a role transfers to a person record and can only be deactivated from the role record, not from the person record
1. From the Portal Page, click Smart Solutions tab > Admin and Report > Setup. Under User Management, select Role.
2. Select the show all ![]() icon to view all shared roles (roles created in global).
icon to view all shared roles (roles created in global).
3. Enter the role for which you wish to add the requirement(s).
4. Select the Requirements tab.
5. Right click and select Add.
6. Zoom from the Requirement Number field to select the Requirement(s).
Please see Course Requirement Setup for more information on creating course requirements
Please see Document Requirement Setup for more information on creating document requirements
7. Click the Next button and enter all appropriate information.
Fields |
Description |
|
Role Specific Policy |
If unchecked, this requirement will inherit whichever certification information is configured within the requirement record (document or course record). If checked, the following options will display specific to the Role for:
If checked, an icon will display next to the requirements indicating role specific policies have been enabled.
|
|
Must Have |
If checked for this Role, then this requirement must be fulfilled by any Person who has this Role and cannot be deactivated from the Person's record. If unchecked, then any Person who has this Role must fulfill the requirement; however, it is considered an Ad Hoc requirement and if needed, the requirement can be removed from the Person's record any time if it is no longer a requirement.
Also, if must have is checked, the Person Certification Status will remain INWORKS or EXPIRED until all must have requirements are fulfilled.
|
|
Complete within Duration Days |
Only seen if Role Specific Policy is checked. The number of days allowed for completion of the requirement. If not specified, the completion date is the day the requirement is associated with the person record. This applies to BOTH Initial and Revision Certifications.
|
|
Need Trainer Sign-off |
Only seen if Role Specific Policy is checked. Check this option if trainer sign off is required for Initial, Revision, and/or Refresher Certification.
|
|
Supports Self Training |
Only seen if Role Specific Policy is checked. This is used for Course Requirements Only Check this option if Course Self Train will be used for Initial, Revision, and/or Refresher Certification.
|
|
Need Training Session |
Only seen if Role Specific Policy is checked. Check this option if Course or Document must be attached to Training Session for Initial, Revision, and/or Refresher Certification.
|
|
Need Assessment |
Only seen if Role Specific Policy is checked. Check this option if a unique Assessment will be attached to Initial, Revision, and/or Refresher Certification.
|
|
Preferred Course |
Only seen if Role Specific Policy is checked. This is used for Document Requirements Only Check this option if the Document must be attached to a specific Course record for Initial, Revision, and/or Refresher Certification.
|
|
Refresher Certification Required |
If enabled: refresher certification is required.
|
|
Refresher Interval Days |
How many days does the user have to take the refresher certification?
|
|
Grace Days for Refresher |
The number of days after the refresher interval occurs that an individual must be re-certified. If the refresher is not completed within that time frame, certification is expired.
|
|
Refresher Advance Notice |
How many days in advance does the Person need to be notified to take the refresher?
|
|
Requires Retraining if Previously Trained |
This is used for Refresher Certification Only Whether individuals must retake the training even if they have taken it in the past. The following three elements of training are evaluated: Training, Assessment, and Checklist.
|
|
Activate Now |
Once saved, this requirement will be activated immediately and be applied to any person’s record which contains this role.
|
|
Activate on Prerelease |
If the requirement you are attaching is INWORKS, then once the Requirement becomes PRERELEASED (document or course) it will automatically be activated and applied to any persons record which contains this role.
|
|
Activate on Date |
Used to activate the requirement on a specific date. Enter the date the requirement will be applied to any person’s record containing this role.
|
8. Click the Save button.
Only requirements which have a Pending status can be activated within a role. The following rules apply when activating role requirements:
· If you are attaching inactive requirements to an active role, you must activate the requirement in order for it to display in the person’s records (not applicable until it is activated).
· You do not have to activate the requirement from the role; you could also do this from the person record.
· Activating a role which has many inactive requirements could also activate all requirements.
1. From the Portal Page, click Smart Solutions tab > Admin and Report > Setup. Under User Management, select Role.
2. Select the show all ![]() icon to view all shared roles (roles created in global).
icon to view all shared roles (roles created in global).
3. Enter the role for which you wish to activate the requirement(s).
4. Select the Requirements tab.
5. Check off all Requirements you wish to activate which are in the Pending status
6. Right click and select Activate.
The requirement displays an active status in the role.
Once a requirement is active, you cannot edit any certification information; however, you can use the Change Defaults option to modify completion date and refresher intervals.
1. From the Portal Page, click Smart Solutions tab > Admin and Report > Setup. Under User Management, select Role.
2. Select the show all ![]() icon to view all shared roles (roles created in global).
icon to view all shared roles (roles created in global).
3. Enter the role for which you wish to activate the requirement(s).
4. Select the Requirements tab.
5. Check off all Requirements you wish to change defaults on which are in the active status
6. Right click and select Change Defaults.
7. Change appropriate defaults
8. Click the Save button
The requirement displays updated information.
If you need all documents which are attached to a single document type to batch transfer into the role as requirements, use the Add Document Type option under the Role Requirements folder.
1. From the Portal Page, click Smart Solutions tab > Admin and Report > Setup. Under User Management, select Role.
2. Select the show all ![]() icon to view all shared roles (roles created in global).
icon to view all shared roles (roles created in global).
3. Enter the role for which you wish to add the Document Type.
4. Select the Requirements folder.
5. Right click and select Add Document Type.
The Add Type window displays.
Fields |
Description |
|
Type |
Zoom from the Type field to select the document type which will be attached to this role.
|
|
Role Specific Policy |
If unchecked, these requirements will inherit whichever certification information is configured within the requirement record (document record). If checked, the following options will display specific to the Role for:
If checked, an icon will display next to the requirements indicating role specific policies have been enabled.
|
|
Must Have |
Requirements associated with this role must be fulfilled. Until they are, the Person Certification Status will remain INWORKS or EXPIRED.
|
|
Complete within Duration Days |
Only seen if Role Specific Policy is checked. The number of days allowed for completion of the requirements. If not specified, the completion date is the day the requirement is associated with the person record. This applies to BOTH Initial and Revision Certifications.
|
|
Need Trainer Sign-off |
Only seen if Role Specific Policy is checked. Check this option if trainer sign off is required for Initial, Revision, and/or Refresher Certification.
|
|
Supports Self Training |
Only seen if Role Specific Policy is checked. This is used for Course Requirements Only Check this option if Course Self Train will be used for Initial, Revision, and/or Refresher Certification.
|
|
Need Training Session |
Only seen if Role Specific Policy is checked. Check this option if these Documents must be attached to Training Session for Initial, Revision, and/or Refresher Certification.
|
|
Need Assessment |
Only seen if Role Specific Policy is checked. Check this option if a unique Assessment will be attached to Initial, Revision, and/or Refresher Certification.
|
|
Preferred Course |
Only seen if Role Specific Policy is checked. This is used for Document Requirements Only Check this option if the Documents must be attached to a specific Course record for Initial, Revision, and/or Refresher Certification.
|
|
Refresher Certification Required |
If enabled: refresher certification is required.
|
|
Refresher Interval Days |
How many days does the user have to take the refresher certification?
|
|
Grace Days for Refresher |
The number of days after the refresher interval occurs that an individual must be re-certified. If the refresher is not completed within that time frame, certification is expired.
|
|
Refresher Advance Notice |
How many days in advance does the Person need to be notified to take the refresher?
|
|
Requires Retraining if Previously Trained |
This is used for Refresher Certification Only Whether individuals must retake the training even if they have taken it in the past. The following three elements of training are evaluated: Training, Assessment, and Checklist.
|
|
Include Inworks |
If checked, only documents which are in the Status of INWORKS will transfer to the requirements tab for this role.
|
|
Include Prerelease |
If checked, only documents which are in the Status of PRERELEASED will transfer to the requirements tab for this role.
|
|
Include Release |
If checked, only documents which are in the Status of CURRENT transfer to the requirements tab for this role.
|
|
Make Change Permanent |
If checked - when new documents are created or changes to the status are checked, the documents transfer to this role as a requirement. If unchecked - , only documents that initially transferred over to this role as a requirement when the document type was added will be included with this role. No new documents created after this transaction action will transfer to this role.
|
6. Once all information is applied click the Save button
The documents containing the statuses indicated above will transfer into the role.
If you wish to remove, at one time, all documents belonging to the same type that have been attached to the requirement use the Delete Document Type option.
1. From the Portal Page, click Smart Solutions tab > Admin and Report > Setup. Under User Management, select Role.
2. Select the show all ![]() icon to view all shared roles (roles created in global).
icon to view all shared roles (roles created in global).
3. Enter the role for which you wish to delete the requirement(s).
4. Select the Requirements tab.
5. Right click and select Delete Document Type.
The Delete Type window is displayed
6. Click the Document Type to remove from the Type drop down menu
7. Click the Make Permanent change option to delete only the pending requirements from the role. Anything that is active will remain in the role and can be removed individually if needed.
8. Click the Save button
All applicable requirements have now been removed from the Role folder.
Role requirements can only be deactivated within the role record, not a person record. The following rules apply when deactivating requirements attached to roles:
· Only requirements that have an active status can be deactivated.
· Once requirements have been deactivated, they are removed from the role.
1. From the Portal Page, click Smart Solutions tab > Admin and Report > Setup. Under User Management, select Role.
2. Select the show all ![]() icon to view all shared roles (roles created in global).
icon to view all shared roles (roles created in global).
3. Enter the role for which you want to deactivate the requirement(s).
4. Select the Requirements folder.
5. Check all Requirements to deactivate which are in the active status.
6. Right click and select Deactivate.
7. Enter a Deactivation Comment.
8. Check off if you wish these Requirements to be kept in any current Actor | Person records.
9. If requirements will not be kept in person records select one of the following options:
Option |
Description |
|
Deactivate |
Role requirements are removed from the person record. |
|
Suspend |
Role requirements are suspended in the person record. A decision can be made later whether to keep or deactivate these requirements. |
|
Keep |
Requirements will no longer be associated with the old role and are kept in the person record. |
10. Enter your Password.
11. Click the Save button.
The Requirement will now be removed from the role.
One or more positions can be attached to a role. The following rules apply when attaching roles to positions:
· If you are attaching inactive roles to an active position, you must activate the role to display it in the person’s records (not applicable until it is activated).
· You do not have to activate the role from position; you could also do this from the person record.
· Activating a position which has many inactive roles could also activate all roles.
1. From the Portal Page, click Smart Solutions tab > Admin and Report > Setup. Under User Management, select Role.
2. Select the show all ![]() icon to view all shared roles (roles created in global).
icon to view all shared roles (roles created in global).
3. Enter the role for which you wish to add positions.
4. Select the Position folder.
5. Right click and select Add.
6. Zoom from the Position field and tag all Positions you wish to attach to the Role.
7. Check the Activate Now check box for any Roles you wish to Activate within the Position.
8. Click the Save button.
|
NOTE: the first role attached to the position becomes the Primary Role. If you wish to change Primary Role you must edit the role attached to the position from the position record and select the Primary Role option. |
Each role record contains a users tab where all persons attached to this role can be viewed.
1. From the Portal Page, click Smart Solutions tab > Admin and Report > Setup. Under User Management, select Role.
2. Select the show all ![]() icon to view all shared roles (roles created in global).
icon to view all shared roles (roles created in global).
3. Enter the Role record.
4. Select the Users folder.
5. From the Select User drop down menu select Person.
A list of all persons attached to this role are now displayed.
Please see How to Add Persons to a Role if you wish to attach multiple persons to a single role record.
Multiple users can be assigned to a role from the role record by selecting the Users tab. Use this option if you need to attach multiple users to a single role.
1. From the Portal Page, click Smart Solutions tab > Admin and Report > Setup. Under User Management, select Role.
To attach a shared role select the ![]() icon to view shared roles.
icon to view shared roles.
2. Select the role for which users will be added by left clicking over the Role.
3. From the Role select the Users folder.
4. From the Select User drop down menu select Person.
5. Scroll to the bottom of the users page to view all available persons who can be attached to this role.
|
NOTE: If an administrator needs to search for users by a different organization, the administrator has an option to select the |
6. From the Available Actors list check off all persons who will be attached to this role.
7. Click the ![]() button to attach selected persons to the role.
button to attach selected persons to the role.
8. Scroll to the top of the Users page.
All users selected are attached to the role.
Please see How to Activate Persons for a Role.
Please see How to Add Roles to a Person if you wish to attach multiple roles to a single person record
When removing persons from a role - A person can only be removed from a role if their active role status is pending.
1. From the Portal Page, click Smart Solutions tab > Admin and Report > Setup. Under User Management, select Role.
To attach a shared role select the ![]() icon to view shared roles.
icon to view shared roles.
2. Select the role for which users will be added by left clicking over the Role.
3. From the role select the Users folder.
4. From the Select User drop down menu select Person.
5. From the Current Actors list check off all persons who will be removed from this role.
6. Click the ![]() button to remove selected persons from the role.
button to remove selected persons from the role.
All users selected are removed from the role.
Only persons who have an Actor Role Status of Pending can be activated within a role. When activating persons to a role, you can activate the role from within the person record.
1. From the Portal Page, click Smart Solutions tab > Admin and Report > Setup. Under User Management, select Role.
2. Select the show all ![]() icon to view all shared roles (roles created in global).
icon to view all shared roles (roles created in global).
3. Enter the role for which you wish to activate the person(s).
4. Select the Users folder then select Person from the Select User drop down menu.
5. Check off all Persons you wish to activate which are in pending status.
6. Right click and select Activate.
The person will now show an actor role status in the role as active
Persons can be deactivated from a role. The following rules apply when deactivating persons attached to roles:
· Only persons who have an Actor Role Status of Active can be deactivated.
· Once persons have been deactivated from the role, they are removed from the role.
1. From the Portal Page, click Smart Solutions tab > Admin and Report > Setup. Under User Management, select Role.
2. Select the show all ![]() icon to view all shared roles (roles created in global).
icon to view all shared roles (roles created in global).
3. Enter the role for which you wish to deactivate the person(s).
4. Select the Users folder then select Person from the Select User drop down menu.
5. Check off all Persons you wish to deactivate which are in the active status.
6. Right click and select Deactivate.
7. Enter a deactivation Comment.
8. Check off if you wish these requirements to be kept in any current actor | person records.
9. If requirements will not be kept in person records select one of the following options:
Option |
Description |
|
Deactivate |
Role and all associated requirements are removed from the person record.
|
|
Suspend |
Role and all associated requirements are suspended in the person record. A decision can be made later whether to keep or deactivate this role and associated requirements.
|
|
Keep |
Role will no longer be associated with the old position it is kept in the person record and is classified as an ad hoc role.
|
10. Enter Password.
11. Click the Save button.
The person will now be removed from the role.
Please see Rights Groups under User Management Setup.
Each person record contains the employee whose training and certification is tracked within the SmartTrainTM system to ensure proficiency in various job skills (functions). Person records are usually managed by the Training Coordinator Team (QA Group).
The following rights must be assigned to a user to manage or view persons:
Rights |
Description |
|
UMG_VIEW |
Allows administrator to view the User Management Console. |
|
PER_SUPERVISOR |
Allows user to view any person's training and person record including the Requirements, Certification Information, Job History and Training History folders. |
|
PER_VIEW_SUPERVISOR |
Allows user to view, sign off and modify any person's training and person record including the Requirements, Certification Information, Job History and Training History folders. Must also be used with the PSN_MANAGE Right. |
|
PRM_MANAGE |
Allows users to add new Person Review Types, modify existing reviews, or delete reviews. |
|
PRM_VIEW |
Allows user to access Person Review Types to view and select. |
|
PSN_ADMINISTRATOR |
Allows user to manage person records that any Manager is assigned to. |
|
PSN_CREATE |
Allows user to create new person records. |
|
PSN_DELETE |
Allows user to delete person records. |
|
PSN_MANAGE |
Allows user to sign-off on their employee's training records, edit their employee's person detail and view their employees's Requirements, Certification Information, Job History and Training History folders. |
|
PSN_VIEW |
Allows user to view only their employee's training records and view their employee’s Requirements, Certification Information, Job History and Training History folders. |
|
PSS_VIEW |
Allows user to access Person Status to view and select. |
|
SIGNUP |
Allows user to sign-up for training. |
|
SIGNUP_SUPERVISOR |
Allows user to sign-up any user for training. |
|
TRN_VIEW |
Allows user to view training sessions. |
|
ROL_MANAGE |
Allows administrator to add new roles, modify existing roles, or delete roles. |
|
ROL_VIEW |
Allows user to access roles to view and select. |
|
RGP_VIEW |
Allows user to access Rights Groups to view and select. |
|
DTN_VIEW |
Allows user to access Document Requirements to view and select. |
|
SDC_VIEW |
Allows user to access document records to view |
|
CUR_VIEW |
Allows user to access course requirements to view and select. |
Please see Rights Groups to assign Rights Groups to users.
Persons belong to one primary organization; however, they can be viewed by all users with appropriate rights and selected from within any organization.
A Person can be created in SmartTrainTM in many different ways. During your implementation of SmartTrainTM, you will be working very closely with your Certified Pilgrim Consultant to first identify which one of these methods will apply:
Person Setup Option |
User Steps |
|
From Find |
1. From the Smart Solutions tab on the Portal Page, select SmartTrain > Find > Person. The Person list displays. 2. From the Person list right click and select Add. 3. Enter all appropriate information Please see Default Person Fields for more information. 4. Click the Save button. The person record has been added to the system.
|
|
From User Management |
1. From the Portal Page, click Smart Solutions tab > Admin and Report > Setup. Under User Management, select Users. 2. Click the Select User dropdown arrow and select Person. The Person list displays. 3. From the Person list right click and select Add. 4. Enter all appropriate information. Please see Default Person Fields for more information. 5. Click the Save button. The person record has been added to the system.
|
|
Import From User |
If you are using other SmartSolve© solutions, you can migrate your internal actors into persons and manage everything from the person record. Once internal actors are migrated, they will be removed from the actor table and need to be managed from the person list. Remaining setup of each person is still required (Job History, Training History, etc.). 1. From the Portal Page, click Smart Solutions tab > Admin and Report > Setup. Under User Management, select Users. 2. If needed, select the show all 3. From the internal actor record, tag all the internal actors you wish to migrate then right click and select Migrate to Person. 4. Zoom from the Position field to select a position for the person. 5. Click the Save button.
|
|
|
NOTE: You can also tag multiple internal actors and migrate them to a single position.
|
|
Via Custom Import Utility |
If you do not wish to recreate persons who may already exist in a third party system, you can work with Pilgrim to have a utility developed to import key person information into SmartSolve©. Please contact your Pilgrim representative for more information.
|
Fields |
Required |
Description |
|
Code |
* |
The Code is a unique field which is the first field that identifies the actor in the Internal Actor list. Most Pilgrim customers populate this field with the user’s first initial/last name or last name and first initial.
|
|
Logon User |
* |
If the actor will be logging into the system, this is the logon ID that will be used by the actor. Ensure the logon user entry exactly matches the user ID entered in the user account on your server. Passwords do not need to be setup as the application uses the password from the user's account on the server.
|
|
Enable Logon |
* |
Check this box to allow the actor to logon to the application as long as they have a valid User ID.
|
|
First & Last Name, Middle Initial |
* |
This is a free text field where the first and last name of the actor is entered. It can later be used for searching.
|
|
Position |
* |
Zoom from this field to select the Position for this Person. Please see Positions.
|
|
Department |
* |
The department field is used for escalation and for Restrict Org Unit Security. It is also used as a method to search for actors. Please see Departments.
|
|
Manager |
* |
The manager field is used for escalation and also later for SmartTrainTM. It is also used as a method to search for actors. Use the DEFAULT actor as a manager if needed until you add all actors; or, configure your actor list using your org chart.
|
|
Hire Date | Start Date |
* |
These are the Dates the employee was hired and will start working in the Position assigned.
|
|
Requires Manager Approval to Attend Training Session |
Enable this check box if the person is required to receive manager approval in order to attend training sessions. |
|
|
Person Status |
* |
If set to ACTIVE, all Roles attached to the Position will transfer to the Person record and all Requirements attached to those Roles will Activate (if applicable). Also, if set to ACTIVE, the Peson will now show up on the Needs Training List for any Requirements that have transferred from Roles under the Position selected. If INACTIVE, Person does not yet show up on the Needs Training List and no Roles attached to the Position will transfer yet to the Person record (until later set to ACTIVE after the Person record is created). Please see How to Change Person Status.
|
|
Activate Ad-Hoc Position Roles |
|
If the Person Status is set to ACTIVE, this option will be made available showing any Ad Hoc Roles which have since been attached to the Position. If checked, all Roles will transfer to the Person record and will be activated automatically. If needed, any of these Ad Hoc Roles can be Deactivated from the Person record at a later date. If unchecked, the Ad Hoc Roles listed here will still transfer to the Person record; however, they will be listed in a Pending Status and can either be deleted from the Person record, or later Activated from the Role folder in this Person record.
|
|
Email Address |
|
If you wish your client contact to be notified via email of items that need to be completed, setup the Contact’s email address in this field.
|
|
Address Info |
|
Free text fields where more contact information can be entered if needed.
|
The person Detail is always the first information displayed when entering the person record. The following information is available:
Information |
Description |
|
Header
|
The header of the person record is always displayed at the top of the screen and contains the following information: Person – Unique code of the person record as well as first and last name of the person is displayed in this field. Person Status – The current status of the person (INACTIVE, ACTIVE, etc.). Position – this field displays the current position assigned to the person Manager – this field displays the person’s manager Person Certification Status – This status is displayed to show if the person is certified or not on all Must Have requirements. Position Certification Status – This status is displayed to show if the person is certified or not on all requirements attached to roles that have been assigned to this person via a position.
|
|
Hire Date |
This is the date the person was hired by the company.
|
|
Start Date |
This is the date the person started working for the company.
|
The following can be managed accordingly by an administrator for persons:
· Persons can be edited
· Persons can be deleted from the system
A person record can be accessed in the system using either of the methods below:
Person Access |
User Steps |
|
From Find |
1. From the Smart Solutions tab on the Portal Page, select SmartTrain > Find > Person. The Person list displays. 2. From the Person list left click over the Person Code. The person record displays.
|
|
From User Management |
1. From the Portal Page, click Smart Solutions tab > Admin and Report > Setup. Under User Management, select Users. 2. Click the Select User dropdown arrow and select Person. The person list displays. 3. From the Person list left click over the Person Code. The person record displays.
|
You can change the name or the description of the person at anytime. This updates any records containing the person.
1. From the Smart Solutions tab on the Portal Page, select SmartTrain > Find > Person.
The Person list displays showing persons from all organizations.
2. Click the ![]() icon to switch to Local view (if applicable).
icon to switch to Local view (if applicable).
3. Enter the person record for which the changes will be made.
4. Right click and select Edit.
5. Make appropriate changes.
6. Click the Save button.
All new changes are displayed in the Person Detail window.
The following rules apply when deleting a person record:
A person can only be deleted from the system if the person record has a status of INACTIVE.
Deleting a person from the global organization will delete it from the global organization and all local organizations. (Deletion of global person records can only be managed from the global organization.)
1. From the Smart Solutions tab on the Portal Page, select SmartTrain > Find > Person.
The Person list displays showing persons from all organizations.
2. Click the ![]() icon to switch to Local view (if applicable).
icon to switch to Local view (if applicable).
3. Check a person to delete who is in INACTIVE Status.
4. Right click and select Delete.
5. Select Ok to confirm.
The person will now be deleted from the system.
Please see Person Management under the SmartTrainTM End User Guide for more information on how to manage a person record.
Please see Single Sign-on under User Management Setup.
The Person Status is used to determine the job status of the individual and also controls how training requirements and history are analyzed. SmartTrain provides three primary statuses; however, you can add new ones or change the names of the existing ones provided in the global organization:
Status |
Description |
|
INACTIVE |
The individual is not active with the company. This status may be used if an individual is on extended leave (i.e., maternity leave) or has been hired, but has not started. The record is still accessible via SmartTrainTM; however, certification tracking and notifications are suspended.
|
|
|
NOTE: all Requirement, Certification, and Training History are removed from the person record when a person status changes from Active back to INACTIVE or TERMINATED; however, the history remains in the database and can be fetched via a Crystal or SmartInsightTM Report.
|
|
ACTIVE |
The individual is actively working for the company. When in an active status, requirements, training history and certification are tracked.
|
|
TERMINATED |
The individual is no longer working for the company. Records are no longer accessible via SmartTrainTM; however, reports can be generated for the individual if needed.
|
|
|
NOTE: all requirement, certification, and training history are removed from the person record when a person status changes from Active back to INACTIVE or TERMINATED; however, the history remains in the database and can be fetched via a Crystal or SmartInsightTM Report.
|
The following rights must be assigned to a user to manage or view person status:
Rights |
Description |
|
PSS_MANAGE |
Allows administrator to add new Person Statuses, modify existing Statuses, or delete Statuses.
|
|
PSS_VIEW |
Allows user to access Person Status to view and select.
|
Please see Rights Groups to assign Rights Groups to users.
Global Person Statuses will be inherited by all local organizations.
Local Person Statuses will only be viewed and used within that local organization.
1. From the Portal Page, click Smart Solutions tab > Admin and Report > Setup. Under
Training, select Person Status.
2. Right click and select Add.
3. Enter the new Secondary Status.
4. Select the appropriate Primary Status from the drop down (i.e., INACTIVE).
5. Click the Save button.
The new person status displays.
Person Statuses can be edited, deleted, and managed accordingly by an administrator.
You can change the name or description of the person status at any time. This updates in any records containing the status.
1. From the Portal Page, click Smart Solutions tab > Admin and Report > Setup. Under
Training, select Person Status.
2. Click the ![]() icon to switch to Local view (if applicable).
icon to switch to Local view (if applicable).
3. Enter the person status record.
4. Right click and select Edit.
5. Make appropriate changes as needed.
The status will now be updated with changes.
A person status can only be deleted from the system if it is not attached to any person records.
1. From the Portal Page, click Smart Solutions tab > Admin and Report > Setup. Under
Training, select Person Status.
2. Click the ![]() icon to switch to Local view (if applicable).
icon to switch to Local view (if applicable).
3. Check off the person status you wish to delete.
4. Right click and select Delete.
5. Select Ok to confirm.
The status is deleted from the system.
Please see Show Terminated Persons under the Application Options Utility.
Certification statuses indicate where individuals stand in the position certification and person certification processes. SmartTrainTM provides three primary statuses and one starting status; however, you can add new ones or change the names of the existing ones provided in the global organization:
Status |
Description |
|
NOT STARTED |
The Role | Requirement has not has not yet been activated in the person record; therefore, the person does not yet have to fulfill the Role | Requirement.
|
|
INWORKS |
The Role | Requirement has been activated and the person must now fulfill the Role | Requirement.
|
|
NEED EVALUATION |
The Role | Requirement has been activated and SmartCommTM is in the process of evaluating the Requirement to determine due dates and fulfillment options.
|
|
CURRENT |
The Role | Requirement has been fulfilled by the person.
|
|
EXPIRED |
The refresher Role | Requirement is now overdue and must now be fulfilled by the person.
|
The following rights must be assigned to a user to manage or view Certification Status:
Rights |
Description |
|
PRS_MANAGE |
Allows administrator to add new Certification Statuses, modify existing Statuses, or delete Statuses.
|
|
PRS_VIEW |
Allows user to access Certification Status to view and select.
|
Please see Rights Groups to assign Rights Groups to users.
Global Certification Statuses will be inherited by all local organizations.
Local Certification Statuses will only be viewed and used within that local organization.
1. From the Portal Page, click Smart Solutions tab > Admin and Report > Setup. Under
Training, select Certification Status.
2. Right click and select Add.
3. Enter the new Secondary Status.
4. Select the appropriate Primary Status from the drop down.
5. Click the Save button.
The new Certification Status displays.
The following can be managed accordingly by an Administrator for Certification Status:
Certification Statuses can be edited.
If you wish to change the name or the description of the Certification Status this can be done at anytime and will update in any records containing the Status.
1. From the Portal Page, click Smart Solutions tab > Admin and Report > Setup. Under
Training, select Certification Status.
2. Click the ![]() icon to switch to Local view (if applicable).
icon to switch to Local view (if applicable).
3. Enter the Certification Status record.
4. Right click and select Edit.
5. Make appropriate changes as needed.
The Status will now be updated.
A Certification Status can only be deleted from the system if it is not attached to any person records.
1. From the Portal Page, click Smart Solutions tab > Admin and Report > Setup. Under
Training, select Certification Status.
2. Click the ![]() icon to switch to Local view (if applicable).
icon to switch to Local view (if applicable).
3. Check off the Certification Status you wish to delete
4. Right click and select Delete.
5. Select Ok to confirm.
The Status is deleted from the system.
A user cannot sign-off using Role assigned if they are not CURRENT on Certification Requirements within the Role. Training requirements are assigned to a role but the user is not active on the role (selectable) until all training is complete.
For example, a user is assigned to the QA Approver Role in setup which has various Certification (Document and Course) Requirements attached that anyone with the QA Approver Role must fulfill.
The user has not yet completed all Certification Requirements on the QA Approver role; therefore, this user cannot be selected to perform any system transaction involving this role. Or, if user was already selected to perform the transaction, but since being selected is not up-to-date on certifications, then this user will not be able to perform the transaction until first fulfilling all requirements. This functionality is configured using Application Option: “MandateCertificationForRole”
Please see Mandate Certification for Role under the Application Options Utility.
In many cases, a Functional Manager will always be the same as the Person Manager. For instance, when there is a change in the Person’s Manager, the previous Manager is still listed as the Functional Manager on the existing Roles assigned within Person’s profile. The training coordinator has to manually update the Functional Manager for each existing Role assigned to that Person’s profile. This functionality is configured using Application Option: “Sync Functional Manager on a Person Role to the current Person Manager.”
Please see Synch Person Manager to Roles as Functional Manager under the Application Options Utility.
SmartTrainTM allows person reviews to be scheduled and performed at any time within the person record. A default review called Default Person Review is already entered in the SmartTrainTM Policy setup table upon installation. This Default Person Review is provided as an optional review which will display in every person record and it is up to you whether or not you use this functionality. The Default Person Review:
Can be edited (renamed).
Automatically attaches to all new person records. If you do not want to use this default, ignore it.
The following rights must be assigned to a user to manage or view the Default Person Review:
Rights |
Description |
|
PRM_MANAGE |
Allows administrator to modify the existing Default Person Review.
|
|
PRM_VIEW |
Allows user to access the Default Person Review to view and select.
|
Please see Rights Groups to assign Rights Groups to users
· Global Default Person Reviews will be inherited by all Local organizations.
· Local Default Person Reviews will only be viewed and used within that local organization.
1. FFrom the Portal Page, click Smart Solutions tab > Admin and Report > Policy. Under
Training, select Person Review Schedule.
The Default Person Review window displays.
2. Edit any information for the Person Review.
3. Click the Save button.
The Person Review has now been modified and these changes will show up in new person records or any person records for which this review is later scheduled.