Please select the object link below for more information on how to configure the object.
Object |
Shared with other SmartSolve© Applications |
Required for SmartComplaintsTM |
Yes |
Yes |
|
No |
Yes |
|
No |
Yes |
|
No |
Yes |
|
No |
Yes |
|
No |
Yes |
|
No |
Yes |
|
No |
Yes |
|
No |
Yes |
|
No |
Yes |
eMDR stands for electronic Medical Device Reporting. The Food and Drug Administration (FDA) allows electronic receipt and processing of medical device adverse event reports. These MedWatch 3500A reports are required of manufacturers, user facilities, and importers when an adverse event occurs.
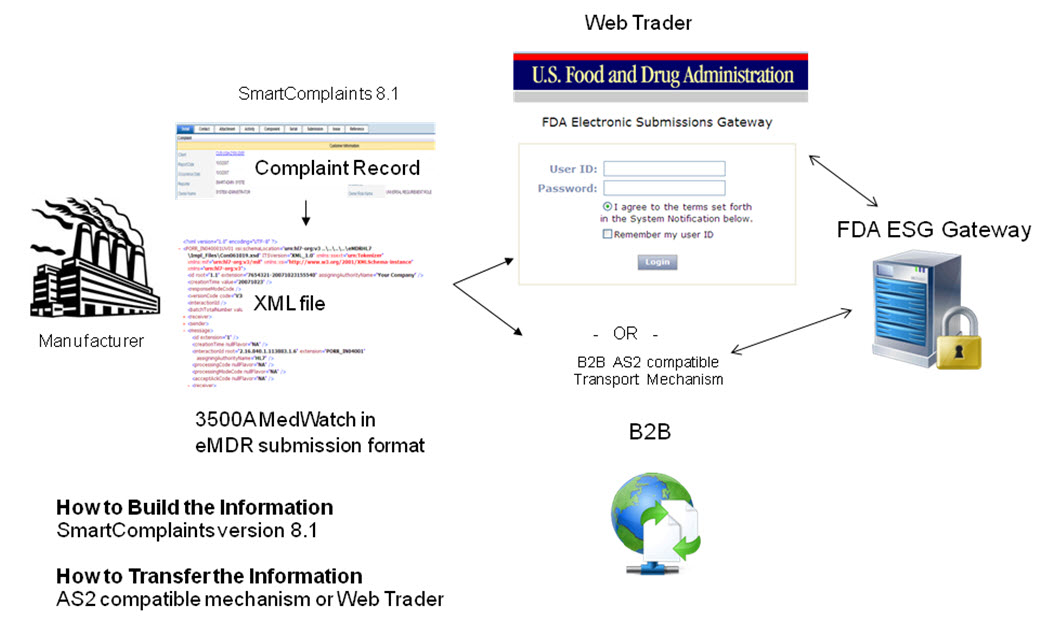
The eMDR feature in SmartComplaintsTM has been developed to support the FDA's Center for Devices and Radiological Health (CDRH) HL7 requirements to generate a complaint eMDR file. Currently, the FDA accepts electronic medical device reports via the following two FDA gateway options:
Options |
Description |
WebTrader |
Generate the 3500A eMDR xml file from SmartComplaintsTM and use the FDA's Web Trader application to send the file to the FDA Gateway. This option is for customers who do not have a B2B mechanism and is available for free for use by the FDA.
|
B2B |
Generate the 3500A eMDR xml file from SmartComplaintsTM and use your company's B2B (AS2 protocol) transport mechanism to send the file to the FDA Gateway.
|
The following reports are accepted by the CDRH eMDR program:
o Attachments as part of the electronic file (with PDF or zip file format)
o 5 day reports
o Initial (30 day) reports
o Follow-up reports
The following reports are not accepted by the CDRH:
Periodic reports
Summary reports (ASR's)
The following list describes current functionality restrictions:
· eMDR Html data entry template is not currently compatible with Forms Configurator.
· ISO 3166 three digit country codes must be used.
· US Postal Service two digit codes must be used. For additional information check the following URL: http://www.usps.com/ncsc/lookups/abbreviations.html#states.
· Three specific Null Values that have to be used are NA, NI, ASKU
SmartComplaintsTM will generate an HL7 compliant eMDR, xml file to send to CDRH via the FDA ESG (Electronic Submission Gateway). The FDA Gateway is used by all centers of the FDA (CDER, CDRH, etc) as they receive many types of electronic submissions. The eMDR will be sent as an xml file to CDRH who will decode and save MedWatch data automatically into MAUDE (Manufacturer And User facility Device Experience database). Any attachments sent will flow into the FDA’s attachment database.
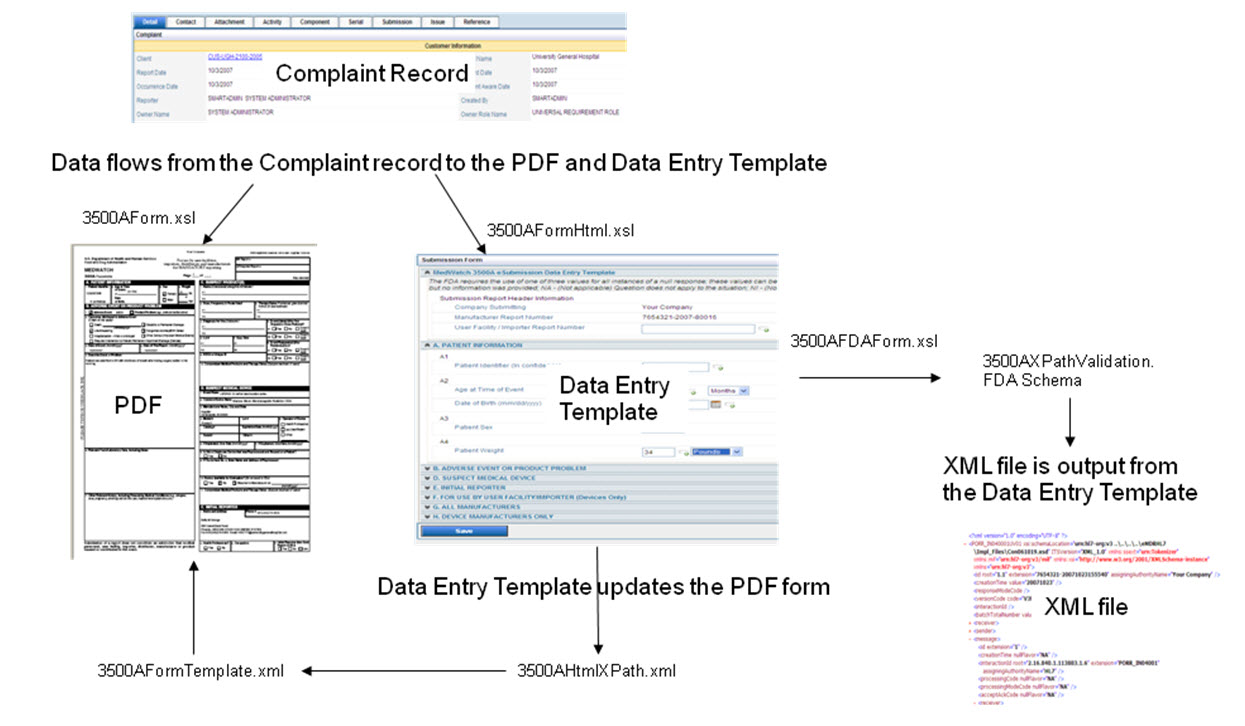
The following diagram shows how information flows from the complaint record into the MedWatch PDF and into the html data entry template and then becomes the eMDR xml file. The specific files that are used to create the records are defined in the data flow.
In order to transfer an eMDR to the FDA, the user must build the documents to be transferred and then transfer them.
Build the Information: generate MedWatch data using HL7 ICSR standard, a message format that is mapped to the 3500A.
HL7 (Health Level 7) standard (ANSI accredited standards organization)
ICSR Release 1– Individual Case Safety Report messaging format
Utilizing codes defined by National Cancer Institute (NCI) and unique FDA codes
Event Types: Death, Malfunction, etc are assigned codes to be used in the xml file submitted to CDRH to define what the terminology means.
How can you do this?
· eSubmitter – downloadable software from FDA website
· SmartComplaintsTM generates the eMDR HL7 complaint xml file!
Transfer the Information: The file will be transmitted electronically to the FDA’s Electronic Gateway (FDA ESG) where it will automatically load the MedWatch file into the FDA’s MAUDE database.
How do I Transmit the electronic file?
Web Trader – free FDA ESG connector, manual method (see Scenario 1)
AS2 compatible transport mechanism (i.e., B2B) and leverage the CSA to connect to SmartComplaintsTM
The FDA Electronic Submissions Gateway (ESG) enables the FDA to process regulatory submissions automatically while it functions as a single point of entry for the receipt and processing of all electronic submissions for all FDA centers. This environment is secure and complies with secure messaging standards. The FDA ESG does not open or review submissions; it automatically routes them to the appropriate FDA Center or Office. A submission to the FDA through the gateway is processed as follows:
1. FDA ESG receives an inbound submission (this would be the 3500A xml file generated from SmartComplaintsTM).
2. FDA ESG sends a Message Delivery Notification (MDN) or Acknowledgment 1 notification to the submitter. Acknowledgment 1 confirms that the submission was successfully received by the FDA ESG and provides the official date received by the FDA. This Acknowledgement verifies your digital certificate and the FDA ESG recognizes you.
3. The submission is automatically transferred to the CDRH Center.
4. Acknowledgment 2 is sent by CDRH to indicate that the submission reached the CDRH center and has now been routed to the MAUDE\CDRH database (MAUDE) for final verification.
5. The CDRH Center validates and processes the submission.
6. Acknowledgment 3 is sent by CDRH to indicate that the submission successfully loaded into the Adverse Event database. It also notes any errors that occurred during validation and loading.
NOTE: Electronic MDR reporters must register as trading partners with the ESG to submit to the Gateway. For further information, visit http://www.fda.gov/esg/. The site contains an extensive manual to assist in understanding ESG requirements as well as a contact email address for ESG questions. |
Users need to determine how they will transfer their eMDR file to the FDA. The accessibility of a company with existing B2B mechanisms usually determines the options for eSubmission transmission. No matter which solution the user chooses for transmission, all users need a digital certificate. This digital certificate is a two part electronic key that, when matched together, defines your company to the FDA.
The following information describes high or low volume submissions to the FDA:
Transmission Type |
Recommendation |
WebTrader |
Web Trader is a browser based mini-B2B conduit offered for free by the FDA. It is used by manufacturers to send their eSubmitter or HL7 compatible files to CDRH. To use this software you need an internet browser and a digital certificate. Please see Scenario 1.
|
B2B |
If you have a high volume of submissions, then a B2B solution is preferable. The process for the submission is similar to Web Trader except that at defined intervals the B2B collects all xml forms that have not been previously submitted and automatically submits them to the FDA. Once they have been received, the FDA sends the three acknowledgements which then have to be manually entered into the SmartComplaintTM record. The B2B solution must be able to comply with an AS2 protocol, and there are two “attributes” that need to be defined in the MIME header of the file for communication with the FDA ESG. These are defined in the detailed document at the FDA ESG website. Please see Scenario 2, 3, or 4.
|
|
NOTE: Even if you are going to transfer your eMDR file using a B2B mechanism your initial testing account should also include the Web Trader. For customers who are not familiar with electronic submissions this provides an opportunity to do some initial submissions very quickly to get experience.
|
Contact your Professional Services representative for detailed guidance regarding the implementation of the eMDR feature. The following procedures in this document define the system functional capabilities needed to generate an HL7 compliant xml file for your submission to the FDA. The FDA has changes in how they are requesting information be submitted electronically versus in the physical reporting world, and there are choices on how you can do the actual electronic submission to the FDA ESG.
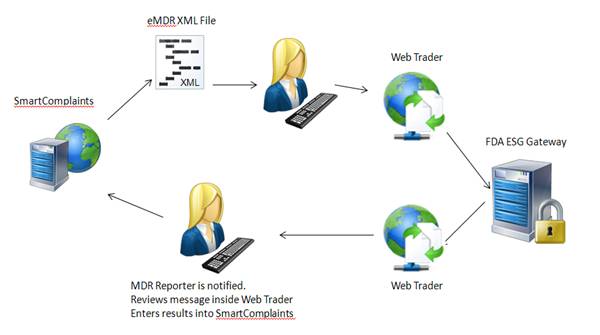
SmartComplaintsTM generates an eMDR HL7 compliant, xml file. The customer enters Web Trader and submits the eMDR file. Web Trader is a front end B2B that submits the file to the FDA ESG. The FDA returns a message and the reporter receives notification and enters Web Trader to review the message. The reporter then manually updates the complaint submission acknowledgement table with FDA information.
The Complaint Synchronization Agent (CSA) cannot retrieve information from Web Trader and send it back to SmartComplaintsTM. Web Trader is a public free access to the FDA gateway, therefore, you cannot install your company specific software as an integration.

SmartComplaintsTM generates an eMDR HL7 compliant, xml file. The users B2B can pick-up the file from a network location, encrypt and then submit it to the FDA ESG. The user can use their own B2B to store the FDA acknowledgements and generate reports to determine if all three acknowledgements have been received and if the final one is PASSED. This scenario will not use the Complaint Synchronization Agent to input the information automatically into the SmartComplaintsTM acknowledgement table.
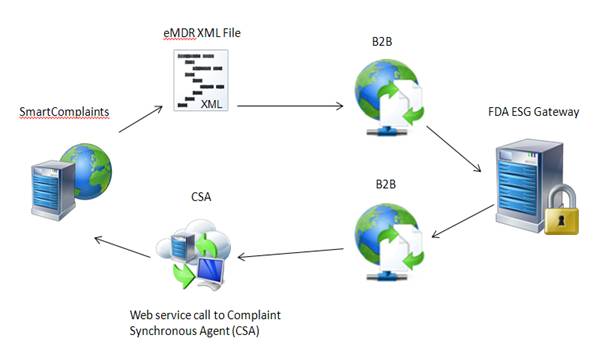
SmartComplaintsTM generates an eMDR xml file, your B2B retrieves the file and submits it to FDA ESG. FDA ESG sends messages back to the B2B which places a call to the Complaints Synchronization Agent to update the complaint submission acknowledgement table with the FDA information.
The SmartComplaintsTM user selects the Submit function within the Submission tab of the complaint record. The eMDR HL7 xml file is output to a folder location of your choice.
The B2B retrieves the eMDR HL7 compliant xml file from a folder on the same or different server than SmartComplaintsTM.
The B2B encrypts the file and sends the eMDR to the FDA.
The B2B will receive three MDN’s from the FDA website. As an MDN is returned from the FDA the B2B must parse out the information that the user wants to update in the Acknowledgement table in the SmartComplaintsTM record.
The B2B places a synchronous “UpdateAcknowledgement” call to the Complaints Synchronization Agent web service and updates the Complaint Submission Acknowledgement table.
SmartComplaintsTM adds a new record in the Activity tab after updates to acknowledgement are complete.
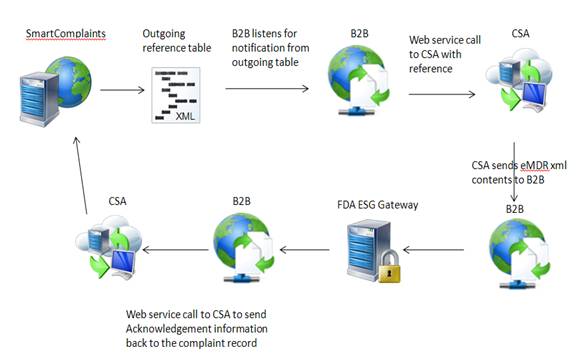
SmartComplaintsTM sends data to an output table. The B2B listens for eMDR notification of availability, and calls CSA to retrieve the eMDR xml file and submit it to the FDA. The FDA returns information and the B2B places a call to the Complaints Synchronization Agent to update the Complaint Submission Acknowledgement table with FDA information.
Term |
Description |
3500A MedWatch |
Medical Device Adverse Event Mandatory Report for Manufacturer, User Facilities and Importers.
|
eMDR |
Electronic Medical Device Adverse Event Reporting for the FDA (CDRH).
|
FDA ESG |
Food and Drug Administration Electronic Submissions Gateway. This is an FDA agency-wide entry point for all electronic submissions. It routes the submissions to the appropriate center or office.
|
FDA CDRH |
Food and Drug Administration Center for Devices and Radiological Health.
|
HL7 |
Health Level 7. This is an ANSI accredited Standards Development Organization (SDO), which is a not for profit volunteer organization that develops standards and specifications related to healthcare. The most widely used standard is a messaging standard that enables disparate healthcare applications to exchange key sets of clinical and administrative data. Additional information may be found at www.Hl7.org.
|
ICSR |
Individual Case Safety Report. This is a message or report that contains all the information from an adverse event. The ICSR message is specifically designed to support individual case safety reports, and does not support population-based case reporting for disease surveillance or outbreak events. In addition, the message is designed to support international safety reporting between public health organizations such as the World Health Organization, and regulatory authorities in the US, Canada, Europe, Japan and other countries. The HL7 ICSR message Release 1 (normative edition2005) supports the exchange of data and other safety reporting requirements between various public health and patient safety organizations. The eMDR release implements Release 1 of the ICSR; additional releases of this ICSR format will add additional reporting requirements in the future.
|
NCI Thesaurus |
The National Cancer Institute (NCI) thesaurus is a product of NCI's Enterprise Vocabulary Service (EVS), which is a collaborative effort of the NCI Office of Communications and the NCI Center for Bioinformatics. It is built so that both humans and computers can interpret it. Published by NCI, this knowledge base contains the working vocabulary used in NCI data systems. It covers clinical, translational and basic research as well as administrative terminology. The CDRH ICSR team worked with terminology experts from the NCI EVS to identify the majority of vocabulary for MDR’s.
|
AS2 |
Applicability Statement 2. An electronic gateway to gateway submission protocol that uses HTTP/HTTPS for communications. This is the required protocol that must be used by customers using the B2B transport mechanism to submit to the FDA ESG.
|
Please see Numbering Scheme under System Wide Setup.
Please see Submission Status under Manual Reporting Setup
The Regulatory Reporting Policy is used for eMDR to:
· Enable eMDR submission capability.
· Define the MDR submission numbering scheme.
· Define the eMDR xml output file naming convention and directory location.
Please see Regulatory Reporting Policy under Manual Reporting Setup
In the Submission tab of the complaint record there is an FDA eSubmission hyperlink. This link, out of the box, sends the user to the FDA ESG test environment. This link can be configured to go to the FDA ESG production environment, once CDRH testing is completed. This link is configurable for one URL, is not driven by any policy, and is effective for all Submission tabs.
The location of the URL may need to be changed if you are using WebTrader and you need to change the link from your test to production account. Please follow the steps below to change the URL.
1. Access the following folder location:
Application Name\SubmissionForms\Formconfig.xsl

<RegulatoryBody Name="FDA" SubmissionUrl="https://esgtest.fda.gov/">
2. Change the URL to the FDA ESG production URL received from the FDA.
If you wish to change the name of the link to better suite your end user (for example, “Click to Launch WebTrader”), then follow the steps below>
1. Access the culture file.
2. Export the culture file from the Language Translator.
3. Open the file and then translate it using the SubmissionUrl.
4. Import the culture file back into the application.
</data>
<data name="SubmissionUrl">
<value>FDA eSubmission</value>
</data>
If a B2B solution is being used and the URL needs to be removed from the page, it can be removed with the following configuration.
The existing tag is:
<RegulatoryBody Name="FDA" SubmissionUrl="https://esgtest.fda.gov/">
To remove the hyperlink from the page remove the URL from the expression:
<RegulatoryBody Name="FDA" SubmissionUrl="">
Please see How to Access the PDF on the Server under Manual Reporting Setup.
Please see How to Map Fields from the Complaint to the PDF under Manual Reporting Setup.
Please see How to Enable | Disable Follow-up Report Data under Manual Reporting Setup.
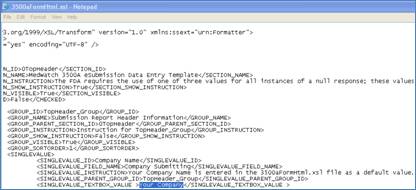
In the MedWatch PDF Report, the default Out of the Box PDF says Your Company.
Please see How to Rename Your Company on the PDF under Manual Reporting Setup.
The Data Entry Template can be loaded from the Submission folder as long as eMDR is enabled in the regulatory reporting policy. The following rules apply to the template:
· The MedWatch eSubmission data entry template captures all the MedWatch data so that the xml file output is compatible with FDA requirements. All labels are identical in naming to the MedWatch form.
· Every section is collapsible.
· All sections of the MedWatch form, required for medical device customers to submit as an eMDR, are available via the template.
· Section C for drugs is not available.
· Field lengths are validated in the template. For example, A1 is a maximum of 10 digits so the system won’t allow users to enter more.
· Dates – mm/dd/yyyy format is required for all dates, which is different than manual submission per FDA. If mm/yyyy is entered the system will automatically apply 01= dd for submitting to the FDA.
· Formats are defined in tool tips as instructions or in the label. Tooltips can be modified if needed.
· Drop down fields help guide user answers. All drop down values are specifically defined by the FDA and should not be changed.
· Client side validation is applied to zip codes and phone numbers. A red icon identifies incorrectly formatted information.
· Note that the labels have format instructions.
· State codes are defined by the US Postal Service.
· Country codes are defined by ISO 3166 Standard.
· Anytime incomplete or incorrect data is entered, the date entry template displays the errors and indicates what must be fixed. Click the error message and it will take you to the error (as long as the section is open).
· Every field label has its own unique instruction. Instructions that are specific to eMDR guide the user in entering data.
Null Values
These are the only Null Values that are allowable by the FDA for a “No” submission response.
Currently the FDA wants every data field in the MDR to have a response in the initial MDR report.
Must have a Null Value instead of a blank field for “initial” reports – this is being asked but not being enforced at this time.
Null Values are selected by using the special icon for text fields.
If there is a drop down field then the null values are in the drop down selection.
The null values entered in the HTML template will populate into the PDF form; except for those fields that are check boxes in the PDF form.
ASKU |
Asked but unknown. Answer could be available but no information was provided. |
NI |
No information. No information is available for this field. |
NA |
Not applicable. This question does not apply to the situation. |
The table below shows the folders that have been added to support the eMDR feature that IT departments may need to access during the implementation stage.
Folder |
Description |
eMDRHL7 |
Contains the Impl_Files/Con061019.xsd” that is the default schema that the FDA is using to validate their information. |
|
NOTE: Do note edit or remove this folder.
|
FDAERRORFILE |
If there is an error when completing the submission, the system creates an error that is displayed on the user's screen and an xml file is created in this folder. The xml file name is the same as the complaint number. This is the file you should submit to Pilgrim's Customer Support Center if you cannot determine what the error is caused from. |
|
NOTE: Do not edit or remove this folder.
|
FDAXML |
Default Location for the FDA xml file. · B2B will need access to this directory for submitting reports to the FDA. · Regulatory submitter requires access to submit reports to the FDA Web Trader. |
|
NOTE: The system can be configured to export the file to other locations.
|
Transferring the data from HTML to PDF is a two step processes:
1. Using the 3500aHTMLXPath.XML to extract the data from the HTML and using the skeleton of file 3500aFormTemplate.XML, we assign the value in the file 3500aFormTemplate.XML.
2. Using the file 3500aFormTemplate.xml with the data, we transfer the data back to the PDF.
The 3500aformTemplate.xml file is used to translate the data from the html template to the MedWatch PDF form.
The 3500aHTMLXPath.xml file is used to translate the data from the html template to the MedWatch PDF form.
Application Name\SubmissionForm\FormConfig.xml
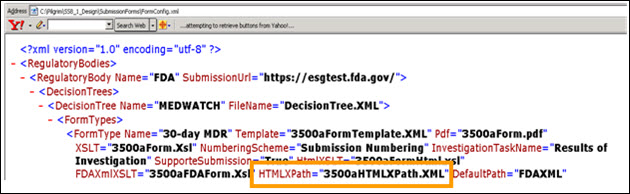
The HtmlXSLT=”3500aFormHtml.xsl” file is used to map the data fields from the complaint record to the data entry template.
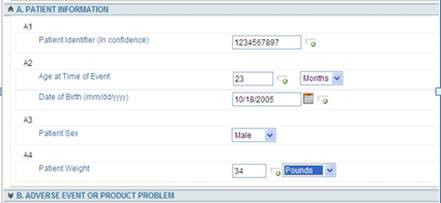
In the template below:
· Patient Information is considered a Section
· A1, A2, A3, A4 is considered a Group
· Age at Time of Event is considered a field
Application Name\SubmissionForm\FormConfig.xml
You then need to go to:
Application Name\SubmissionForm\3500aFormHtml.xsl
The eMDR xml file is copied to the DefaultPath= FDAXML folder when eSubmission is selected in the Submission tab of the complaint record.
FDAXML is a new folder for the output of the xml default folder.
B2B’s transport mechanisms will need access to this directory.
The Regulatory Submitter may need access to submit the xml file from Web Trader.
DefaultFormat="{0}-CDRH-eMDR.xml" is the default naming convention used for all eMDR xml files that are created and by default stored in the FDAXML file folder. This default file naming convention can be overwritten in the unique regulatory reporting policy created for each registration site. This is the default applied to all the eMDR xml files.
Application Name\SubmissionForm\FormConfig.xml
Default file name for eMDR xml output file that is stored in the FDAXML folder
A default naming convention for the xml MdeWatch file is provided out of the box.
The default file name, using the expression above, results in the following file name: 1234567-2007-00001-CDRH-Emdr.xml, where 1234567-2007-00001 is the numbering MDR numbering scheme used by the Regulatory Reporting Policy for the specific MDR registration site.
This allows you to know what MedWatch report number the xml file equates to.
The default naming can be overwritten in the regulatory reporting policy if needed. However, the first report number pre-fix of the naming convention should be maintained. This allows uniqueness to be maintained as new files are exported to the same folder location and will not overwrite the xml file each time.
In the Submission tab look for the Submission Method column. Once you have submitted the eMDR an Acknowledgement hyperlink appears. Select the hyperlink to display the file.
This naming convention displays under the Acknowledgements hyperlink. You can check here quickly to see the immediate impact if you change the name.

Changes |
Description |
|
Section Title Name |
Change individual section titles by changing the value of the “Name”: <SECTION_NAME>A. PATIENT INFORMATION</SECTION_NAME>
|
|
Section Instructions |
Change individual section instruction by changing the value of “instruction” , this is a tool tip: <SECTION_INSTRUCTION>Instruction for A. PATIENT INFORMATION</SECTION_INSTRUCTION> <SECTION_SHOW_INSTRUCTION>True</SECTION_SHOW_INSTRUCTION>
|
|
Make Section Visible |
Make Individual section visible by changing the value of “visible”: <SECTION_VISIBLE>True</SECTION_VISIBLE>
|
|
Changes |
Description |
Group Name |
Change the Group Name by changing the value of “Name”: <GROUP_NAME>A1</GROUP_NAME>
|
Group Instruction |
Change individual group instruction by changing the value of “instruction”, this is a tool tip: <GROUP_INSTRUCTION>Instruction for Group A</GROUP_INSTRUCTION>
|
Show Group Instruction |
Show Group instruction <GROUP_SHOW_INSTRUCTION>False</GROUP_SHOW_INSTRUCTION>
|
Make Group Visible |
Make Individual group visible by changing the value of “visible”: <GROUP_VISIBLE>True</GROUP_VISIBLE>
|
Change Group Order |
Order of the group <GROUP_SORTORDER>1</GROUP_SORTORDER>
|
Changes |
Description |
Field Name |
Change the Field Name by changing the value of “Name”: <SINGLEVALUE_FIELD_NAME>Patient Identifier</SINGLEVALUE_FIELD_NAME>
|
Field Instruction |
Change individual Field instruction by changing the value of “instruction”, this is a tool tip: <SINGLEVALUE_INSTRUCTION> Instruction for patient field.</SINGLEVALUE_INSTRUCTION>
|
Show Field Instruction |
Show Field instruction: <SINGLEVALUE_SHOW_INSTRUCTION>False</SINGLEVALUE_INSTRUCTION> Make individual Field visible by changing the value of “visible”: <SINGLEVALUE_VISIBLE> True</SINGLEVALUE_VISIBLE>
|
Change Field Order |
Order of the Fields: <SINGLEVALUE_SORTORDER> 1</SINGLEVALUE_SORTORDER>
|
Change Field to Text, Memo, Dropdown, or Checkbox |
Each Field can be a: Text, Dropdown, Memo or Checkbox: <SINGLEVALUE_COLUMN_TO_SHOW>DROPDOWN</SINGLEVALUE_COLUMN_TO_SHOW>
|
Disable Field or make Field Modifiable |
Each Field can be modifiable=True or read only if=False: <SINGLEVALUE_MODIFIABLE>False</SINGLEVALUE_MODIFIABLE>
|
Make Field Required or Optional |
Each Field can be required or not: <SINGLEVALUE_REQUIRED>False</SINGLEVALUE_REQUIRED>
|
Show SmartSolve Data |
To show the Smart Solve data for the follow up report: SINGLEVALUE_NOTINFOLLOWUP>True</SINGLEVALUE_NOTINFOLLOWUP>
|
Changes |
Description |
Change Maximum Character Length |
Maximum number of characters that can be entered, for example: <SINGLEVALUE_TEXTBOX_MAXLENGTH>10</SINGLEVALUE_TEXTBOX_MAXLENGTH>
|
Change Field Size |
Size of the Textbox that is viewable for entering data: <SINGLEVALUE_TEXTBOX_SIZE>15</SINGLEVALUE_TEXTBOX_SIZE>
|
Add Zoom Field |
If the zoom control needs to be added then add the following and where it is zooming to: <SINGLEVALUE_ZOOMTO>Calendar</SINGLEVALUE_ZOOMTO> If the data needs to be validated at the client side using regular expression (NOTE: these are standard .net expressions that can be used and are not Pilgrim specific): <SINGLEVALUE_MASK>(^\d{3}\(\d{3}\)\d{3}\-\d{4}$)|(^\d{3}\(\d{3}\)\d{3}\-\d{4}(x)\d{1,5}$)|(NA)|(NI)|(ASKU)</SINGLEVALUE_MASK>
|
Add Default Data into Text Field |
For example the out of the box code for A1 is shown below as: <SINGLEVALUE_TEXTBOX_VALUE /> It needs to be replaced with the following expression to default “NA” into the text box field. <SINGLEVALUE_TEXTBOX_VALUE>NA</SINGLEVALUE_TEXTBOX_VALUE >
|
Changes |
Description |
Change Maximum Character Length |
What value you want to show in the drop down has to have a value in the “3500aVOCAB.xml file. <SINGLEVALUE_DROPDOWN_FILTER_VALUE>Answer</SINGLEVALUE_DROPDOWN_FILTER_VALUE>
|
Add Default Data into Dropdown Field |
For example, the Out of the Box code for D9 “Country” field is shown below as: <SINGLEVALUE_DROPDOWN_VALUE /> It will need to be replaced with the following expression to default “UNITED STATES” into the drop down field. <SINGLEVALUE_DROPDOWN_VALUE>UNITED STATES</SINGLEVALUE_DROPDOWN_VALUE>
|
|
NOTE: this is for any fields which do not contain SmartComplaintsTM data.
|
Add Default Data into Dropdown Field – SmartComplaints Data transferred |
For example the Out of the Box code for D3 “Country” is shown below as: <SINGLEVALUE_DROPDOWN_VALUE><xsl:value-of select="Complaint/MANUFACTURER_ADDRESS/PHY_COUNTRY" /></SINGLEVALUE_DROPDOWN_VALUE> It will need to be replaced with the following expression to default “UNITED STATES” into the drop down field. <SINGLEVALUE_DROPDOWN_VALUE>UNITED STATES</SINGLEVALUE_DROPDOWN_VALUE>
|
|
NOTE: this is for any fields which contain SmartComplaintsTM transferred data.
|
Default Age Dropdown to Years |
<SINGLEVALUE> <SINGLEVALUE_ID>A2_Age</SINGLEVALUE_ID> <SINGLEVALUE_FIELD_NAME>Age at Time of Event</SINGLEVALUE_FIELD_NAME> <SINGLEVALUE_INSTRUCTION>If patient is 3 years or older</SINGLEVALUE_INSTRUCTION> <SINGLEVALUE_PARENT_GROUP_ID>A2</SINGLEVALUE_PARENT_GROUP_ID> <SINGLEVALUE_TEXTBOX_VALUE /> <SINGLEVALUE_DROPDOWN_VALUE>YR</SINGLEVALUE_DROPDOWN_VALUE> <SINGLEVALUE_CHECKBOX_VALUE>0</SINGLEVALUE_CHECKBOX_VALUE> <SINGLEVALUE_FINAL_VALUE /> <SINGLEVALUE_COLUMN_TO_SHOW>TEXTBOX | DROPDOWN</SINGLEVALUE_COLUMN_TO_SHOW> <SINGLEVALUE_TEXTBOX_MAXLENGTH>5</SINGLEVALUE_TEXTBOX_MAXLENGTH> <SINGLEVALUE_TEXTBOX_SIZE>6</SINGLEVALUE_TEXTBOX_SIZE> <SINGLEVALUE_TEXTBOX_FORMAT_TYPE /> <SINGLEVALUE_REQUIRED>False</SINGLEVALUE_REQUIRED> <SINGLEVALUE_ZOOMTO /> <SINGLEVALUE_DROPDOWN_FILTER_VALUE>YearUnit</SINGLEVALUE_DROPDOWN_FILTER_VALUE> <SINGLEVALUE_MODIFIABLE>True</SINGLEVALUE_MODIFIABLE> <SINGLEVALUE_VISIBLE>True</SINGLEVALUE_VISIBLE> <SINGLEVALUE_SORTORDER>5</SINGLEVALUE_SORTORDER> <SINGLEVALUE_MASK>(^\d{1,5}$)|(NA)|(NI)|(ASKU)</SINGLEVALUE_MASK> </SINGLEVALUE>
Use the YearUnit conversion in the Vocabulary file so that the correct dropdown value is selected. The VOCABULARY3500A.xml file has the concept code you need to enter in the default dropdown field above. <Table> <CodeSystem>YearUnit</CodeSystem> <ConceptCode>YR</ConceptCode> <ConceptPreferredTerm>Years</ConceptPreferredTerm> </Table>
|
Default Weight Dropdown to Pounds |
Replace <SINGLEVALUE_DROPDOWN_VALUE /> With the following <SINGLEVALUE_DROPDOWN_VALUE>lbs</SINGLEVALUE_DROPDOWN_VALUE>
<SINGLEVALUE> <SINGLEVALUE_ID>A4_Weight</SINGLEVALUE_ID> <SINGLEVALUE_FIELD_NAME>Patient Weight</SINGLEVALUE_FIELD_NAME> <SINGLEVALUE_INSTRUCTION>Enter the weight and select the appropriate unit of measure. Make a best estimate if exact weight is unknown.</SINGLEVALUE_INSTRUCTION> <SINGLEVALUE_PARENT_GROUP_ID>A4</SINGLEVALUE_PARENT_GROUP_ID> <SINGLEVALUE_TEXTBOX_VALUE /> <SINGLEVALUE_DROPDOWN_VALUE>lbs</SINGLEVALUE_DROPDOWN_VALUE> <SINGLEVALUE_CHECKBOX_VALUE>0</SINGLEVALUE_CHECKBOX_VALUE> <SINGLEVALUE_FINAL_VALUE /> <SINGLEVALUE_COLUMN_TO_SHOW>TEXTBOX | DROPDOWN</SINGLEVALUE_COLUMN_TO_SHOW> <SINGLEVALUE_TEXTBOX_MAXLENGTH>3</SINGLEVALUE_TEXTBOX_MAXLENGTH> <SINGLEVALUE_TEXTBOX_SIZE>4</SINGLEVALUE_TEXTBOX_SIZE> <SINGLEVALUE_TEXTBOX_FORMAT_TYPE /> <SINGLEVALUE_REQUIRED>False</SINGLEVALUE_REQUIRED> <SINGLEVALUE_ZOOMTO /> <SINGLEVALUE_DROPDOWN_FILTER_VALUE>UOM</SINGLEVALUE_DROPDOWN_FILTER_VALUE> <SINGLEVALUE_MODIFIABLE>True</SINGLEVALUE_MODIFIABLE> <SINGLEVALUE_VISIBLE>True</SINGLEVALUE_VISIBLE> <SINGLEVALUE_SORTORDER>5</SINGLEVALUE_SORTORDER> <SINGLEVALUE_MASK /> </SINGLEVALUE>
The VOCABULARY3500A.xml file has the concept code you need to enter in the default dropdown field above. <Table> <CodeSystem>UOM</CodeSystem> <ConceptCode>lbs</ConceptCode> <ConceptPreferredTerm>Pounds</ConceptPreferredTerm> </Table>
|
Capture Sex of Patient from Complaint Field to HTML Template Dropdown |
In the complaint page a user defined field was used to capture the sex of the patient as shown below:
To map female or male to the correct dropdown in the eMDR template below:
<SINGLEVALUE> <SINGLEVALUE_ID>A3_SEX</SINGLEVALUE_ID> <SINGLEVALUE_FIELD_NAME>Patient Sex</SINGLEVALUE_FIELD_NAME> <SINGLEVALUE_INSTRUCTION>Select the patient's gender from the dropdown list. If the adverse event is a congenital anomaly, report the sex of the child.</SINGLEVALUE_INSTRUCTION> <SINGLEVALUE_PARENT_GROUP_ID>A3</SINGLEVALUE_PARENT_GROUP_ID> <SINGLEVALUE_TEXTBOX_VALUE /> <xsl:choose> <xsl:when test="normalize-space(Complaint/V_CEX_CXP_EXTENSION/CEX_UDF_STRING_1) = 'Male'"> <SINGLEVALUE_DROPDOWN_VALUE>Male</SINGLEVALUE_DROPDOWN_VALUE> </xsl:when><xsl:when test="normalize-space(Complaint/V_CEX_CXP_EXTENSION/CEX_UDF_STRING_1) = 'Female'"> <SINGLEVALUE_DROPDOWN_VALUE>Female</SINGLEVALUE_DROPDOWN_VALUE> </xsl:when> </xsl:choose> <SINGLEVALUE_CHECKBOX_VALUE>0</SINGLEVALUE_CHECKBOX_VALUE> <SINGLEVALUE_FINAL_VALUE /> <SINGLEVALUE_COLUMN_TO_SHOW>DROPDOWN</SINGLEVALUE_COLUMN_TO_SHOW> <SINGLEVALUE_TEXTBOX_MAXLENGTH>5</SINGLEVALUE_TEXTBOX_MAXLENGTH> <SINGLEVALUE_TEXTBOX_SIZE>6</SINGLEVALUE_TEXTBOX_SIZE> <SINGLEVALUE_TEXTBOX_FORMAT_TYPE /> <SINGLEVALUE_REQUIRED>False</SINGLEVALUE_REQUIRED> <SINGLEVALUE_ZOOMTO /> <SINGLEVALUE_DROPDOWN_FILTER_VALUE>SexType</SINGLEVALUE_DROPDOWN_FILTER_VALUE> <SINGLEVALUE_MODIFIABLE>True</SINGLEVALUE_MODIFIABLE> <SINGLEVALUE_VISIBLE>True</SINGLEVALUE_VISIBLE> <SINGLEVALUE_SORTORDER>5</SINGLEVALUE_SORTORDER> <SINGLEVALUE_MASK /> </SINGLEVALUE>
|
Changes |
Description |
Auto Check a Check box |
A checkbox unchecked would show as: <SINGLEVALUE_CHECKBOX_VALUE>0</SINGLEVALUE_CHECKBOX_VALUE> It will need to be replaced with the following expression to default the checkbox with a check. <SINGLEVALUE_CHECKBOX_VALUE>1</SINGLEVALUE_CHECKBOX_VALUE>
|
Use this when you are mapping data from the complaint record to the HTML.
FDA eMDR has field limitations per the HL7 ICSR version 1 requirements.
Always use the GetFixLengthData command when bringing over information. This allows the appropriate length of information to be brought over initially. If it is not used, the user will get an error message when they submit the eMDR. This is because it will be validated to the FDA eMDR schema file that is checked before loading into the MAUDE database.
If the field size in SmartSolve is greater than in the eMDR, you should only map for certain character length. Below is the sample of the mapping that has been done when SmartSolve© size is greater than eMDR size.
File Name : 3500aFormHtml.xsl
Field Name : D1_BrandName
<SINGLEVALUE_TEXTBOX_VALUE>
<xsl:value-of select="ssext:GetFixLengthData(Complaint/V_CXP_CUSTOMER_PXP/CXP_BRAND_NAME,80)" />
</SINGLEVALUE_TEXTBOX_VALUE>
To find the size of the data fields in SmartComplaintsTM:
· Access the DDF/ERD documents on Disc 2 of the last SmartSolve© major release CD.
OR
· Open a view and look at the columns to find the data field size and type.
Data fields can be mapped:
· from the Complaint record to the MedWatch PDF form
· from the Complaint record to the data entry template
· from the HTML template to the MedWatch PDF form
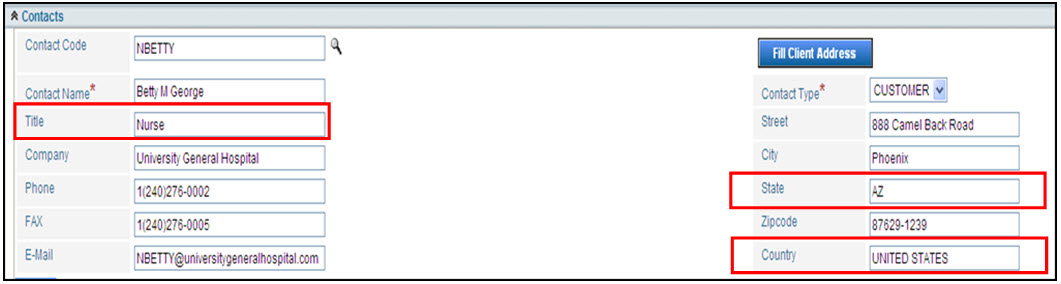
The fields below are mapped to the eMDR report. This means Title, State, and Country map into the Medwatch report for the Medwatch template. The fields are drop down fields and must be selected exactly. They can be configured to allow any input and the system will insert the correct information into the HTML template for the MedWatch report. If fields aren’t auto populating into your template, contact your IT Administrator who can configure the system so the correct information is entered.
Fields, Folders, Tabs |
Description |
State |
State must be populated with either the capitalized 2-digit US Postal State Code or capitalized full state spelling. For Example, user will submit either AZ or ARIZONA so that it populates correctly into the form.
|
Country |
Country must be populated with either the fully capitalized country name (based on the ISO 3166 standard), for example UNITED STATES, UNITED KINGDOM, CANADA. The following other countries have been configured out of the box: US, us, USA, usa, United States, united states, United States, INDIA, NEPAL.
|
Title |
Title will populate into a field that has drop down values that the FDA requires for submission. The customer can configure these defaults. Note: IT can configure the State, Country and Titles so that they can comply with the standards already in use by the customer.
|
The following views can be used to map fields into the html or pdf forms:
Data Fields |
Views |
|
CustomerComplaint |
V_CXP_CUSTOMER_PXP |
|
AdditionalInfo |
V_CEX_CXP_EXTENSION |
|
SerialNumbers |
V_PXS_PXP_SERIAL |
|
Attachments |
V_BAH_BASE_ATTACH_QXP |
|
Contacts |
V_CMC_CXP_CONTACT |
|
Part |
V_EPA_EXCEPTION_PART |
|
Lots |
V_EPL_EXCEPTION_PART_LOT |
|
Submissions |
V_BAH_BASE_ATTACH_CXP |
|
GetInvestigationResult |
V_BTK_BASETASK |
|
References Tab | External Reference |
Complaint/V_EXR_EXTERNAL_REFERENCE/EXR_REFERENCE_VALUE |
|
NOTE: Each data field in the complaint record is associated with a specific view; basically use the prefix of the data field to find the appropriate view name to use in your expressions. For Example, If you want to use a user defined field, CEX_UDF_STRING_2 and map it over you will need to use the view: V_CEX_CXP_EXTENSION
|
The data fields below are examples of the types of data fields that have been mapped over from the complaint record into the HTML template:
1. Physical Address of OrgUnit (m_objComplaint.OrgUnitID) (ORG_UNIT): ORGUNIT_ADDRESS
2. Physical Address of Report site(BAH_VIGL_RPTSTE_ID): RPTSITE_ADDRESS
3. Physical Address of Manufacture: MANUFACTURER_ADDRESS ( for Site: CEX_MFCTR_SITE_ID)
4. Distributor/Importer: IMP_DISTR_SITE_ADDRESS (CEX_IMPRT_DISTRB_ID)
5. Importer/Distributor Contact Info (BAH_IMP_DISTR_CONT_ID Distributor Contact) : IMP_DISTR_CONTACT
6. Vigilance contact Info (BAH_VIGL_RPTSTE_CONT_ID ) : VIGL_RPTSTE_CONTACT
7. Manufacture Contact Info( BAH_MFCT_CONTACT_ID): MFCT_CONTACT
Scenario |
Configuration |
|
This Scenario brings over the short description and then the description text.
|
<SINGLEVALUE> <SINGLEVALUE_ID>B5_DescribeEvent</SINGLEVALUE_ID> <SINGLEVALUE_FIELD_NAME>Describe Event or Problem (Required field for eSubmission.)</SINGLEVALUE_FIELD_NAME> <SINGLEVALUE_INSTRUCTION>For an adverse event: Describe the event in detail using the reporter's own words, including a description of what happened and a summary of all relevant clinical information (medical status prior to the event; signs and/or symptoms; differential diagnosis for the event in question; clinical course; treatment; outcome, etc.). </SINGLEVALUE_INSTRUCTION> <SINGLEVALUE_PARENT_GROUP_ID>B5</SINGLEVALUE_PARENT_GROUP_ID> <SINGLEVALUE_TEXTBOX_VALUE /> <SINGLEVALUE_MEMO_VALUE> <xsl:value-of select="Complaint/V_CXP_CUSTOMER_PXP/QXP_SHORT_DESC" /> <xsl:value-of select="string(' ')" /> <xsl:value-of select="Complaint/V_CXP_CUSTOMER_PXP/QXP_DESCRIPTION" /> </SINGLEVALUE_MEMO_VALUE> <SINGLEVALUE_DROPDOWN_VALUE /> <SINGLEVALUE_CHECKBOX_VALUE>0</SINGLEVALUE_CHECKBOX_VALUE> <SINGLEVALUE_FINAL_VALUE /> <SINGLEVALUE_COLUMN_TO_SHOW>MEMO</SINGLEVALUE_COLUMN_TO_SHOW> <SINGLEVALUE_TEXTBOX_MAXLENGTH>6000</SINGLEVALUE_TEXTBOX_MAXLENGTH> <SINGLEVALUE_TEXTBOX_SIZE>4000</SINGLEVALUE_TEXTBOX_SIZE> <SINGLEVALUE_TEXTBOX_FORMAT_TYPE /> <SINGLEVALUE_REQUIRED>True</SINGLEVALUE_REQUIRED> <SINGLEVALUE_ZOOMTO /> <SINGLEVALUE_DROPDOWN_FILTER_VALUE /> <SINGLEVALUE_MODIFIABLE>True</SINGLEVALUE_MODIFIABLE> <SINGLEVALUE_VISIBLE>True</SINGLEVALUE_VISIBLE> <SINGLEVALUE_SORTORDER>5</SINGLEVALUE_SORTORDER> <SINGLEVALUE_MASK /> <SINGLEVALUE_NOTINFOLLOWUP>True</SINGLEVALUE_NOTINFOLLOWUP> </SINGLEVALUE>
|
|
This scenario shows how to Get External Reference Value (Get Value) |
<SINGLEVALUE> <SINGLEVALUE_ID>A1_PatientIdentifier</SINGLEVALUE_ID> <SINGLEVALUE_FIELD_NAME>Patient Identifier (In confidence)</SINGLEVALUE_FIELD_NAME> <SINGLEVALUE_INSTRUCTION>The Patient identifier can be 10 alpha/numeric characters long. Provide the patient's initials or some other type of identifier that will allow both the submitter and the initial reporter (if different) to locate the case if contacted for follow-up. Do not use the patient's name or social security number. The patient's identity is held in strict confidence by FDA and protected to the fullest extent of the law.</SINGLEVALUE_INSTRUCTION> <SINGLEVALUE_PARENT_GROUP_ID>A1</SINGLEVALUE_PARENT_GROUP_ID> <SINGLEVALUE_TEXTBOX_VALUE> <xsl:value-of select="Complaint/V_EXR_EXTERNAL_REFERENCE/EXR_REFERENCE_VALUE" /> </SINGLEVALUE_TEXTBOX_VALUE> <SINGLEVALUE_DROPDOWN_VALUE /> <SINGLEVALUE_CHECKBOX_VALUE>0</SINGLEVALUE_CHECKBOX_VALUE> <SINGLEVALUE_FINAL_VALUE /> <SINGLEVALUE_COLUMN_TO_SHOW>TEXTBOX</SINGLEVALUE_COLUMN_TO_SHOW> <SINGLEVALUE_TEXTBOX_MAXLENGTH>10</SINGLEVALUE_TEXTBOX_MAXLENGTH> <SINGLEVALUE_TEXTBOX_SIZE>15</SINGLEVALUE_TEXTBOX_SIZE> <SINGLEVALUE_TEXTBOX_FORMAT_TYPE /> <SINGLEVALUE_REQUIRED>False</SINGLEVALUE_REQUIRED> <SINGLEVALUE_ZOOMTO></SINGLEVALUE_ZOOMTO> <SINGLEVALUE_DROPDOWN_FILTER_VALUE /> <SINGLEVALUE_MODIFIABLE>True</SINGLEVALUE_MODIFIABLE> <SINGLEVALUE_VISIBLE>True</SINGLEVALUE_VISIBLE> <SINGLEVALUE_SORTORDER>5</SINGLEVALUE_SORTORDER> <SINGLEVALUE_MASK /> </SINGLEVALUE>
|
|
In the eMDR template, the default out of the box PDF says Your Company. It needs to be changed to the corporate name for the company. This setup is configured once and will populate into all the eMDR data entry templates.
1. Access the folder - Application Name\SubmissionForms\3500aFormHtml.xsl
2. Change Your Company to the name to be used for your MedWatch Reporting.
The FDA will only accept the 3 digit country code in the xml file that is submited. It uses the HL7 Standard to create an ICSR version 1 message format.
· HL7 is the Health Level 7 Standard used when writing the xml code that is required to be submitted.
· ICSR is at version 1, it is the INDIVIDUAL CASE SAFETY REPORT message format. It is the “roadmap” used to create the correct xml file to be submitted.
· The ICSR format says the name of the “tags” in the xml file and what needs to go inside of the tags.
· The 3500A form is a physical form and the submission of that form is an xml file.
If users have a contact management system in place, the standards used in that system for case and abbreviations may not be configured to the Pilgrim off the shelf solution for country or state codes. Out of the box Pilgrim provides the ability to configure any formats for any country and state through use of the translation file.
The translation file is a configurable tool that helps users work within the variation of country naming conventions within their company. By allowing the variability to be managed within the translation file, the information can flow consistently from the Complaint record to the eMDR template, so that the correct country name can be selected and transferred to the template so the user does not have to re-select the country name.
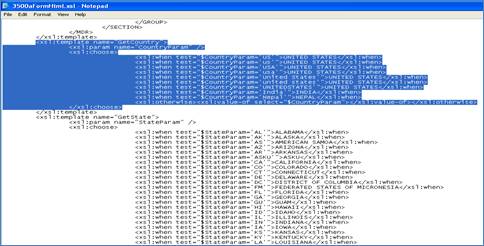
The following type of configurable code has been included in the 3500aFormHtml.xsl file as an example of what can be done.
<xsl:template name="GetCountry">
<xsl:param name="CountryParam" />
<xsl:choose>
<xsl:when test="$CountryParam='US'">UNITED STATES</xsl:when>
<xsl:when test="$CountryParam='us'">UNITED STATES</xsl:when>
<xsl:when test="$CountryParam='USA'">UNITED STATES</xsl:when>
<xsl:when test="$CountryParam='usa'">UNITED STATES</xsl:when>
<xsl:when test="$CountryParam='United States'">UNITED STATES</xsl:when>
<xsl:when test="$CountryParam='united states'">UNITED STATES</xsl:when>
<xsl:when test="$CountryParam='UNITEDSTATES'">UNITED STATES</xsl:when>
<xsl:when test="$CountryParam='India'">INDIA</xsl:when>
<xsl:when test="$CountryParam='Nepal'">NEPAL</xsl:when>
<xsl:otherwise>
<xsl:value-of select="$CountryParam" />
If the user needs to support more countries, they can access the file and enter all the various combinations for the countries needed.
1. Access the form - Application Name\ SubmissionForms\3500aFormHtml.xsl
2. Go to the end of the file (do a search on GetCountry).
3. Access the configurable code and enter all the variations for each country, making sure to get the correct country name from the 3500aVOCAB.xml file.
NOTE: This is additional configuration supported for countries; however, the more you add to the file the longer the search will take when creating the eMDR template.
|
NOTE: When mapping fields from the complaint record to the eMDR template use getfixlength. Transferring fields that are too long truncates the fields going into the eMDR template for the out-of-the-box mapped fields.
|
States are configured similarly to countries. Users should run a report to see how codes are currently entered in their database. The translation file is a configurable tool that helps users work within the variation of state naming conventions within their company. By allowing the variability to be managed within the translation file, the information can flow consistently to the eMDR template so that the correct state name can be selected and transferred to the eMDR template and then finally to the xml file..
State must be populated with either the capitalized two-digit US postal state code or capitalized full state spelling. For Example, either AZ or ARIZONA so that it populates correctly into the form.
To support more states, access the file and enter all the various combinations for the states needed:
Application Name\ SubmissionForms\3500aFormHtml.xsl
For the State, out of the box Pilgrim supports FL and IL. To support more:
Application Name\SubmissionForms\3500aFormHtml.xsl .
1. Go to function GetState and add more conditions.
2. Access the configurable code and enter all the variations for each state making sure to get the correct country name from the 3500aVOCAB.xml file.
Below are the out-of-the-box definitions:
</xsl:template>
- <xsl:template name="GetState">
<xsl:param name="StateParam" />
- <xsl:choose>
<xsl:when test="$StateParam='AL'">ALABAMA</xsl:when>
<xsl:when test="$StateParam='AK'">ALASKA</xsl:when>
<xsl:when test="$StateParam='AS'">AMERICAN SAMOA</xsl:when>
<xsl:when test="$StateParam='AZ'">ARIZONA</xsl:when>
- <xsl:otherwise>
<xsl:value-of select="$StateParam" />
</xsl:otherwise>
Please refer to the CDRH Event Code website for more information on CDRH Codes as regulated by the FDA for device, pharma, and patient codes.
The following rights must be assigned to a user to manage or view CDRH Codes:
Rights |
Description |
HDR_IMPORT |
Allows administrator to Import CDRH Codes.
|
HDR_MANAGE |
Allows administrator to Manage CDRH Codes.
|
HDR_DELETE |
Allows administrator to Delete CDRH Codes.
|
HDR_VIEW |
Allows user to access CDRH Codes to View and Select.
|
Please see Rights Groups to assign Rights Groups to users
Global CDRH codes should be managed from the global organization and all local organizations will inherit these codes.
NOTE: do not import CDRH Codes into a Local Organization.
|
CDRH codes can be imported into SmartComplaintsTM. These codes are used in the FDA MedWatch report.
NOTES: Full text search should be installed/setup. This way codes can be imported and enabled. Before importing CDRH Codes, obtain the FDS spreadsheet from the CDRH Event Codes web page.
|
1. From the Portal Page, click Administrator Tools tab > Utility > Regulatory Terms.
The Regulatory Terms window displays.
2. From the menu select Action > Import CDRH Codes.
3. In the FileTo Import field, click Browse and select the xls file to import.
4. Click Save.
5. To check that the file imported correctly, select the hyperlink labeled CDRH and the system will provide the same search mechanism to view the terms.
NOTE: Current design uses the CDRH spreadsheet as the file to import with the newest codes.
|
CDRH Codes can be enabled, deleted, and managed accordingly by an administrator.
After CDRH codes are setup, the codes must be enabled for users. The system uses the last Created Date that is enabled.
1. From the Portal Page, click Administrator Tools tab > Utility > Regulatory Terms.
The Regulatory Terms window displays.
The system will use the latest imported created dictionary that is Enabled to present to the users when they are searching on CDRH event codes.
2. From the menu select Action > Enable.
3. The Dictionary Enabled field for the item now says Yes and the Enabled date is documented.
If needed, CDRH Codes can be deleted from the system.
1. From the Portal Page, click Administrator Tools tab > Utility > Regulatory Terms.
The Regulatory Terms window displays.
2. Check off the CDRH Codes to remove from the system
3. From the menu select Action > Delete.
4. Select Ok to confirm the delete.
The CDRH Codes have been removed from the system.
The Submission Code Table contains FDA codes from the FDA website.
Submission Codes need to go through a strict change control mechanism. If users upgrade to codes that do not meet the FDA approved codes the eMDR submission will fail at Acknowledgement 3. Submission codes should not be changed, however, those codes that are not needed may be deleted.
The following Codes can be setup under the Submission Code setup table for SmartComplaintsTM:
· Conclusion Codes
· Method Codes
· Result Codes
· Product Codes
The following rights must be assigned to a user to manage or view Submission Codes:
Rights |
Description |
CSC_MANAGE |
Allows administrator to add new Submission Codes, modify existing Codes, or delete Codes.
|
CSC_VIEW |
Allows user to access Submission Codes to view and select.
|
Please see Rights Group to assign Rights Groups to users
Global Submission Codes will be inherited by all local organizations.
NOTE: do not create Submission Codes in a Local Organization.
|
1. In the GLOBAL Organization, from the Portal Page, click Smart Solutions tab > Admin and Report > Setup. Under Exception/Issue, select Submission Code.
The Submission Codes display.
2. Click Action > Add to add codes to the table. Enter codes as found on the FDA website.
3. Enter information in the following fields:
Field |
Description |
Code Type |
Click the drop down button and select the type of code to be added.
|
Code |
Enter the code number for the submission code, as defined by the FDA.
|
Name |
Enter the name of the submissions code as defined by the FDA.
|
Description |
Enter a description for the code.
|
4. Click the Save button.
Submission codes can be edited, deleted, and managed accordingly by an administrator.
1. In the GLOBAL Organization, from the Portal Page, click Smart Solutions tab > Admin and Report > Setup. Under Exception/Issue, select Submission Code.
The Submission Codes display.
2. Select the check box of the Submission Code to edit, then select Action > Edit from the main menu.
3. Edit any information for your Code.
4. Click the Save button.
All changes should now be reflected in the list.
1. In the GLOBAL Organization, from the Portal Page, click Smart Solutions tab > Admin and Report > Setup. Under Exception/Issue, select Submission Code.
The Submission Codes display
2. Select the check box of the Code to delete, then select Action > Delete from the main menu.
3. Click the Save button.
The object has now been removed from the system