Please select the object link below for more information on how to configure the object.
Object |
Shared with other SmartSolve© Applications |
Required for SmartAuditTM |
No |
Yes |
|
Yes |
Yes |
|
No |
Yes |
|
No |
Yes |
|
No |
Yes |
|
No |
Yes |
|
Yes |
Yes |
|
Yes |
Yes |
|
No |
No |
|
No |
Yes |
|
No |
Yes |
|
No |
Yes |
|
No |
Yes |
|
No |
No |
|
No |
No |
Audit Types are used to categorize audits and audit programs. The option is given for the audit type to control whether work group security is applied to audits. By enabling the audit type's Apply Security check box, the Work Group Access Only check box is automatically enabled in audits based on this type and only internal team members have access to view the audit.
The audit type also determines the numbering scheme to apply to audits. Each audit type can have its own numbering scheme or the same numbering scheme can be used for all audits.
The following rights must be assigned to a user to manage or view audit types:
Rights |
Description |
ATY_MANAGE |
Allows administrator to add new audit types, modify existing audit types, or delete audit types.
|
ATY_VIEW |
Allows user to access audit type to view and select.
|
Please see Rights Group to assign Rights Groups to users
· Global Audit Types will be inherited by all local organizations.
· Local Audit Types will only be viewed and used within that local organization.
1. From the Portal Page, click Smart Solutions tab > Admin and Report > Setup. Under Audit, select Audit Type.
2. Click Action > Add.
3. Enter information in the following fields:
Fields |
Description |
Name |
Enter a name for the audit type.
|
Description |
Enter a description of the audit type.
|
Apply Security |
Click the check box to enable security, if applicable.
NOTE: If Apply Security is checked, then only members listed in the Internal Team folder of the Audit record can view the audit from the system. The Apply Security option enables the Work Group Access only option in the audit record.
|
Numbering Scheme |
Select a numbering scheme from the drop down list.
|
Add Another |
Click this box to add another audit type.
|
4. Click the Save button.
The following options are available within Audit Type objects and can be managed accordingly by an administrator:
Audit Types can be edited and deleted.
Audit Types can later be attached to AdHoc Audits and Audit Programs.
1. From the Portal Page, click Smart Solutions tab > Admin and Report > Setup. Under Audit, select Audit Type.
The Audit Types list displays.
2. Click
the ![]() icon to switch to local view (if applicable).
icon to switch to local view (if applicable).
3. Select the check box of the Audit Type to edit, then select Action > Edit from the main menu.
4. Edit any information for your Audit Type.
5. Click the Save button.
All changes should now be reflected in the list.
Audit Types can only be deleted from SmartSolve© if the audit type has not been attached to any SmartSolve© records.
1. From the Portal Page, click Smart Solutions tab > Admin and Report > Setup. Under Audit, select Audit Type.
The object list displays.
2. Click
the ![]() icon to switch to local view (if applicable).
icon to switch to local view (if applicable).
3. Select the check box of the audit type to delete, then select Action > Delete from the main menu.
4. Click the Save button.
The object has now been removed from the system.
Please see Numbering Scheme under System Wide Setup.
Audit Status indicates the point in the workflow of the audit. The following statuses come as defaults with the system and can be changed if you wish to apply your own terminology, or if needed local organizations can create their own statuses and apply them to their audit workflows:
The following statuses are applied to the audit workflow listed below in the order that they would appear:
Status |
Description |
INWORKS |
When an audit is first created, the INWORKS status is displayed. The audit status remains INWORKS while the audit sections and notes are worked on by the audit team. The INWORKS status remains displayed in the audit until the Finding Review is completed.
|
FINDINGS APPROVED |
Once the finding review is completed, the status of the audit changes to FINDINGS APPROVED. This status remains until audit results are assigned (if no findings require action), or until Response Review (Action Plan Approval) is completed for findings requiring further action.
|
ACTION PLANS APPROVED |
Once the response review (Action Plan Approval) is completed, the status of the audit changes to ACTION PLANS APPROVED. This status remains until audit results are assigned.
|
PRERELEASED |
The PRERELEASED status is only displayed in the audit if audit results have been assigned and an Implementation Review scheduled; otherwise, the PRERELEASED status is skipped in the audit (see CLOSED Status below).
|
CLOSED |
The CLOSED status is displayed in the audit record when results are assigned with no implementation review scheduled; or, after it has been determined that no further implementation review will need to be performed and the audit can be closed.
|
The following rights must be assigned to a user to manage or view Audit Statuses:
Rights |
Description |
AST_MANAGE |
Allows administrator to add new audit statuses, modify existing statuses, or delete statuses.
|
AST_VIEW |
Allows user to access audit status to view and select.
|
Please see Rights Group to assign Rights Groups to users
· Global Audit Statuses will be inherited by all local organizations.
· Local Audit Statuses will only be viewed and used within that local organization.
1. From the Portal Page, click Smart Solutions tab > Admin and Report > Setup. Under Audit, select Audit Status.
2. Click Action > Add.
3. Enter the Audit Status
4. Select the Primary Status
Primary Status |
Description |
ABORTED |
Audit has been aborted.
|
INWORKS |
Audit is in process.
|
PRERELEASED |
Audit is complete and Implementation Review is Scheduled.
|
RELEASED |
Audit is completed.
|
5. Click the Save button.
The following options are available within Audit Status objects and can be managed accordingly by an administrator:
Newly created audit statuses can be edited and deleted.
When new audit statuses are created, the new status must be assigned to the organization’s Audit Review Types and Audit Review Model. Failure to do this step will impact system performance and cause system errors when the audit record is created.
1. From the Portal Page, click Smart Solutions tab > Admin and Report > Setup. Under Audit, select Audit Status.
The Audit Statuses list displays.
2. Click
the ![]() icon to switch to local view (if applicable).
icon to switch to local view (if applicable).
3. Select the check box of the Audit Status to edit, then select Action > Edit from the main menu.
4. Edit any information for your Audit Status.
5. Click the Save button.
All changes should now be reflected in the list.
Audit statuses can only be deleted from SmartSolve© if the audit status has not been attached to any SmartSolve© records.
1. From the Portal Page, click Smart Solutions tab > Admin and Report > Setup. Under Audit, select Audit Status.
The Audit Statuses list displays.
2. Click
the ![]() icon to switch to local view (if applicable).
icon to switch to local view (if applicable).
3. Select the check box of the Audit Status to delete, then select Action > Delete from the main menu.
4. Click the Save button.
The object has now been removed from the system.
Phases indicate all possible audit phases. When each step in the audit is completed, the audit record is updated to the phase specified by the step to indicate the current stage or milestone in the audit's life cycle. Audit phases are setup up in the audit review model.
The following default phases are applied to the audit workflow listed below in the order that they would appear:
Phase |
Description |
DISCOVERY |
When an audit is first created, the INWORKS status is displayed and the phase specifies DISCOVERY. The audit phase remains DISCOVERY while the audit sections and notes are worked on by the audit team. The DISCOVERY phase remains displayed in the audit until the finding review is routed.
|
FINDINGS APPROVAL |
Once the finding review is routed by the audit owner, the phase of the audit changes to FINDINGS APPROVAL. This phase remains until finding approval is completed.
|
|
Suggestion: Some customers rename this Phase UNDER FINDINGS APPROVAL.
|
RESPONSE |
Once the finding review is completed, the phase of the audit changes to RESPONSE. This phase remains until investigation of action plans in exceptions are completed by the exception owner (if applicable).
|
|
Suggestion: Some customers rename this Phase UNDER INVESTIGATION.
|
ACTION PLAN APPROVAL |
Once the response review (Action Plan Approval) is routed by the audit owner, the phase of the audit changes to ACTION PLAN APPROVAL. This phase remains until action plan approval is completed.
|
|
Suggestion: Some customers rename this Phase UNDER ACTION PLAN APPROVAL.
|
IMPLEMENTATION |
Once the response review is completed, the phase of the audit changes to IMPLEMENTATION. This phase remains until action plans have been marked as complete.
|
|
Suggestion: Some customers rename this Phase UNDER IMPLEMENTATION.
|
COMPLETE |
Once all action plans have been marked complete, the phase of the audit changes to COMPLETE. This phase remains until the audit owner assigns results to the audit to close it.
|
|
Suggestion: Some customers rename this Phase ACTION PLANS COMPLETED.
|
CLOSED |
The CLOSED phase is displayed in the audit record when audit results are assigned by the audit owner.
|
The following rights must be assigned to a user to manage or view audit phases:
Rights |
Description |
PHS_MANAGE |
Allows administrator to add new audit phases, modify existing phases, or delete phases.
|
APH_VIEW |
Allows user to access Audit Phase to view and select.
|
Please see Rights Group to assign Rights Groups to users
· Global Audit Phases will be inherited by all local organizations.
· Local Audit Phases will only be viewed and used within that local organization.
1. From the Portal Page, click Smart Solutions tab > Admin and Report > Setup. Under Audit, select Audit Phase.
2. Click Action > Add.
3. Enter the Audit Phase.
4. Click the Save button.
The following options are available within Audit Phase objects and can be managed accordingly by an administrator:
Newly created Audit Phases can be edited and deleted.
When new Audit Phases are created, the new phase must be assigned to the organization’s Audit Review Types and Audit Review Model. Failure to do this step will impact system behavior when the audit record is created.
1. From the Portal Page, click Smart Solutions tab > Admin and Report > Setup. Under Audit, select Audit Phase.
The Phases list displays.
2. Click
the ![]() icon to switch to local view (if applicable).
icon to switch to local view (if applicable).
3. Select the check box of the Audit Phase to edit, then select Action > Edit from the main menu.
4. Edit any information for your Audit Phase.
5. Click the Save button.
All changes should now be reflected in the list.
Audit Phases can only be deleted from SmartSolve© if the phase has not been attached to any SmartSolve© records.
1. From the Portal Page, click Smart Solutions tab > Admin and Report > Setup. Under Audit, select Audit Phase.
The Phases list displays.
2. Click
the ![]() icon to switch to local view (if applicable).
icon to switch to local view (if applicable).
3. Select the check box of the Audit Phase to delete, then select Action > Delete from the main menu.
4. Click the Save button.
The object has now been removed from the system.
Each Audit Result Type is its own set of valid audit results. Valid audit results must be equated to either Pass or Fail. For example, the audit result type has multiple results (or result sets) that can be associated with each result type. An audit result type can be named "S/U" and define two audit responses: Satisfactory and Unsatisfactory. The result type Satisfactory can be equated to the system result type Pass, and the result type Unsatisfactory can be equated to the result type Fail.

The following rights must be assigned to a user to manage or view Audit Result Types:
Rights |
Description |
RTY_MANAGE |
Allows administrator to add new Audit Result Types, modify existing Audit Result Types, or delete Audit Result Types.
|
RTY_VIEW |
Allows user to access audit result type to view and select. |
Please see Rights Group to assign rights groups to users
· Global Audit Result Types will be inherited by all local organizations.
· Local Audit Result Types will only be viewed and used within that local organization.
1. From the Portal Page, click Smart Solutions tab > Admin and Report > Setup. Under Audit, select Audit Result Type.
2. Click Action > Add.
3. Enter the Audit Result Name and Description.
4. Click the Save button.
5. Select the Result folder.
6. Click Action > Add.
7. Enter Result Name and Primary Result Type.
8. Click the Save button.
Click the Add Another check box to add additional results as needed.
The following options are available within Audit Result Type objects and can be managed accordingly by an administrator:
Audit Result Types can be edited and deleted
Audit Result Types can later be attached to AdHoc Audits and Audit Programs.
1. From the Portal Page, click Smart Solutions tab > Admin and Report > Setup. Under Audit, select Audit Result Type.
The Result Types list displays.
2. Click
the ![]() icon to switch to local view (if applicable).
icon to switch to local view (if applicable).
3. Select the check box of the Audit Result Type to edit, then select Action > Edit from the main menu.
4. Edit any information for your Audit Result Type.
5. Click the Save button.
All changes should now be reflected in the list.
Audit Result Types can only be deleted from SmartSolve© if the result type has not been attached to any SmartSolve© records.
1. From the Portal Page, click Smart Solutions tab > Admin and Report > Setup. Under Audit, select Audit Result Type.
The Result Types list displays.
2. Click
the ![]() icon to switch to local view (if applicable).
icon to switch to local view (if applicable).
3. Select the check box of the Audit Result Type to delete, then select Action > Delete from the main menu.
4. Click the Save button.
The object has now been removed from the system.
Audit Notes are comments recorded by auditor’s while performing an audit. The auditor must select the Audit Note Type to apply to their note as they enter it in the system. The Audit Note Type contains the policy which tells the auditor the level of importance of the note they entered and whether or not further action needs to be taken by the auditee on this note (i.e., Finding which will later become an exception in the system).
Each audit record, audit section, and section question can have notes attached. Each note has two options that determine whether the note requires further action to be taken on the question for which the note is recorded:
· Include in Summary - this option indicates that the note is transferred to the audit summary.
· Requires Action Plan - this option indicates that an action plan against the question for which the note is recorded must be created to continue with the audit process.
The Note Types provided at installation contain the following predefined settings:
Base Note Types |
Description |
COMMENT |
Notes of this type do not require further action to be taken on the audit section, question or sub question. This note simply represents additional remarks for the audited item.
|
FINDING |
Notes of this type must be approved by the audit team. This process is referred to as Findings Approval. The findings approval cannot be started until: · A result is assigned to all sections at the root level. · All questions that require a note have a note attached to them. Findings cannot be automatically deleted if they are rejected during the approval process. The option is given to save or delete the finding upon rejection. During the approval process, a response approver enables the Action Plan Required check box when signing off their response which requires an action plan to be created.
|
RECOMMENDATION |
Notes of this type are recorded in the audit summary but do not require further action.
|
The following rights must be assigned to a user to manage or view Audit Note Types:
Rights |
Description |
NTY_MANAGE |
Allows administrator to add new Audit Note Types, modify existing Audit Note Types, or delete Audit Note Types.
|
NTY_VIEW |
Allows user to access Audit Note Types to view and select.
|
Please see Rights Group to assign Rights Groups to users
· Global Audit Note Types will be inherited by all local organizations.
· Local Audit Note Types will only be viewed and used within that local organization.
1. From the Portal Page, click Smart Solutions tab > Admin and Report > Policy. Under Audit, select Audit Note Type.
2. Click Action > Add.
The Note Type window displays.
3. Enter information in the following fields:
Field |
Description |
Base Type |
Select a base type from the drop down list.
|
Name |
Enter the name of the audit note.
|
Description |
Enter the audit note description.
|
Requires Action Plan |
Check this box if this note requires that an exception be created in the audit. (Include in Summary will automatically be checked if you select this option).
|
Include in Summary |
Check this box to include in the summary.
|
Severity |
Select a severity from the drop down box.
|
Priority |
Select a priority from the drop down box.
|
Add Another |
Check this box to add another note type.
|
4. Click the Save button.
The following options are available within Audit Note Type objects and can be managed accordingly by an administrator:
Audit Note Types can be edited and deleted
Audit Note Types can later be attached to AdHoc Audits and Audit Programs.
1. From the Portal Page, click Smart Solutions tab > Admin and Report > Policy. Under Audit, select Audit Note Type.
The Note Types list displays.
2. Click
the ![]() icon to switch to local view (if applicable).
icon to switch to local view (if applicable).
3. Select the check box of the Audit Note Type to edit, then select Action > Edit from the main menu.
4. Edit any information for your audits note type.
5. Click the Save button.
All changes should now be reflected in the list.
Audit Note Types can only be deleted from SmartSolve© if the Note Type has not currently been attached to any SmartSolve© records.
1. From the Portal Page, click Smart Solutions tab > Admin and Report > Policy. Under Audit, select Audit Note Type.
The Note Types list displays.
2. Click
the ![]() icon to switch to local view (if applicable).
icon to switch to local view (if applicable).
3. Select the check box of the Audit Note Type to delete, then select Action > Delete from the main menu.
4. Click the Save button.
The object has now been removed from the system.
Please see Severity under System Wide Setup.
Please see Priority under System Wide Setup.
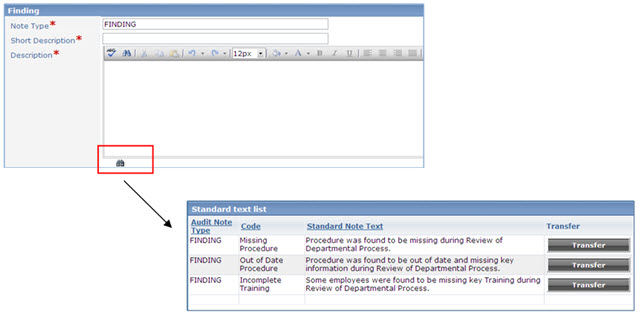
The Standard Note Text list is used in conjunction with audit note types and is configured to help minimize the workload for a lead auditor when adding audit record notes or findings. This list also helps to standardize notes entered in audit to help in searching for audit exceptions.
NOTE: Standard note text can only be used when entering audit notes directly into the audit record sections or notes folder from the tree. (This function cannot be performed within the offline or online editing form.) |
The following rights must be assigned to a user to manage or view Standard Note Text:
Rights |
Description |
SNT_MANAGE |
Allows administrator to add new Standard Note Text, modify existing Standard Note Text, or delete Standard Note Text.
|
SNT_VIEW |
Allows user to access Standard Note Text to view and select.
|
Please see Rights Group to assign Rights Groups to users
· Global Standard Note Text will be inherited by all Local organizations.
· Local Standard Note Text will only be viewed and used within that local organization.
1. From the Portal Page, click Smart Solutions tab > Admin and Report > Setup. Under System Wide, select Standard Note Text.
2. Click Action > Add.
The Standard text list window displays.
3. Enter information in the following fields:
Field |
Description |
Audit Note Type |
Select the audit note type to which the Standard Note Text will apply.
|
Code |
Enter the code for the Standard Note Text.
|
Standard Note Text |
Enter the Standard Note Text.
|
Add Another |
Check this box to add additional Standard Note Text.
|
4. Click the Save button.
The following options are available within Standard Note Text objects and can be managed accordingly by an administrator:
Standard Note Text can be edited and deleted.
Standard Note Text can later be attached to Audit Records.
1. From the Portal Page, click Smart Solutions tab > Admin and Report > Setup. Under System Wide, select Standard Note Text.
The Standard text list displays.
2. Click
the ![]() icon to switch to local view (if applicable).
icon to switch to local view (if applicable).
3. Select the check box of the Standard Note Text to edit, then select Action > Edit from the main menu.
4. Edit any information for your Standard Note Text.
5. Click the Save button.
All changes should now be reflected in the list.
Standard Note Text can only be deleted from SmartSolve© if the note text has not been attached to any SmartSolve© records.
1. From the Portal Page, click Smart Solutions tab > Admin and Report > Setup. Under System Wide, select Standard Note Text.
The Standard text list displays.
2. Click
the ![]() icon to switch to local view (if applicable).
icon to switch to local view (if applicable).
3. Select the check box of the Standard Note Text to delete, then select Action > Delete from the main menu.
4. Click the Save button.
The object has now been removed from the system.
Audit Response Types are used by the following criteria and audit areas:
Sections
Subsections
Questions
Sub questions
Each Audit Response Type is its own set of valid responses for audit sections and questions/sub questions. For example, an audit response type can be named YES/NO and define two audit responses, YES and NO. Use this audit response type when the audit material can be answered by either a YES or NO answer.
The Audit Response Type can also determine which response requires a note to be created and is the default response:
By enabling the Note Required check box, a note must be created for audit sections, questions and sub questions answered with this response.
By enabling the Default Response check box, this response is automatically selected for each section, question or sub question using this audit response type.
Each response is equated to one of four system responses:
Response |
Description |
Skipped |
Item does not require an answer.
|
Pass |
Item has met or exceeded expectations. When configuring response Yes could equal Pass.
|
Fail |
Item has not met expectations. When configuring response No could equal Fail.
|
In Review |
Item is still under investigation.
|
The following rights must be assigned to a user to manage or view Audit Response Types:
Rights |
Description |
ART_MANAGE |
Allows administrator to add new Audit Response Types, modify existing Audit Response Types, or delete Audit Response Types.
|
ART_VIEW |
Allows user to access Audit Response Type to view and select.
|
Please see Rights Group to assign Rights Groups to users
· Global Audit Response Types will be inherited by all local organizations.
· Local Audit Response Types will only be viewed and used within that local organization.
1. From the Portal Page, click Smart Solutions tab > Admin and Report > Setup. Under Audit, select Audit Response Type.
2. Click Action > Add.
3. Enter information in the following fields:
Field |
Description |
Name |
Enter the name of the response type.
|
Description |
Enter a description for the response type.
|
Add Another |
Check this box to add another response type.
|
4. Click the Save button.
5. Select the Response tab then click Action > Add.
6. Enter information in the following fields:
Field |
Description |
Name |
Enter a name for the response.
|
Primary Response Type |
Select a primary response type from the drop down list.
|
Note Required |
If the response requires a note, check this box.
|
Default Response |
Check this box if this response will be the default response within the audit.
|
Add Another |
Check this box to add another response.
|
7. Click the Save button.
The following options are available within Audit Response Type objects and can be managed accordingly by an administrator:
Audit Response Types can be edited and deleted.
Audit Response Types can later be attached to Audit Records and Audit Criteria.
1. From the Portal Page, click Smart Solutions tab > Admin and Report > Setup. Under Audit, select Audit Response Type.
The Audit Response Types list displays.
2. Click
the ![]() icon to switch to local view (if applicable).
icon to switch to local view (if applicable).
3. Select the check box of the Audit Response Type to edit, then select Action > Edit from the main menu.
4. Edit any information for your Audit Response Type.
5. Click the Save button.
All changes should now be reflected in the list.
Audit Response Types can only be deleted from SmartSolve© if the response type has not been attached to any SmartSolve© records.
1. From the Portal Page, click Smart Solutions tab > Admin and Report > Setup. Under Audit, select Audit Response Type.
The Audit Response Types list displays.
2. Click
the ![]() icon to switch to local view (if applicable).
icon to switch to local view (if applicable).
3. Select the check box of the Audit Response Type to delete, then select Action > Delete from the main menu.
4. Click the Save button.
The object has now been removed from the system.
Team Member Types are used in defining work team responsibilities. There are two default member types: Lead and Member. The audit owner is assigned the lead member type while additional team members can be assigned as member.
The Lead Member Type is a default value in the SmartAuditTM system and cannot be deleted.
The following rights must be assigned to a user to manage or view Audit Member Type:
Rights |
Description |
AMT_ MANAGE |
Allows the administrator to add new audit types, modify existing audit types, or delete audit types.
|
AMT_VIEW |
Allows user to access Audit Member Type to View and select.
|
Please see Rights Group to assign Rights Groups to users
· Global Audit Team Types will be inherited by all local organizations.
· Local Audit Team Types will only be viewed and used within that local organization.
1. From the Portal Page, click Smart Solutions tab > Admin and Report > Setup. Under Audit, select Team Type.
The Member Types window displays.
2. Click Action > Add.
3. Enter information in the following fields:
Field |
Description |
Name |
Enter the name of the team member.
|
Primary Type |
Grayed out, no action needed.
|
Add Another |
Check this box to add another response type.
|
4. Click the Save button.
The following options are available within Audit Member Type objects and can be managed accordingly by an administrator:
Audit Member Types can be edited and deleted.
Audit Member Types can later be attached to Audit Criteria and Audit Programs.
1. From the Portal Page, click Smart Solutions tab > Admin and Report > Setup. Under Audit, select Team Type.
The Member Types list displays.
2. Click
the ![]() icon to switch to Local view (if applicable).
icon to switch to Local view (if applicable).
3. Select the check box of the Audit Member Type to edit, then select Action > Edit from the main menu.
4. Edit any information for your Audit Member Type.
5. Click the Save button.
All changes should now be reflected in the list.
Audit Member Types can only be deleted from SmartSolve© if the Member Type has not been attached to any SmartSolve© records.
1. From the Portal Page, click Smart Solutions tab > Admin and Report > Setup. Under Audit, select Team Type.
The Member Types list displays.
2. Click
the ![]() icon to switch to local view (if applicable).
icon to switch to local view (if applicable).
3. Select the check box of the Audit Member Type to delete, then select Action > Delete from the main menu.
4. Click the Save button.
The object has now been removed from the system.
Audit Review Types determine the reviews which need to be performed within the audit record throughout its life cycle. Audit Review Types are later attached to the Audit Review Model which enforces the Audit Workflow.
The SmartAuditTM system comes with three default Review Types that can be used within the audit record:
Review Type |
Description |
The Findings Review is similar to the exit meeting of the audit. It is used when a group of signatures needs to be captured after all findings have been documented by the auditor during the audit. This review is performed to seal an agreement between the auditor and auditee that these findings have in fact been verified by both parties. This review type is optional in the system and if needed, can be removed from the audit workflow by the system administrator. Please see Audit Review Model to remove this Review Type from your audit workflow. |
|
The Response Review (commonly referred to as Action Plan Approval) is a review that only needs to take place in the audit record if findings occur during the audit that may require the auditee to identify action plans. Results cannot be assigned to an audit record by the auditor until after response review has been completed if findings require further action. If no findings are documented that require further action, this approval can be skipped within the audit record and results can be assigned to the audit record by the auditor. |
|
The Implementation Review is a review that only needs to take place in the audit record if findings occur during the audit that may require the auditee to identify and complete action plans. This review can be scheduled by the auditor when assigning results to the audit record if the auditor wishes to keep the audit record open in order to come back at a later date to verify that all action plans that have since been approved have been completed as needed. The Implementation Review can be scheduled as a periodic review with a user defined Interval. For example, if the auditor wishes the system to send notification in a month to come back and review the progress of the action plans currently under implementation. If no findings are documented that require further action, or the auditor does not wish to schedule an implementation review if action plans do exist, then this approval can be skipped within the audit record. Please see Audit Review Model to remove or add this Review Type to and from your audit workflow. |
The following rights must be assigned to a user to manage or view Audit Review Types:
Rights |
Description |
RTA_MANAGE |
Allows administrator to modify existing Audit Review Types.
|
RTA_VIEW |
Allows user to access Audit Review Type to view and select.
|
Please see Rights Group to assign Rights Groups to users
· Global Audit Review Types will be inherited by all local organizations.
· Local Audit Review Types will only be viewed and used within that local organization.
The following options are available within Audit Review Type objects and can be managed accordingly by an administrator:
No new Audit Review Types can be created in the system.
Audit Review Types can be edited only from the global organization.
Audit Review Types are automatically attached to the Audit Review Model.
1. Log into the global organization.
2. From the Portal Page, click Smart Solutions tab > Admin and Report > Policy. Under Audit, select Review Type.
3. Select the review type and the click Action > Edit.
4. Enter information in the following fields:
Field |
Description |
Name |
The name of the review type is already entered.
|
Review Purpose |
Enter a review purpose. This is required by the FDA.
|
Review Group |
Does not apply for SmartAuditTM.
|
Checklist |
Does not apply for SmartAuditTM.
|
Applicable Status |
Select an applicable status from the drop down list.
|
To Status |
Select a to status from the drop down list.
|
Phase on Start |
Select a phase on start from the drop down list.
|
Phase on Close |
Select a phase on close from the drop down list. This is the phase the audit will change to after the review has been closed.
|
5. Click the Save button.
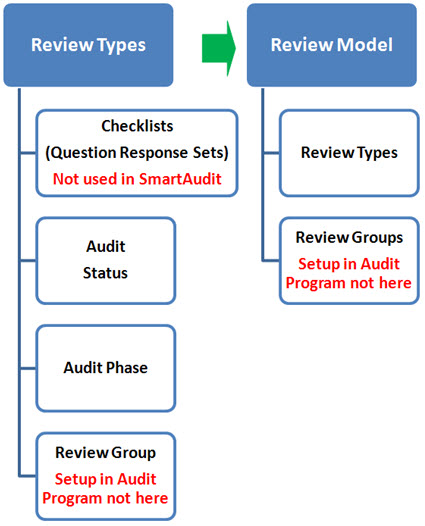
As previously mentioned Audit Review Types determine the reviews which need to be performed within the audit record throughout its lifecycle. Audit Review Types are later attached to the Audit Review Model which enforces the audit workflow.
Only one review can be performed in the audit record at a time and these reviews are activated by the audit status which is attached to each review type. The Review Model contains schedules that define which review types should be transferred into the audit record when it is created.
NOTE: Each organization can only use one review model which will enforce the reviews to be used for both scheduled and ad hoc audits created in the system. |
This matrix illustrates the setup tables involved with audit review.
The following rights must be assigned to a user to manage or view Audit Review Models:
Rights |
Description |
RMA_MANAGE |
Allows administrator to add new Audit Models, modify existing Audit Models, or delete Audit Models.
|
RMA_VIEW |
Allows user to access Audit Model to view and select.
|
Please see Rights Group to assign Rights Groups to users
· The Global Review Model will be inherited by the global organization and all local organizations which don’t have their own local review model.
· The Local Review Model will override the global review model
It is important to use this matrix when configuring the Review Model which will fit your specific organizational needs.
ReviewOptions |
ReviewType |
Phase |
Applicable Status |
ToStatus |
Phase on Start |
Phase on Close |
Finding Review + Response Review Standard off the shelf configuration |
FINDING REVIEW |
DISCOVERY |
INWORKS |
FINDINGS APPROVED |
FINDINGS APPROVAL |
RESPONSE |
RESPONSE REVIEW |
RESPONSE |
FINDINGS APPROVED |
ACTION PLAN APPROVED |
ACTION PLAN APPROVAL |
IMPLEMENTATION |
|
Response Review only
You must modify Phase and Applicable Status |
RESPONSE REVIEW |
DISCOVERY |
INWORKS |
ACTION PLAN APPROVED |
ACTION PLAN APPROVAL |
IMPLEMENTATION |
Finding Review + Response Review + Implementation Review |
FINDING REVIEW |
DISCOVERY |
INWORKS |
FINDINGS APPROVED |
FINDINGS APPROVAL |
RESPONSE |
You must attach Implementation Review if you wish it to be required |
RESPONSE REVIEW |
RESPONSE |
FINDINGS APPROVED |
ACTION PLAN APPROVED |
ACTION PLAN APPROVAL |
IMPLEMENTATION |
|
IMPLEMENTATION REVIEW
|
IMPLEMENTATION |
PRERELEASED |
CLOSED |
COMPLETE |
CLOSED |
1. Log into the appropriate organization to set the model.
2. From the Portal Page, click Smart Solutions tab > Admin and Report > Policy. Under Audit, select Review Model.
3. Select the Schedule link.
4. Delete any reviews which will not apply to the model.
5. Tag and edit to change any reviews based on which reviews will be used in the model using the above matrix.
Please see Application Options to configure Audit End Date.
The Audit Word Report is an add-on purchase to using the SmartAuditTM solution. The purpose of this report is to generate final audit summary report to be distributed to all parties involved with the audit. Once an Audit is complete (or at anytime during the Audit process) a Detail Report can be run from the Audit record show key information in the audit such as:
Company Header
Audit Title, Auditee and Dates
Audit Team
Audit Background
Executive Summary
Observations
Action Plans
Please make sure you have purchased this add on prior to configuring the report.